REMOVAL
Removal / installation · Vehicles built from Aug 2013
- HINT:
- Use the same procedure for the RH and LH sides.
- The procedure listed below is for the LH side.
- Use the same procedure for the RH and LH sides.
| 1. DISCONNECT CABLE FROM NEGATIVE BATTERY TERMINAL |

- NOTICE:
- w/ Navigation System (for HDD):
After the ignition switch is turned off, the HDD navigation system requires approximately a minute to record various types of memory and settings. As a result, after turning the ignition switch off, wait a minute or more before disconnecting the cable from the negative (-) battery terminal.
- When disconnecting the cable, some systems need to be initialized after the cable is reconnected (Click here).
- w/ Navigation System (for HDD):
| 2. REMOVE FRONT SPEED SENSOR LH |
Remove the bolt and speed sensor from the knuckle.
- NOTICE:
- Pull out the sensor while trying as much as possible not to rotate it.
| 3. REMOVE FRONT AXLE HUB SUB-ASSEMBLY LH |
Remove the front axle hub (Click here).
| 4. DISCONNECT TIE ROD END SUB-ASSEMBLY LH |
Using SST, disconnect the tie rod end assembly.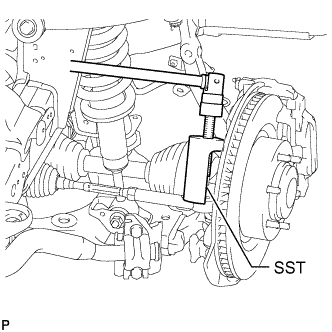

- SST
- 09610-20012
| 5. DISCONNECT FRONT LOWER BALL JOINT ATTACHMENT LH |
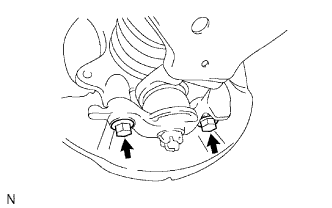 |
Remove the 2 bolts and disconnect the front lower ball joint attachment from the axle.
| 6. REMOVE STEERING KNUCKLE LH |
Support the front suspension lower arm LH with a jack.
Remove the clip and nut.
Using SST, disconnect the upper ball joint from the steering knuckle.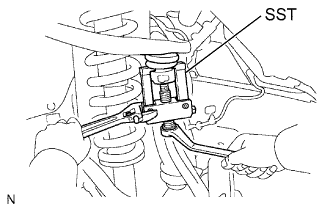
- SST
- 09628-62011
- NOTICE:
- Do not the damage the ball joint dust cover.
Remove the steering knuckle.