REASSEMBLY
Removal / installation · Vehicles built from Aug 2013
| 1. INSTALL BACK DOOR OUTSIDE GARNISH PROTECTOR (for Upper Side) |

- HINT:
- When installing the back door outside garnish protector, heat the No. 2 back door outside garnish surface using a heat light.
- Standard:
Item
Temperature
No. 2 Back Door Outside Garnish
20 to 30°C (68 to 86°F)
- NOTICE:
- Do not heat the back door outside garnish excessively.
Clean the No. 2 back door outside garnish surface.
Using a heat light, heat the No. 2 back door outside garnish surface
Remove the double-sided tape from the No. 2 back door outside garnish.
Wipe off any tape adhesive residue with cleaner.
Install a new back door outside garnish protector.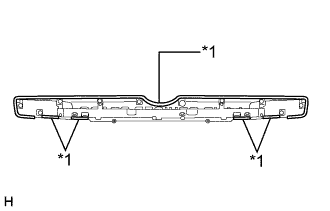

Using a heat light, heat the No. 2 back door outside garnish.
Remove the peeling paper from the face of the back door outside garnish protector.
- HINT:
- After removing the peeling paper, keep the exposed adhesive free from foreign matter.
Install the back door outside garnish protector as shown in the illustration.
- HINT:
- Press the back door outside garnish protector firmly to install it.
Text in Illustration *1
Back Door Outside Garnish Protector
| 2. INSTALL BACK DOOR OUTSIDE GARNISH PROTECTOR (for Lower Side) |
- HINT:
- When installing the back door outside garnish protector, heat the back door outside garnish sub-assembly surface using a heat light.
- Standard:
Item
Temperature
Back Door Outside Garnish Sub-assembly
20 to 30°C (68 to 86°F)
- NOTICE:
- Do not heat the back door outside garnish excessively.
Clean the back door outside garnish sub-assembly surface.
Using a heat light, heat the back door outside garnish sub-assembly surface
Remove the double-sided tape from the back door outside garnish sub-assembly.
Wipe off any tape adhesive residue with cleaner.
Install a new back door outside garnish protector.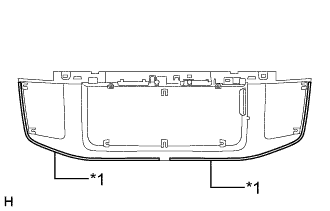
Using a heat light, heat the back door outside garnish sub-assembly.
Remove the peeling paper from the face of the back door outside garnish protector.
- HINT:
- After removing the peeling paper, keep the exposed adhesive free from foreign matter.
Install the back door outside garnish protector as shown in the illustration.
- HINT:
- Press the back door outside garnish protector firmly to install it.
Text in Illustration *1
Back Door Outside Garnish Protector
| 3. INSTALL BACK DOOR ELECTRICAL KEY SWITCH (w/ Entry and Start System) |
Attach the 2 guides to install the back door electrical key switch.
Install the 2 screws.
Attach the clamp.
| 4. INSTALL NO. 1 BACK DOOR GARNISH RETAINER |
Install the No. 1 back door garnish retainer with the 3 screws.
| 5. INSTALL LICENSE PLATE LIGHT ASSEMBLY |
Attach the 2 guides to install the license plate light assembly.
Install the 4 screws.
| 6. INSTALL LICENSE PLATE LIGHT CORD (w/o Entry and Start System) |
Connect the connector to install the license plate light cord.