INSTALLATION
Removal / installation · Vehicles built from Aug 2014
Versions by build date: Aug 2013 – Jul 2014 from Aug 2014
- CAUTION:
- Wear protective gloves. Sharp areas on the parts may injure your hands.
| 1. INSTALL REAR CENTER SEAT INNER BELT ASSEMBLY |

Install the inner belt with bolt.
- Torque:
- 42 N*m{ 428 kgf*cm , 31 ft.*lbf }
Install the band.
| 2. INSTALL REAR SEATBACK ASSEMBLY RH |
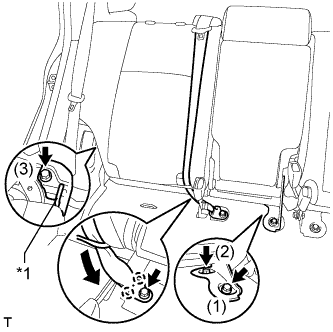  |
Fold down the seatback, set the seatback positioning wire on the hinge, and then temporarily install the bolt to the hinge.
Text in Illustration *1
Positioning Wire
- NOTICE:
- Be careful not to damage the vehicle body.
Restore the seatback to the upright position and temporarily install the seatback with the 2 bolts.
Tighten the bolts in the order indicated in the illustration.
- Torque:
- 37 N*m{ 377 kgf*cm , 27 ft.*lbf }
Attach the 2 claws and connect the outer belt with the bolt.
- Torque:
- 42 N*m{ 428 kgf*cm , 31 ft.*lbf }
| 3. INSTALL REAR SEATBACK BOARD CARPET ASSEMBLY RH |
Attach the 2 claws and 5 clips to install the carpet.
| 4. INSTALL REAR SEATBACK COVER |
Attach the 4 claws to install the cover.
Restore the seatback to the upright position and lock it.
| 5. INSTALL REAR SEAT HEADREST ASSEMBLY |
Install the headrest.