INSTALLATION
Removal / installation · Vehicles built from Aug 2014
Versions by build date: Aug 2013 – Jul 2014 from Aug 2014
| 1. INSTALL FRONT NO. 1 ENGINE MOUNTING BRACKET RH |

Install the engine mounting bracket with the 4 bolts.
- Torque:
- 51 N*m{ 520 kgf*cm , 38 ft.*lbf }
| 2. INSTALL FRONT NO. 1 ENGINE MOUNTING BRACKET LH |
Install the engine mounting bracket with the 4 bolts.
- Torque:
- 51 N*m{ 520 kgf*cm , 38 ft.*lbf }
| 3. INSTALL FRONT ENGINE MOUNTING INSULATOR |
Install the 2 mounting insulators with the 2 nuts.
- Torque:
- 46 N*m{ 469 kgf*cm , 34 ft.*lbf }
| 4. INSTALL ENGINE OIL LEVEL DIPSTICK GUIDE |
Install the oil level dipstick guide with the bolt.
- Torque:
- 20 N*m{ 204 kgf*cm , 15 ft.*lbf }
| 5. INSTALL NO. 1 WATER BY-PASS PIPE |
Install a new gasket and the water by-pass pipe with the 2 nuts.
- Torque:
- 18 N*m{ 178 kgf*cm , 13 ft.*lbf }
| 6. INSTALL NO. 1 IDLER PULLEY SUB-ASSEMBLY |
Install the spacer and idler pulley with the bolt.
- Torque:
- 43 N*m{ 438 kgf*cm , 32 ft.*lbf }
| 7. INSTALL NO. 1 COMPRESSOR MOUNTING BRACKET |
- NOTICE:
- Install the No. 1 compressor mounting bracket exactly as described in the procedures below to properly secure and prevent damage to the fan and generator V belt.
Temporarily install the No. 1 compressor mounting bracket with the 3 bolts.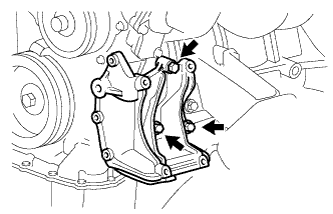

- HINT:
- Temporarily install the No . 1 compressor mounting bracket with the 3 bolts so that the bracket can be moved by hand.
Push the No. 1 compressor mounting bracket toward the cylinder block as shown in the illustration and tighten bolt B.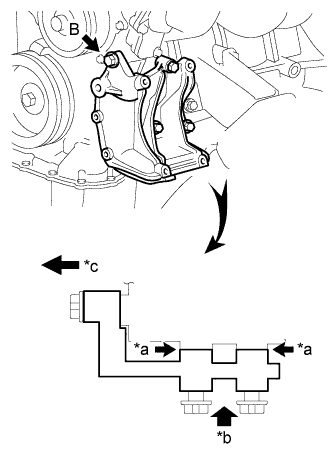
- Torque:
- for bolt B:
- 45 N*m{ 459 kgf*cm , 33 ft.*lbf }
Text in Illustration *a
No Clearance
*b
Push
*c
Front
- HINT:
- Make sure there is no clearance between the cylinder block and No. 1 compressor mounting bracket as shown in the illustration.
Uniformly tighten the 4 bolts in the order shown in the illustration.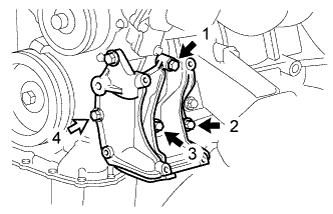
- Torque:
- for bolt A:
- 45 N*m{ 459 kgf*cm , 33 ft.*lbf }
- for bolt C:
- 25 N*m{ 250 kgf*cm , 18 ft.*lbf }
Text in Illustration 
Bolt A

Bolt C
| 8. INSTALL IDLE PULLEY ASSEMBLY |
Temporarily install the idle pulley assembly with the bolt.
- NOTICE:
- Do not use any tools.
Tighten the bolt.
- Torque:
- 44 N*m{ 449 kgf*cm , 32 ft.*lbf }
| 9. INSTALL INTAKE MANIFOLD |
Install the No. 2 fuel vapor feed hose to the intake manifold.
Install the 2 wire harness clamp brackets to the intake manifold with the 2 bolts.
- Torque:
- 8.0 N*m{ 82 kgf*cm , 71 in.*lbf }
Install a new gasket to the intake manifold.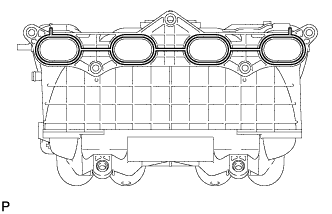
Install the intake manifold with the 5 bolts and 2 nuts.
- Torque:
- 25 N*m{ 255 kgf*cm , 18 ft.*lbf }
for Engine Rear Side:
Attach the No. 2 water by-pass hose and connect the No. 3 ventilation hose to the intake manifold.
for Engine Front Side:
Attach the 2 wire harness clamps to the 2 wire harness clamp brackets.
| 10. INSTALL PURGE VSV |
Install the purge VSV with the bolt.
- Torque:
- 9.0 N*m{ 92 kgf*cm , 80 in.*lbf }
Connect the 2 purge line hoses to the purge VSV.
Connect the purge VSV connector.
| 11. INSTALL FUEL DELIVERY PIPE WITH FUEL INJECTOR |
Install the fuel delivery pipe with fuel injector (Click here).
| 12. INSTALL THROTTLE WITH MOTOR BODY ASSEMBLY |
Install a new gasket to the intake manifold.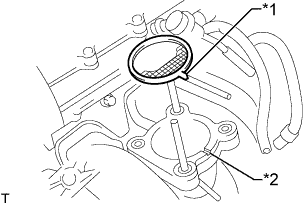
Text in Illustration *1
Protrusion
*2
Groove
- HINT:
- Align the protrusion of the gasket with the groove of the intake manifold.
for Type A:
Install the throttle body with motor with the 2 bolts and 2 nuts.- Torque:
- 9.0 N*m{ 92 kgf*cm , 80 in.*lbf }
for Type B:
Install the throttle body with motor with the 4 bolts.- Torque:
- 9.0 N*m{ 92 kgf*cm , 80 in.*lbf }
Connect the water by-pass hose.
Connect the No. 2 water by-pass hose.
Connect the throttle position sensor and throttle control motor connector.
| 13. INSTALL EXHAUST MANIFOLD |
Install a new gasket.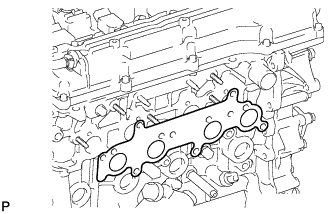
Install the exhaust manifold with 8 new nuts in the order shown in the illustration.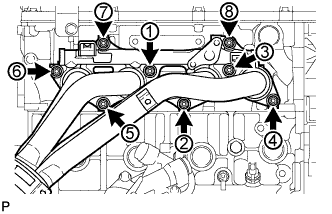
- Torque:
- 36 N*m{ 367 kgf*cm , 27 ft.*lbf }
| 14. INSTALL AIR SWITCHING VALVE ASSEMBLY |
Set the No. 1 exhaust manifold heat insulator in place.
Install the air switching valve with 2 new nuts.
- Torque:
- 20 N*m{ 204 kgf*cm , 15 ft.*lbf }
Connect the connector.
w/ Manifold Absolute Pressure Sensor:
Connect the vacuum hose.
| 15. INSTALL NO. 4 INTAKE PIPE |
Install 2 new gaskets and the No. 4 intake pipe with 4 new nuts in the order shown in the illustration. Tighten the nuts labeled 1 and 3 to the torque specification again.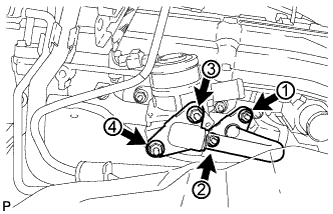
- Torque:
- 20 N*m{ 204 kgf*cm , 15 ft.*lbf }
Check that the nuts are tightened to the torque specification.
| 16. INSTALL NO. 1 EXHAUST MANIFOLD HEAT INSULATOR |
Install the No. 1 exhaust manifold heat insulator with the 5 bolts.
- Torque:
- 12 N*m{ 122 kgf*cm , 9 ft.*lbf }
| 17. INSTALL GENERATOR ASSEMBLY |
for 80 A Type:
Install the generator (Click here).
for 100 A Type:
Install the generator (Click here).
| 18. INSTALL IGNITION COIL ASSEMBLY |
Install the 4 ignition coils with the 4 bolts.
- Torque:
- 9.0 N*m{ 92 kgf*cm , 80 in.*lbf }
Connect the 4 ignition coil connectors.