INSTALLATION
Removal / installation · Vehicles built from Aug 2013
- HINT:
- Use the same procedure for RHD and LHD vehicles.
- The procedure listed below is for LHD vehicles.
- A bolt without a torque specification is shown in the standard bolt chart (Click here).
- Use the same procedure for RHD and LHD vehicles.
| 1. INSTALL REAR CONSOLE BOX ASSEMBLY |

Install the rear console box with the 2 screws and 2 bolts.
| 2. INSTALL UPPER CONSOLE PANEL |
Connect the connector and attach the clamp.
Attach the 2 clips to install the upper console panel.
Install the 2 screws.
| 3. INSTALL FRONT NO. 2 CONSOLE BOX INSERT |
Attach the 2 clips and guide to install the front No. 2 console box insert.
| 4. INSTALL NO. 2 INSTRUMENT PANEL UNDER COVER SUB-ASSEMBLY |
Attach the 3 clips and 2 guides to install the No. 2 instrument panel under cover.
Install the screw.
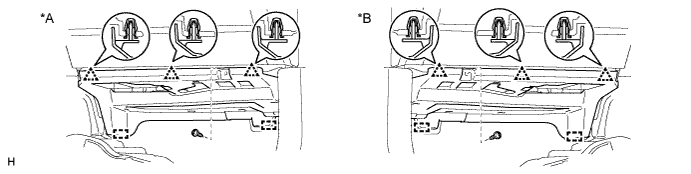

Text in Illustration *A
for LHD
*B
for RHD
| 5. INSTALL FRONT NO. 1 CONSOLE BOX INSERT |
Attach the 2 clips and guide to install the front No. 1 console box insert.
| 6. INSTALL NO. 1 INSTRUMENT PANEL UNDER COVER SUB-ASSEMBLY |
for LHD:
Attach the 2 clips and 2 guides to install the No. 1 instrument panel under cover.
Install the screw.
for RHD:
Attach the 3 clips and 2 guides to install the No. 1 instrument panel under cover.
Install the screw.
| 7. INSTALL FRONT CONSOLE UPPER PANEL GARNISH |
Connect the connectors.
Attach the 5 clips to install the front console upper panel garnish.
| 8. INSTALL NO. 2 INSTRUMENT PANEL FINISH PANEL CUSHION |
Attach the 5 clips to install the No. 2 instrument panel finish panel cushion.
| 9. INSTALL INSTRUMENT PANEL FINISH PANEL END LH |
Attach the 4 clips to install the instrument panel finish panel end.
| 10. INSTALL NO. 1 INSTRUMENT PANEL FINISH PANEL CUSHION |
- HINT:
- Use the same procedure described for the No. 2 instrument panel finish panel cushion.
| 11. INSTALL INSTRUMENT PANEL FINISH PANEL END RH |
Connect the connector.
Attach the 4 clips to install the instrument panel finish panel end.
| 12. INSTALL INTEGRATION CONTROL AND PANEL ASSEMBLY |
Connect the connector.
Attach the 4 clips to install the integration control and panel assembly.