Clearance Warning Buzzer Circuit
Circuit diagnosis · Vehicles built Aug 2013 – Jul 2014
Versions by build date: Aug 2013 – Jul 2014 from Aug 2014
DESCRIPTION
The No. 1 clearance warning buzzer is an ECU-operated buzzer that sounds when it receives a pulsed digital signal from the ECU. The ECU operates the buzzer so that it sounds in a pattern that changes depending on the distance to the obstacle.WIRING DIAGRAM
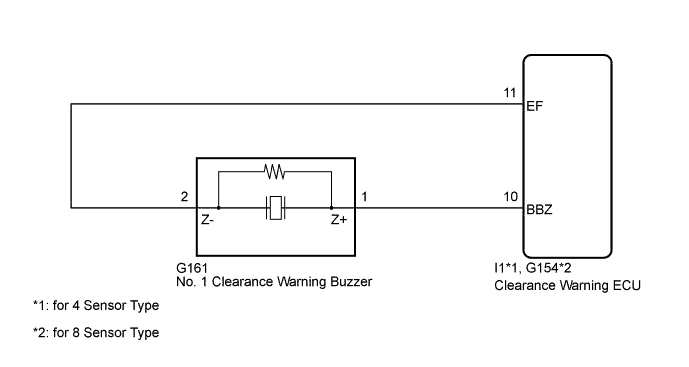

INSPECTION PROCEDURE
| 1. PERFORM ACTIVE TEST USING GTS |

Connect the GTS to the DLC3.
Turn the engine switch on (IG).
Turn the GTS on.
Enter the following menus: Body / Clearance Sonar / Active Test.
Check that the buzzer operates by performing the Active Test.
Clearance Sonar Tester Display
Test Part
Control Range
Diagnostic Note
Buzzer
No. 1 clearance warning buzzer/ Operate or Stop
Operate: No. 1 clearance warning buzzer ON
Stop: No. 1 clearance warning buzzer OFF
Confirm that the vehicle is stopped and the engine switch is on (IG)
- OK:
- The No. 1 clearance warning buzzer sounds.
|
|
||||

| OK | ||
 |
||
| ||
| 2. CHECK HARNESS AND CONNECTOR (CLEARANCE WARNING ECU - CLEARANCE WARNING BUZZER) |
Disconnect the I1*1 or G154*2 clearance warning ECU connector.
- *1: for 4 Sensor Type
- *2: for 8 Sensor Type
- *1: for 4 Sensor Type
Disconnect the G161 No. 1 clearance warning buzzer connector.
Measure the resistance according to the value(s) in the table below.
- Standard Resistance:
for 4 Sensor Type Tester Connection
Condition
Specified Condition
I1-10 (BBZ) - G161-1 (Z+)
Always
Below 1 Ω
I1-11 (EF) - G161-2 (Z-)
Always
Below 1 Ω
I1-10 (BBZ) - Body ground
Always
10 kΩ or higher
I1-11 (EF) - Body ground
Always
10 kΩ or higher
for 8 Sensor Type Tester Connection
Condition
Specified Condition
G154-10 (BBZ) - G161-1 (Z+)
Always
Below 1 Ω
G154-11 (EF) - G161-2 (Z-)
Always
Below 1 Ω
G154-10 (BBZ) - Body ground
Always
10 kΩ or higher
G154-11 (EF) - Body ground
Always
10 kΩ or higher
|
|
||||

| OK | |
 |
| 3. REPLACE NO. 1 CLEARANCE WARNING BUZZER |
Replace the No. 1 clearance warning buzzer with a new or normally functioning one (Click here).
| NEXT | |
|
| 4. PERFORM ACTIVE TEST USING GTS |
Connect the GTS to the DLC3.
Turn the engine switch on (IG).
Turn the GTS on.
Enter the following menus: Body Electrical / Clearance Sonar / Active Test.
Check that the buzzer operates by performing the Active Test.
Clearance Sonar Tester Display
Test Part
Control Range
Diagnostic Note
Buzzer
No. 1 clearance warning buzzer/ Operate or Stop
Operate: No.1 clearance warning buzzer ON
Stop: No. 1 clearance warning buzzer OFF
Confirm that the vehicle is stopped and the engine switch is on (IG)
- OK:
- The No. 1 clearance warning buzzer sounds.
Result Result
Proceed to
OK
A
NG (for LHD)
B
NG (for RHD)
C
|
|
||||
|
|
||||
| A | ||
|
||
| ||