1GD-FTV ENGINE MECHANICAL ENGINE ON-VEHICLE INSPECTION
PROCEDURE

 1.INSPECT ENGINE COOLANT
2.INSPECT ENGINE OIL
3.INSPECT BATTERY
16620
4.INSPECT V-RIBBED BELT TENSIONER ASSEMBLY
5.CHECK VALVE LASH ADJUSTER NOISE
Rev the engine several times. Check that the engine does not emit unusual noises.
If unusual noises occur, warm up the engine and idle it for more than 30 minutes. Then perform the inspection above again.
If any defects or problems are found during the inspection above, perform a valve lash adjuster inspection (See page Engine / Hybrid System>1GD-FTV (ENGINE MECHANICAL)>ENGINE UNIT>INSPECTION).
17801
6.INSPECT AIR CLEANER FILTER ELEMENT SUB-ASSEMBLY
Remove the air cleaner cap.
Remove the air cleaner filter element sub-assembly from the air cleaner case.
Visually check that the air filter sub-assembly is not excessively damaged or oily.
If necessary, replace the air cleaner filter element sub-assembly.
Reinstall the air cleaner filter element sub-assembly to the air cleaner case.
Reinstall the air cleaner cap.
7.INSPECT ENGINE IDLE SPEED
Warm up and stop the engine.
When using the GTS:
- HINT:
- ·
For more information about the GTS, refer to its operator's manual.
·If the GTS is not available, use a tachometer as a substitute.
Connect the GTS to the DLC3.
Start the engine and idle it.
Enter the following menus: Powertrain / Engine and ECT / Data List / Engine Speed.
- Standard Idle Speed:
Item Specified Condition w/ Urea SCR System 650 to 750 rpm w/o Urea SCR system 630 to 730 rpm
When not using the GTS:
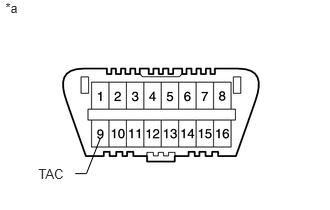
Connect a tester probe of a tachometer to terminal 9 (TAC) of the DLC3 with SST.
- SST
- 09843-18040
Start the engine and idle it.
Inspect the engine idle speed.
- Standard Idle Speed:
Item Specified Condition w/ Urea SCR System 650 to 750 rpm w/o Urea SCR system 630 to 730 rpm
- NOTICE:
- ·
Turn all the electrical systems and A/C off.
·When checking the idle speed, move the shift lever to neutral.
Turn the ignition switch off.
Disconnect the GTS or tachometer tester probe from the DLC3.
8.INSPECT MAXIMUM SPEED
Start the engine.
Fully depress the accelerator pedal.
Check the maximum engine speed.
- Maximum engine speed:
4450 to 4750 rpm
9.INSPECT COMPRESSION
Warm up and stop the engine.
Remove the 4 injector assemblies (See page Engine / Hybrid System>1GD-FTV (FUEL)>FUEL INJECTOR>REMOVAL).
Inspect the cylinder compression pressure.
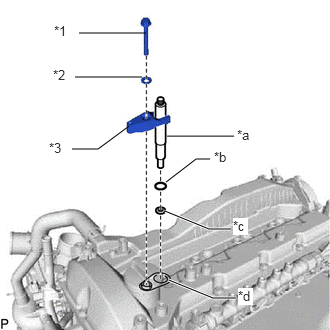
Install a new nozzle holder gasket, new injection nozzle seat, new O-ring, SST (attachment I), nozzle holder clamp and washer to the cylinder head cover sub-assembly with the bolt.
- SST
- 09992-19015 (09992-10120)
- Torque:
- 21 N*m (214 kgf*cm, 15 ft.*lbf)
| *1 | Bolt |
| *2 | Washer |
| *3 | Nozzle Holder Clamp |
| *a | SST (Attachment I) |
| *b | New O-Ring |
| *c | New Injection Nozzle Seat |
| *d | New Nozzle Holder Gasket |
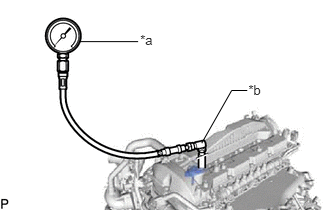
Connect SST (gauge assembly), SST (packing set) and SST (L-joint) to SST (attachment I).
- SST
- 09992-19015 (09992-10010, 09992-10020, 09992-10030)
| *a | SST (Compression Gauge) |
| *b | SST (L-Joint) |
While cranking the engine, measure the compression pressure.
- Standard compression pressure:
2700 kPa (27.5 kgf/cm2, 392 psi) or higher
- Minimum pressure:
2200 kPa (22.4 kgf/cm2, 319 psi)
- Difference between each cylinder:
500 kPa (5.1 kgf/cm2, 73 psi) or less
- NOTICE:
- ·
Use a fully-charged battery so the engine speed can be increased to 280 rpm or more.
·Inspect the other cylinders in the same way.
·Measure the compression as quickly as possible.
If the cylinder compression is low, pour a small amount of engine oil into the cylinder through the injector holes, and then inspect it again.
If adding oil increases the compression pressure, the piston rings and/or cylinder bore may be worn or damaged.
If the pressure stays low, the valve may be stuck or seated improperly, or there may be leakage from the gasket.
Remove SST.
Install the 4 injector assemblies (See page Engine / Hybrid System>1GD-FTV (FUEL)>FUEL INJECTOR>INSTALLATION).