2TR-FE EMISSION CONTROL AIR SWITCHING VALVE INSTALLATION
PROCEDURE

 25710
1.INSTALL AIR SWITCHING VALVE ASSEMBLY
Set the No. 1 exhaust manifold heat insulator in place.
Install the air switching valve with 2 new nuts.
- Torque:
- 26 N*m (265 kgf*cm, 19 ft.*lbf)
Connect the connector.
Connect the vacuum hose.
17117B
2.INSTALL NO. 4 INTAKE PIPE
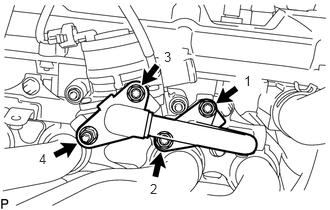
Install 2 new gaskets and the No. 4 intake pipe with 4 new nuts in the order shown in the illustration. Tighten the nuts labeled 1 and 3 to the torque specification again.
- Torque:
- 26 N*m (265 kgf*cm, 19 ft.*lbf)
Check that the nuts are tightened to the torque specification.
17167
3.INSTALL NO. 1 EXHAUST MANIFOLD HEAT INSULATOR
Install the No. 1 exhaust manifold heat insulator with the 5 bolts.
- Torque:
- 12 N*m (122 kgf*cm, 9 ft.*lbf)
17341
4.CONNECT NO. 1 AIR INJECTION SYSTEM HOSE
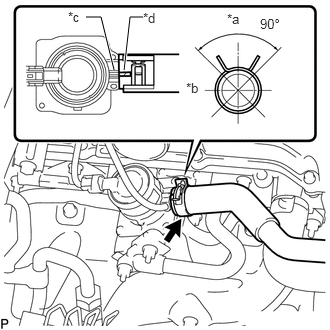
Connect the No. 1 air injection system hose so that its paint mark aligns with the rib of the air switching valve as shown in the illustration.
| *a | Upper |
| *b | RH Side |
| *c | Rib |
| *d | Paint Mark |
- HINT:
- ·
Make sure the paint mark of the No. 1 air injection system hose is facing upward.
·Make sure the direction of the hose clamp is as shown in the illustration.
53736B
5.INSTALL FRONT NO. 1 FENDER APRON TO FRAME SEAL RH
Install the front No. 1 fender apron to frame seal with the 5 clips.
6.INSTALL AIR CLEANER CASE
7.INSTALL AIR CLEANER AND HOSE