2TR-FE ENGINE MECHANICAL ENGINE ASSEMBLY INSTALLATION
CAUTION / NOTICE / HINT
- HINT:
-
Perform "Inspection After Repairs" after replacing the engine assembly, cylinder head sub-assembly, camshaft, No. 2 camshaft, camshaft timing gear assembly, camshaft timing exhaust gear assembly, piston sub-assembly or piston ring (See page Engine / Hybrid System>2TR-FE (ENGINE CONTROL)>SFI SYSTEM>INITIALIZATION).
PROCEDURE

 12281A
1.INSTALL NO. 1 ENGINE HANGER
2.REMOVE ENGINE FROM ENGINE STAND
Attach an engine sling device and hang the engine assembly with a chain block.
- NOTICE:
-
Pay attention to the angle of the sling device as the engine assembly or No. 1 engine hanger may be damaged or deformed if the angle is incorrect.
Lift the engine assembly and remove it from the engine stand.
3.INSTALL ENGINE ASSEMBLY
- HINT:
-
Perform "Inspection After Repairs" after replacing the engine assembly (See page Engine / Hybrid System>2TR-FE (ENGINE CONTROL)>SFI SYSTEM>INITIALIZATION).
Slowly lower the engine assembly into the engine compartment.
Install the engine assembly with the 4 bolts and 4 nuts.
- Torque:
- 40 N*m (408 kgf*cm, 30 ft.*lbf)
Remove the 2 bolts and 2 No. 1 engine hangers.
11355
4.INSTALL REAR END PLATE
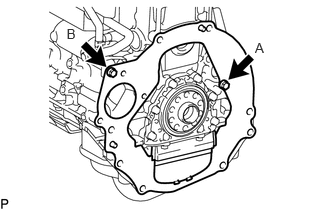
Install the rear end plate with the 2 bolts.
- Torque:
- for bolt A : 18 N*m (184 kgf*cm, 13 ft.*lbf)
- for bolt B : 18 N*m (178 kgf*cm, 13 ft.*lbf)
Attach the flywheel housing dust seal.
13405
5.INSTALL FLYWHEEL SUB-ASSEMBLY (for Manual Transmission)
31250
6.INSTALL CLUTCH DISC ASSEMBLY (for Manual Transmission)
31210
7.INSTALL CLUTCH COVER ASSEMBLY (for Manual Transmission)
31210
8.INSPECT AND ADJUST CLUTCH COVER ASSEMBLY (for Manual Transmission)
32101
9.INSTALL DRIVE PLATE AND RING GEAR SUB-ASSEMBLY (for Automatic Transmission)
12371
10.INSTALL REAR NO. 1 ENGINE MOUNTING INSULATOR
- HINT:
-
Perform this procedure only when replacement of the rear No. 1 engine mounting insulator is necessary.
Install the rear No. 1 engine mounting insulator.
for Manual Transmission (See page Drivetrain>R150F (MANUAL TRANSMISSION / TRANSAXLE)>MANUAL TRANSMISSION ASSEMBLY>INSTALLATION)
for Automatic Transmission (See page Drivetrain>AC60F (AUTOMATIC TRANSMISSION / TRANSAXLE)>AUTOMATIC TRANSMISSION ASSEMBLY (for 2TR-FE)>INSTALLATION)
33030
11.INSTALL MANUAL TRANSMISSION ASSEMBLY (for Manual Transmission)
35030
12.INSTALL AUTOMATIC TRANSMISSION ASSEMBLY (for Automatic Transmission)
28100
13.INSTALL STARTER ASSEMBLY
for 1.4 kW Type: (See page Engine / Hybrid System>2TR-FE (STARTING)>STARTER (for 1.4 kW Type)>INSTALLATION)
for 2.0 kW Type: (See page Engine / Hybrid System>2TR-FE (STARTING)>STARTER (for 2.0 kW Type)>INSTALLATION)
32101A
14.INSTALL DRIVE PLATE AND TORQUE CONVERTER CLUTCH SETTING BOLT (for Automatic Transmission)
37140
15.INSTALL FRONT PROPELLER SHAFT ASSEMBLY
37110
16.INSTALL PROPELLER SHAFT ASSEMBLY
17410
17.INSTALL FRONT EXHAUST PIPE ASSEMBLY
18.CONNECT ENGINE WIRE
Install the bracket to the engine mounting insulator LH with the bolt.
- Torque:
- 13 N*m (131 kgf*cm, 9 ft.*lbf)
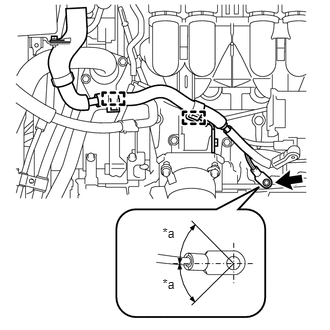
Install the ground wire and engine wire with the 2 clamps and bolt.
- Torque:
- 40 N*m (408 kgf*cm, 30 ft.*lbf)
| *a | 45° or less |
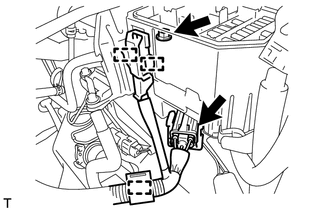
Attach the 2 clamps to connect the wire harness to the engine room No. 1 relay block.
Install the nut.
- Torque:
- 11 N*m (112 kgf*cm, 8 ft.*lbf)
Connect the connector and attach the clamp.
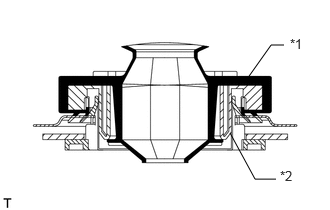
Connect the ECM connector.
Attach the grommet to the wire harness support.
| *1 | Grommet |
| *2 | Wire Harness Support |
Pass the wire harness into the vehicle and install the wire harness support.
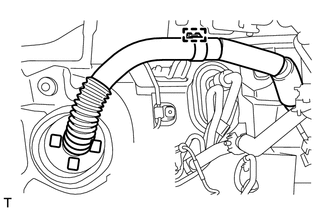
Attach the clamp.
Connect the 9 connectors and attach the clamp.
Install the glove compartment door (See page Vehicle Interior>INTERIOR PANELS / TRIM>INSTRUMENT PANEL SAFETY PAD>INSTALLATION).
Attach the 3 clamps and connect the engine wire to the vehicle RH side.
53737A
19.INSTALL FRONT NO. 1 FENDER APRON TO FRAME SEAL LH
53736B
20.INSTALL FRONT NO. 1 FENDER APRON TO FRAME SEAL RH
88320
21.CONNECT COOLER COMPRESSOR ASSEMBLY
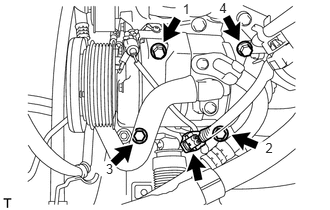
Temporarily install the cooler compressor assembly with the 4 bolts.
Tighten the bolts in the order shown in the illustration to connect the cooler compressor assembly.
- Torque:
- 25 N*m (250 kgf*cm, 18 ft.*lbf)
Connect the connector.
Connect the suction hose with the bolt.
- Torque:
- 7.8 N*m (80 kgf*cm, 69 in.*lbf)
44320
22.CONNECT VANE PUMP ASSEMBLY
Connect the vane pump assembly with the 2 bolts.
- Torque:
- 21 N*m (214 kgf*cm, 15 ft.*lbf)
Connect the 2 connectors.
Install the pressure feed tube with the bolt.
- Torque:
- 28 N*m (285 kgf*cm, 21 ft.*lbf)
23.CONNECT HEATER HOSE
for Single Air Conditioning System:
Connect the 2 heater hoses to the heater core, and slide the 2 clips to secure the hoses.
for Dual Air Conditioning System:
Connect the 2 heater hoses to the water by-pass pipe and hose, and slide the 2 clips to secure the hoses.
44773F
24.CONNECT UNION TO CHECK VALVE HOSE
Connect the union to check valve hose to the brake booster assembly, and slide the clip to secure the hose.
23820
25.CONNECT PURGE LINE HOSE
Connect the purge line hose to the purge VSV, and slide the clip to secure the hose.
23273C
26.INSTALL NO. 2 FUEL HOSE
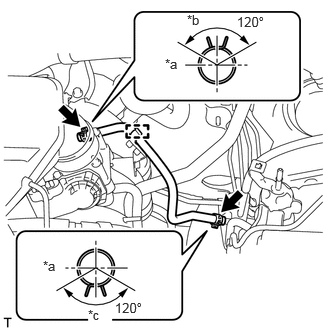
Install the No. 2 fuel hose to the fuel pressure regulator and floor pipe, and slide the clip to secure the hose.
| *a | Front |
| *b | Top |
| *c | LH Side |
- HINT:
-
The direction of each clip is indicated in the illustration.
Attach the clamp.
23271F
27.INSTALL FUEL HOSE
Install the fuel hose (See page Engine / Hybrid System>2TR-FE (FUEL)>FUEL SYSTEM>PRECAUTION).
Attach the 2 clamps.
28.CONNECT NO. 1 OIL COOLER INLET HOSE AND NO. 1 OIL COOLER OUTLET HOSE (for Automatic Transmission)
16711
29.INSTALL FAN SHROUD
16572D
30.INSTALL NO. 2 RADIATOR HOSE
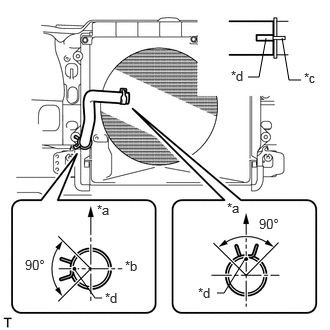
Install the No. 2 radiator hose so that its paint marks align with the radiator assembly and water inlet protrusion as shown in the illustration and slide the 2 clips to secure the hose.
| *a | Top |
| *b | RH Side |
| *c | Protrusion |
| *d | Paint Mark |
- HINT:
-
The direction of each clip is indicated in the illustration.
16571C
31.INSTALL NO. 1 RADIATOR HOSE
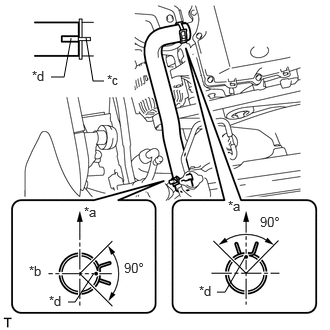
Install the No. 1 radiator hose so that its paint marks align with the radiator assembly and cylinder head protrusions as shown in the illustration and slide the 2 clips to secure the hose.
| *a | Top |
| *b | LH Side |
| *c | Protrusion |
| *d | Paint Mark |
- HINT:
-
The direction of each clip is indicated in the illustration.
16470
32.INSTALL RADIATOR RESERVOIR
17341
33.INSTALL NO. 1 AIR INJECTION SYSTEM HOSE
Install the No. 1 air injection system hose to the air switching valve assembly and air pump assembly, and slide the 2 clips to secure the hose.
Install a new hose clamp.
17861
34.INSTALL INTAKE AIR CONNECTOR
35.INSTALL AIR CLEANER CASE
Install the air cleaner case with the 3 bolts.
- Torque:
- 12 N*m (122 kgf*cm, 9 ft.*lbf)
Install the air cleaner filter element sub-assembly.
17705
36.INSTALL AIR CLEANER CAP SUB-ASSEMBLY
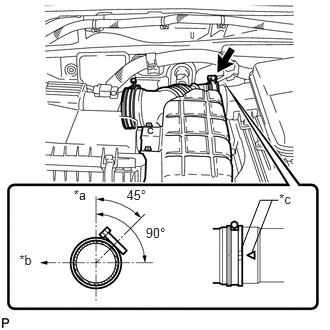
Install the air cleaner hose and align its matchmark with the matchmark of the intake air connector as shown in the illustration.
| *a | Upper Side |
| *b | Front |
| *c | Matchmark |
Tighten the hose clamp.
- NOTICE:
-
Check that the air cleaner hose is securely installed.
Attach the 4 clamps.
Connect the mass air flow meter connector and attach the 3 clamps.
55781E
37.INSTALL COWL TOP VENTILATOR LOUVER SUB-ASSEMBLY
53301
38.INSTALL HOOD SUB-ASSEMBLY
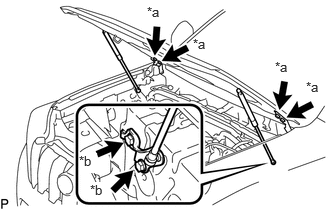
Install the hood sub-assembly with the 8 bolts.
- Torque:
- for bolt A : 13 N*m (133 kgf*cm, 10 ft.*lbf)
- for bolt B : 18 N*m (184 kgf*cm, 13 ft.*lbf)
| *a | Bolt A |
| *b | Bolt B |
Connect the washer nozzle hose.
53301
39.ADJUST HOOD SUB-ASSEMBLY
40.CONNECT CABLE TO NEGATIVE BATTERY TERMINAL
- NOTICE:
-
When disconnecting the cable, some systems need to be initialized after the cable is reconnected (See page General>INTRODUCTION>REPAIR INSTRUCTION>INITIALIZATION).
41.ADD AUTOMATIC TRANSMISSION FLUID (for Automatic Transmission)
43.ADD ENGINE COOLANT
44.INSPECT SHIFT LEVER POSITION
45.INSPECT FOR OIL LEAK
46.INSPECT ENGINE OIL LEVEL
47.INSPECT FOR COOLANT LEAK
48.INSPECT FOR FUEL LEAK
49.INSPECT FOR EXHAUST GAS LEAK
50.INSPECT IGNITION TIMING
51.INSPECT ENGINE IDLE SPEED
53292A
53.INSTALL UPPER RADIATOR SUPPORT SEAL
Install the upper radiator support seal with the 13 clips.
51450
54.INSTALL REAR ENGINE UNDER COVER ASSEMBLY
Install the rear engine under cover with the 4 bolts.
- Torque:
- 29 N*m (296 kgf*cm, 21 ft.*lbf)
51495
55.INSTALL TRANSMISSION UNDER COVER
Install the transmission under cover with the 2 bolts.
- Torque:
- 29 N*m (296 kgf*cm, 21 ft.*lbf)
51405A
56.INSTALL NO. 1 ENGINE UNDER COVER SUB-ASSEMBLY
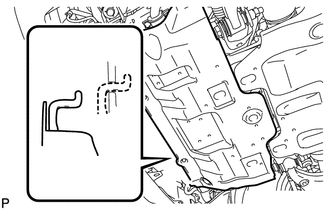
Hook the No. 1 engine under cover sub-assembly to the vehicle body as shown in the illustration.
Install the 4 bolts.
- Torque:
- 29 N*m (296 kgf*cm, 21 ft.*lbf)
52129B
57.INSTALL FRONT BUMPER COVER LOWER
Install the front bumper cover lower with the 5 bolts and clip.
- Torque:
- 8.0 N*m (82 kgf*cm, 71 in.*lbf)
58.INSPECT ENGINE COOLANT LEVEL