RA61F MANUAL TRANSMISSION / TRANSAXLE INPUT SHAFT REASSEMBLY
PROCEDURE

 33311A
1.INSTALL INPUT SHAFT FRONT BEARING
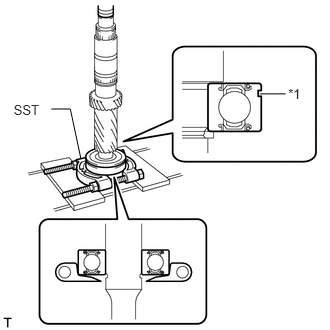
Using SST and a press, install the input shaft front bearing to the input shaft.
- SST
- 09950-00020
| *1 | Groove |
- HINT:
-
Make sure that the groove of the bearing faces the correct direction as shown in the illustration.
33311G
2.INSTALL INPUT SHAFT FRONT BEARING SNAP RING
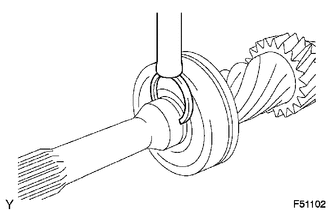
Select a new snap ring that will allow minimal axial play.
- Standard clearance:
0.1 mm (0.00394 in.) or less
- Standard Snap Ring:
Part No. Mark Thickness 90520-31026 A 2.65 to 2.70 mm
(0.1043 to 0.1063 in.)90520-31027 B 2.70 to 2.75 mm
(0.1063 to 0.1083 in.)90520-31028 C 2.75 to 2.80 mm
(0.1083 to 0.1102 in.)90520-31029 D 2.80 to 2.85 mm
(0.1102 to 0.1122 in.)90520-31030 E 2.85 to 2.90 mm
(0.1122 to 0.1142 in.)90520-31031 F 2.90 to 2.95 mm
(0.1142 to 0.1161 in.)
Using a brass bar and hammer, install the snap ring to the input shaft.
33362
3.INSTALL NO. 2 TRANSMISSION CLUTCH HUB
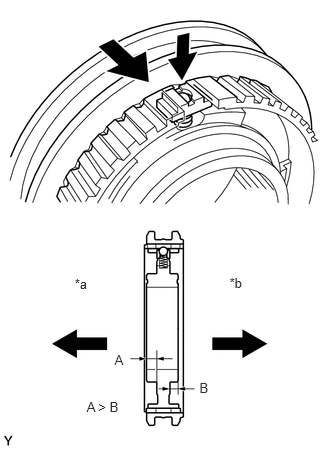
Apply a light coat of gear oil to the sleeve and hub.
Install the No. 2 clutch hub to the clutch hub sleeve.
| *a | 4th Gear Side |
| *b | 3rd Gear Side |
Install one of the balls to each shifting key.
Install one of the springs to each shifting key.
Install the shifting keys with balls and springs to the No. 2 clutch hub.
- HINT:
-
Make sure that the No. 2 clutch hub faces the correct direction as shown in the illustration.
- NOTICE:
-
Be careful to prevent the balls from flying off.
33393
4.INSTALL NO. 3 TRANSMISSION CLUTCH HUB
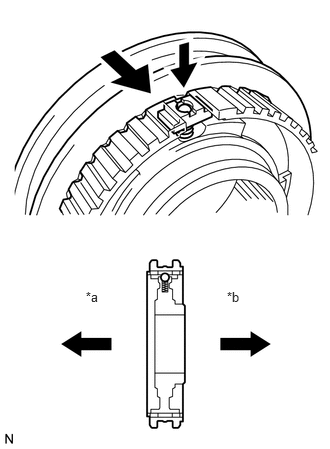
Apply a light coat of gear oil to the sleeve and hub.
Install the No. 3 clutch hub to the clutch hub sleeve.
| *a | 6th Gear Side |
| *b | 5th Gear Side |
Install one of the balls to each shifting key.
Install one of the springs to each shifting key.
Install the shifting keys with balls and springs to the No. 3 clutch hub.
- HINT:
-
Make sure that the No. 2 clutch hub faces the correct direction as shown in the illustration.
- NOTICE:
-
Be careful to prevent the balls from flying off.
33334A
5.INSTALL 4TH GEAR NEEDLE ROLLER BEARING
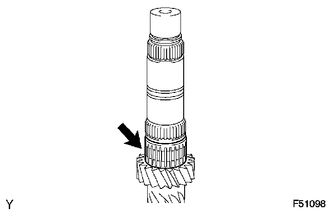
Coat the 4th gear needle roller bearing with gear oil, and then install it to the input shaft.
33334
6.INSTALL 4TH GEAR
Coat the 4th gear and No. 3 synchronizer ring with gear oil, and then install them to the input shaft.
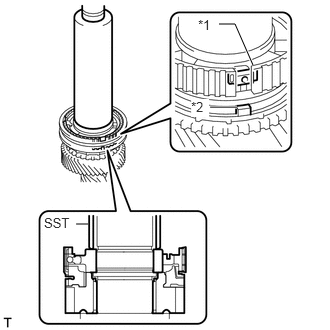
Using SST and a press, install the No. 2 clutch hub to the input shaft.
- SST
- 09308-14010
- HINT:
-
Align the groove of the clutch hub of the synchronizer ring with the protrusion.
| *1 | Groove |
| *2 | Protrusion |
Check that the gear and synchronizer ring move smoothly.
33362A
7.INSTALL NO. 2 CLUTCH HUB SETTING SHAFT SNAP RING
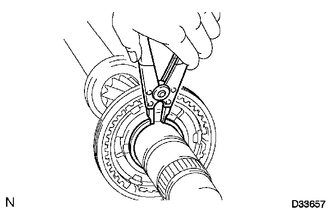
Select a new snap ring that will allow minimal axial play.
- Standard clearance:
0.1 mm (0.00394 in.) or less
- Standard Snap Ring:
Part No. Mark Thickness 90520-42012 A 1.80 to 1.85 mm
(0.0709 to 0.0728 in.)90520-42013 B 1.85 to 1.90 mm
(0.0728 to 0.0748 in.)90520-42014 C 1.90 to 1.95 mm
(0.0748 to 0.0767 in.)90520-42015 D 1.95 to 2.00 mm
(0.0767 to 0.0787 in.)90520-42016 E 2.00 to 2.05 mm
(0.0787 to 0.0807 in.)90520-42017 F 2.05 to 2.10 mm
(0.0807 to 0.0826 in.)90520-42018 G 2.10 to 2.15 mm
(0.0826 to 0.0846 in.)
Using a snap ring expander, install the snap ring to the input shaft.
33038E
8.INSTALL NO. 2 SYNCHRONIZER RING SET
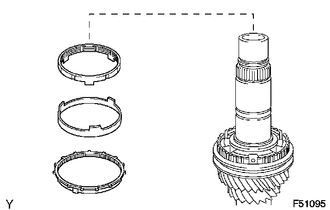
Coat the No. 2 synchronizer ring set with gear oil, and then install it to the input shaft.
9.INSTALL SPACER
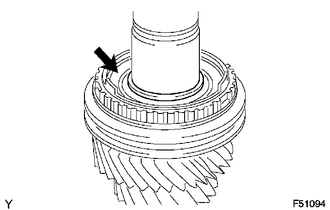
Coat the spacer with gear oil and install it to the input shaft.
33333A
10.INSTALL 3RD GEAR NEEDLE ROLLER BEARING
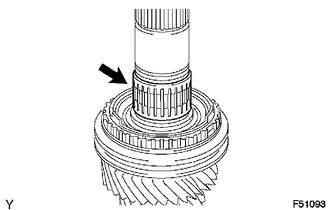
Coat the 3rd gear needle roller bearing with gear oil and install it to the input shaft.
11.INSTALL STRAIGHT PIN
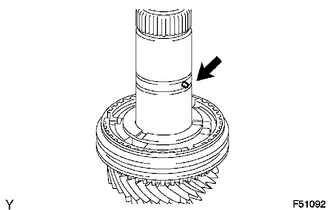
Install the straight pin to the input shaft.
33333
12.INSTALL 3RD GEAR
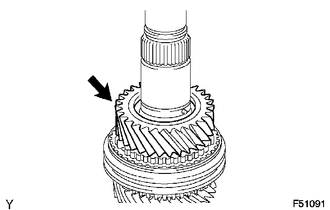
Coat the 3rd gear with gear oil and install it to the input shaft.
33342C
13.INSTALL 3RD GEAR THRUST WASHER
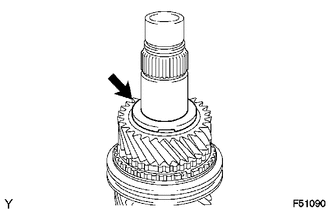
Coat the 3rd gear thrust washer with gear oil and install it to the input shaft.
- HINT:
-
Align the groove of the gear thrust washer with the straight pin.
33342B
14.INSTALL GEAR THRUST WASHER SHAFT SNAP RING
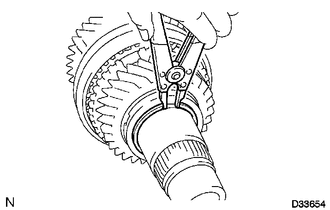
Select a new snap ring that will allow minimal axial play.
- Standard clearance:
0.1 mm (0.00394 in.) or less
- Standard Snap Ring:
Part No. Mark Thickness 90520-39026 A 2.07 to 2.12 mm
(0.0815 to 0.0835 in.)90520-39027 B 2.12 to 2.17 mm
(0.0835 to 0.0854 in.)90520-39028 C 2.17 to 2.22 mm
(0.0854 to 0.0874 in.)90520-39029 D 2.22 to 2.27 mm
(0.0874 to 0.0894 in.)90520-39030 E 2.27 to 2.32 mm
(0.0894 to 0.0913 in.)90520-39031 F 2.32 to 2.37 mm
(0.0913 to 0.0933 in.)
Using a snap ring expander, install the snap ring to the input shaft.
33311F
15.INSTALL SPACER
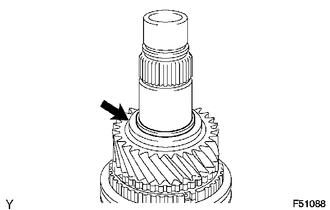
Coat the spacer with gear oil and install it to the input shaft.
33337A
16.INSTALL 6TH GEAR NEEDLE ROLLER BEARING
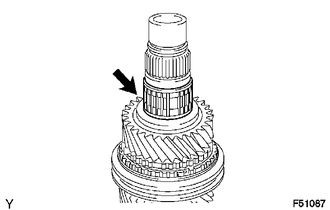
Coat the 6th gear needle roller bearing with gear oil and install it to the input shaft.
33337
17.INSTALL 6TH GEAR SUB-ASSEMBLY
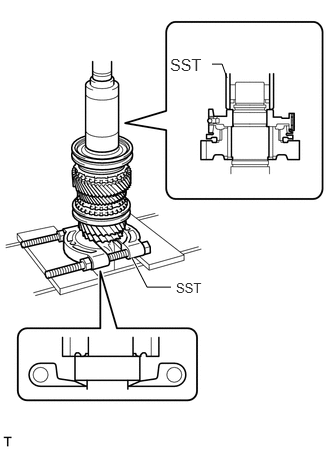
Install the 6th gear to the input shaft.
Install the synchronizer ring to the input shaft.
Using SST and a press, install the clutch hub to the input shaft.
- SST
- 09309-37010
09950-00020
Check that the gear and synchronizer ring move smoothly.
33393A
18.INSTALL NO. 3 TRANSMISSION CLUTCH HUB SHAFT SNAP RING
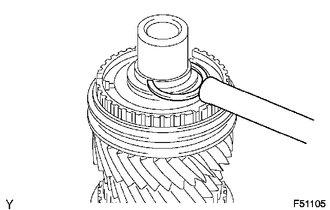
Select a new snap ring that will allow minimal axial play.
- Standard clearance:
0.1 mm (0.00394 in.) or less
- Standard Snap Ring:
Part No. Mark Thickness 90520-33022 A 2.10 to 2.15 mm
(0.0827 to 0.0847 in.)90520-33023 B 2.15 to 2.20 mm
(0.0847 to 0.0866 in.)90520-33024 C 2.20 to 2.25 mm
(0.0866 to 0.0886 in.)90520-33025 D 2.25 to 2.30 mm
(0.0886 to 0.0906 in.)90520-33026 E 2.30 to 2.35 mm
(0.0906 to 0.0925 in.)90520-33027 F 2.35 to 2.40 mm
(0.0925 to 0.0945 in.)90520-33028 G 2.40 to 2.45 mm
(0.0945 to 0.0965 in.)
Using a brass bar and hammer, install the snap ring to the input shaft.
19.INSPECT 6TH GEAR THRUST CLEARANCE
33333
20.INSPECT 3RD GEAR THRUST CLEARANCE
33334
21.INSPECT 4TH GEAR THRUST CLEARANCE
22.INSPECT 6TH GEAR RADIAL CLEARANCE
33333
23.INSPECT 3RD GEAR RADIAL CLEARANCE
33334
24.INSPECT 4TH GEAR RADIAL CLEARANCE