AXLE AND DIFFERENTIAL FRONT DIFFERENTIAL CARRIER ASSEMBLY REASSEMBLY
PROCEDURE

 1.INSTALL FRONT DIFFERENTIAL SIDE GEAR SHAFT BEARING RH
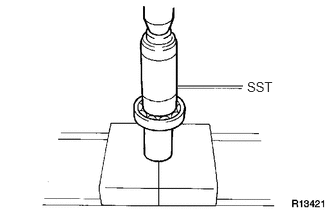
Using SST and a press, press in the shaft bearing.
- SST
- 09223-00010
Using a snap ring expander, install the snap ring.
- HINT:
-
Install the snap ring securely.
41304F
2.INSTALL DIFFERENTIAL SIDE GEAR SHAFT SUB-ASSEMBLY RH
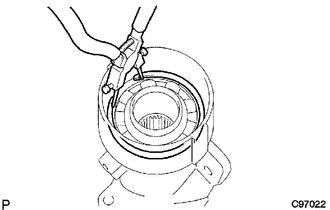
Install the shaft to the differential tube.
Using needle nose pliers, install the snap ring.
- HINT:
-
Install the snap ring securely.
41304P
3.INSTALL DIFFERENTIAL SIDE GEAR SHAFT OIL SEAL
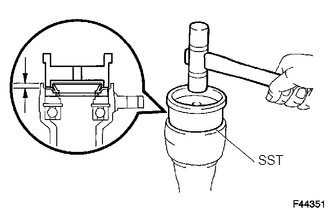
Coat the lip of a new oil seal with MP grease.
- Standard oil seal depth:
4.8 to 5.8 mm (0.189 to 0.229 in.)
Using SST and a plastic-faced hammer, tap in the oil seal.
- SST
- 09223-15020
41311
4.INSTALL DIFFERENTIAL CASE ASSEMBLY
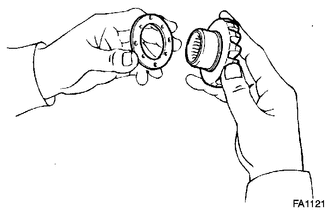
Install the 2 thrust washers to the 2 side gears.
- Standard Thrust Washer:
Thickness Thickness 1.48 to 1.52 mm (0.0583 to 0.0598 in.) 1.73 to 1.77 mm (0.0681 to 0.0697 in.) 1.53 to 1.57 mm (0.0602 to 0.0618 in.) 1.78 to 1.82 mm (0.0701 to 0.0717 in.) 1.58 to 1.62 mm (0.0622 to 0.0638in.) 1.83 to 1.87 mm (0.0720 to 0.0736 in.) 1.63 to 1.67 mm (0.0642 to 0.0657 in.) 1.88 to 1.92 mm (0.0740 to 0.0756 in.) 1.68 to 1.72 mm (0.0661 to 0.0677 in.) -
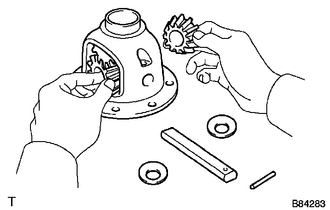
Install the 2 side gears, 2 pinion gears, 2 side gear thrust washers, 2 pinion thrust washers and pinion shaft to the differential case.
- HINT:
-
Align the holes of the differential case and pinion shaft.
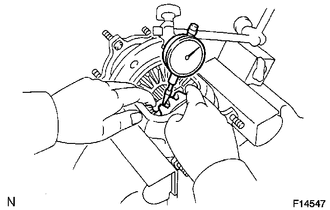
Measure the side gear backlash.
Using a dial indicator, measure the side gear backlash while holding one pinion gear toward the differential case.
- Standard backlash:
0.25 mm (0.00984 in.) or less
If the backlash is not as specified, install 2 side gear thrust washers with different thicknesses.
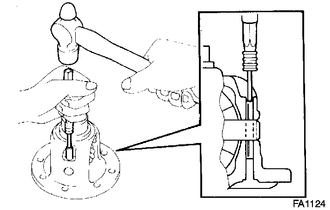
Using a 5 mm pin punch and hammer, tap in the straight pin through the differential case and hole of the pinion shaft.
Stake the differential case.
5.INSTALL DIFFERENTIAL RING GEAR
Clean the contact surfaces of the differential case and ring gear.
Heat the ring gear in water that is approximately 100°C (212°F).
Carefully remove the ring gear from the boiling water.
After the moisture on the ring gear has completely evaporated, quickly install the ring gear to the differential case.
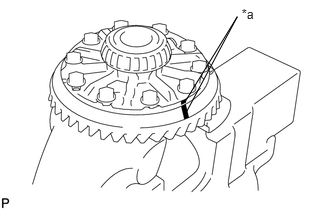
Align the matchmarks on the ring gear with those of the differential case.
| *a | Matchmark |
After the ring gear cools down, apply thread lock adhesive to the 10 set bolts and install them.
- Adhesive:
Toyota Genuine Adhesive 1360K, Three Bond 1360K or equivalent
- Torque:
- 115 N*m (1173 kgf*cm, 85 ft.*lbf)
41311A
6.INSTALL FRONT DIFFERENTIAL CASE BEARING
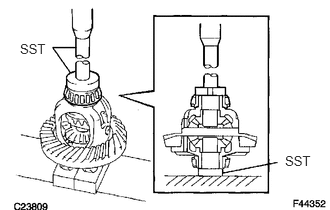
Using SST and a press, press the 2 bearings (inner) into the differential case.
- SST
- 09950-60010 (09951-00520, 09951-00610)
09950-70010 (09951-07150)
41311A
7.INSTALL FRONT DIFFERENTIAL CASE BEARING
- HINT:
-
When replacing the 3 differential case bearings, install the 2 thinnest new washers onto each bearing. When reusing the bearings, install the new case washers to the same places they were removed from.
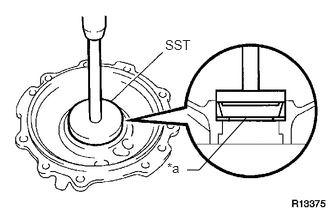
Using SST and a press, press the case bearing (outer race) into the differential case bearing retainer.
- SST
- 09950-60020 (09951-00810)
09950-70010 (09951-07150)
| *a | Case Washer |
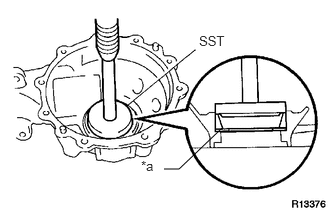
Using SST and a press, press the case bearing (outer) into the differential carrier.
- SST
- 09950-60020 (09951-00810)
09950-70010 (09951-07150)
| *a | Case Washer |
41211B
8.INSTALL FRONT DRIVE PINION REAR TAPERED ROLLER BEARING (OUTER)
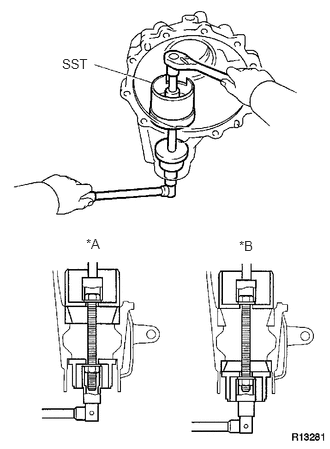
Using SST, install the front drive pinion rear tapered roller bearing (outer race).
- SST
- 09950-00020 (09951-00890, 09951-00680)
41211A
9.INSTALL FRONT DRIVE PINION FRONT TAPERED ROLLER BEARING
Using a brass bar and hammer, tap in the oil storage ring.
Using SST, install the front drive pinion front tapered roller bearing (outer race).
- SST
- 09950-00020 (09951-00890, 09951-00680)
| *A | for Rear |
| *B | for Front |
41211A
10.INSTALL FRONT DRIVE PINION FRONT TAPERED ROLLER BEARING
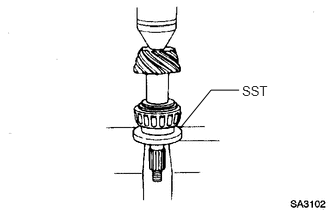
Install the washer to the drive pinion.
- HINT:
-
First, install a washer that has the same thickness as the removed washer, and then check the tooth contact pattern. Replace the washer with one of a different thickness if necessary.
Using SST and a press, press the front bearing onto the drive pinion.
- SST
- 09506-30012
11.INSPECT DIFFERENTIAL DRIVE PINION PRELOAD
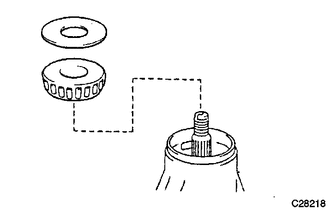
Install the drive pinion, roller bearing and oil slinger to the differential case.
- HINT:
-
Install the spacer, oil storage ring and oil seal after adjusting the gear contact pattern.
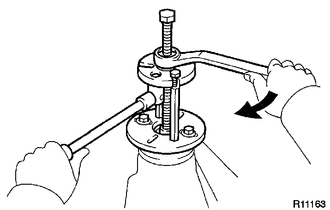
Using SST, install the companion flange.
- SST
- 09950-30012 (09951-03010, 09953-03010, 09954-03010, 09955-03030, 09956-03020)
- NOTICE:
-
Before using SST (center bolt), apply hypoid gear oil to its threads and tip.
Adjust the drive pinion preload by tightening the companion flange nut.
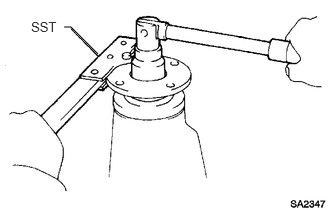
Using SST to hold the companion flange in place, then slowly tighten the nut within the drive pinion preload adjustment range so that it reaches the specified drive pinion preload (at Starting).
- SST
- 09330-00021
- Limit Torque Value:
370 N*m (3773 kgf*cm, 273 ft.*lbf) or less
- NOTICE:
- ·
As there is no spacer, tighten the nut a little at a time. Be careful not to overtighten it.
- ·
Apply hypoid gear oil to the nut.
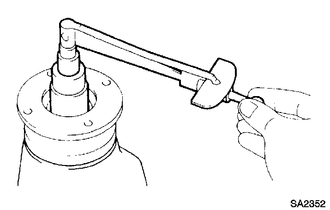
Using a torque wrench, measure the preload.
- Standard Preload (at Starting):
Item Specified Condition New bearing 0.98 to 1.57 N*m (10 to 16 kgf*cm, 8.7 to 14 in.*lbf) Used bearing 0.49 to 0.78 N*m (5 to 8 kgf*cm, 4.3 to 6.9 in.*lbf)
- NOTICE:
-
For a more accurate measurement, rotate the bearing forward and backward several times before measuring.
12.INSTALL DIFFERENTIAL CASE ASSEMBLY
13.ADJUST DIFFERENTIAL RING GEAR BACKLASH
Install the side bearing retainer with the 10 bolts.
- Torque:
- 75 N*m (765 kgf*cm, 55 ft.*lbf)
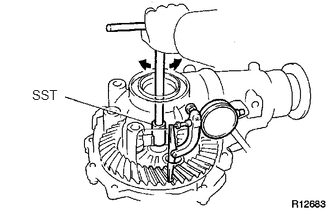
Using SST and a dial indicator, measure the ring gear backlash.
- SST
- 09564-32011
- Standard backlash:
0.09 to 0.21 mm (0.00355 to 0.00826 in.)
If the backlash is not as specified, adjust it by either increasing or decreasing the number of washers on both sides equally.
- HINT:
-
There should be no clearance between the plate washer and case. Make sure that the ring gear has backlash.
- Standard Washer:
Thickness Thickness Thickness 1.57 to 1.59 mm (0.0618 to 0.0626 in.) 1.79 to 1.81 mm (0.0705 to 0.0713 in.) 1.99 to 2.01 mm (0.0783 to 0.0791 in.) 1.59 to 1.61 mm (0.0626 to 0.0634 in.) 1.81 to 1.83 mm (0.0713 to 0.0720 in.) 2.01 to 2.03 mm (0.0791 to 0.0799 in.) 1.61 to 1.63 mm (0.0634 to 0.0642 in.) 1.83 to 1.85 mm (0.0720 to 0.0728 in.) 2.03 to 2.05 mm (0.0791 to 0.0807 in.) 1.63 to 1.65 mm (0.0642 to 0.0650 in.) 1.85 to 1.87 mm (0.0728 to 0.0736 in.) 2.05 to 2.07 mm (0.0807 to 0.0815 in.) 1.65 to 1.67 mm (0.0650 to 0.0657 in.) 1.87 to 1.89 mm (0.0736 to 0.0744 in.) 2.07 to 2.09 mm (0.0815 to 0.0822 in.) 1.67 to 1.69 mm (0.0657 to 0.0665 in.) 1.89 to 2.01 mm (0.0744 to 0.0791 in.) 2.09 to 2.11 mm (0.0822 to 0.0830 in.) 1.69 to 1.71 mm (0.0665 to 0.0673 in.) 1.89 to 1.91 mm (0.0744 to 0.0752 in.) 2.11 to 2.13 mm (0.0830 to 0.0839 in.) 1.71 to 1.73 mm (0.0673 to 0.0681 in.) 1.91 to 1.93 mm (0.0752 to 0.0760 in.) 2.13 to 2.15 mm (0.0839 to 0.0846 in.) 1.73 to 1.75 mm (0.0681 to 0.0689 in.) 1.93 to 1.95 mm (0.0760 to 0.0768 in.) 2.15 to 2.17 mm (0.0846 to 0.0854 in.) 1.75 to 1.77 mm (0.0689 to 0.0697 in.) 1.95 to 1.97 mm (0.0768 to 0.0776 in.) - 1.77 to 1.79 mm (0.0697 to 0.0705 in.) 1.97 to 1.99 mm (0.0776 to 0.0783 in.) -
14.INSPECT TOTAL PRELOAD
Using a torque wrench, measure the preload with the teeth of the drive pinion and ring gear in contact.
- Standard Total Preload (at Starting):
Item Specified Condition New bearing 1.2 to 2.45 N*m (12 to 25 kgf*cm, 10.6 to 21.7 in.*lbf) Used bearing 0.71 to 1.66 N*m (7.2 to 17 kgf*cm, 6.3 to 14.7 in.*lbf)
If necessary, disassemble and inspect the differential.
15.ADJUST TOOTH CONTACT BETWEEN RING GEAR AND DRIVE PINION
Remove the differential case bearing retainer and differential case.
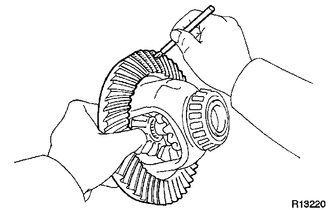
Coat 3 or 4 teeth at 3 different positions on the ring gear with Prussian blue.
Install the differential case and differential case bearing retainer.
- Torque:
- 75 N*m (765 kgf*cm, 55 ft.*lbf)
Hold the companion flange firmly in place and rotate the ring gear in both directions.
Remove the differential case bearing retainer and differential case.
Inspect the tooth contact pattern.
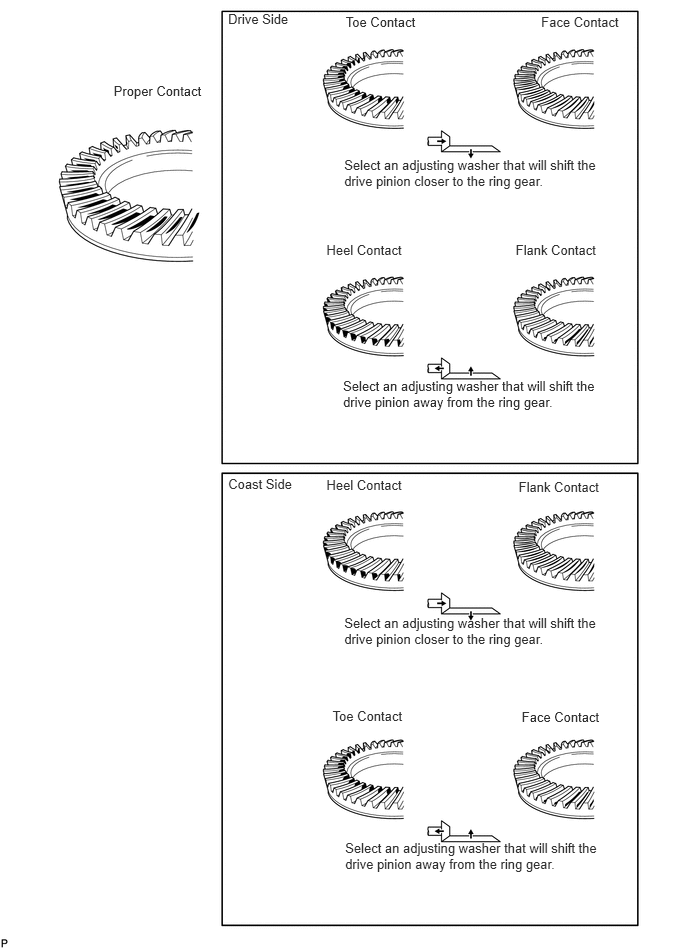
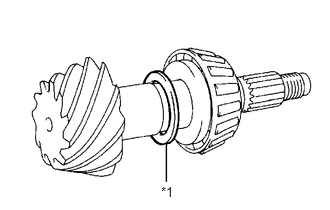
If the teeth are not contacting properly, use the following chart to select an appropriate washer.
| *1 | Drive Pinion Washer |
- Standard Washer:
Thickness Thickness Thickness 1.69 to 1.71 mm (0.0665 to 0.0673 in.) 1.93 to 1.95 mm (0.0760 to 0.0768 in.) 2.17 to 2.19 mm (0.0854 to 0.0862 in.) 1.72 to 1.74 mm (0.0677 to 0.0685 in.) 1.96 to 1.98 mm (0.0772 to 0.0780 in.) 2.20 to 2.22 mm (0.0866 to 0.0874 in.) 1.75 to 1.77 mm (0.0689 to 0.0697 in.) 1.99 to 2.01 mm (0.0783 to 0.0791 in.) 2.23 to 2.25 mm (0.0878 to 0.0886 in.) 1.78 to 1.80 mm (0.0700 to 0.0709 in.) 2.02 to 2.04 mm (0.0795 to 0.0803 in.) 2.26 to 2.28 mm (0.0890 to 0.0898 in.) 1.81 to 1.83 mm (0.0713 to 0.0720 in.) 2.05 to 2.07 mm (0.0807 to 0.0815 in.) 2.29 to 2.31 mm (0.0902 to 0.0909 in.) 1.84 to 1.86 mm (0.0724 to 0.0732 in.) 2.08 to 2.10 mm (0.0819 to 0.0827 in.) 2.32 to 2.34 mm (0.0913 to 0.0921 in.) 1.87 to 1.89 mm (0.0736 to 0.0744 in.) 2.11 to 2.13 mm (0.0831 to 0.0839 in.) - 1.90 to 1.92 mm (0.0748 to 0.0756 in.) 2.14 to 2.16 mm (0.0843 to 0.0850 in.) -
41204E
16.REMOVE FRONT DRIVE PINION COMPANION FLANGE NUT
41204D
17.REMOVE FRONT DRIVE PINION COMPANION FLANGE SUB-ASSEMBLY
41214C
18.REMOVE FRONT DIFFERENTIAL DRIVE PINION OIL SLINGER
41211B
19.REMOVE FRONT DRIVE PINION REAR TAPERED ROLLER BEARING (INNER)
41211B
20.REMOVE FRONT DRIVE PINION REAR TAPERED ROLLER BEARING (OUTER)
21.INSTALL FRONT DIFFERENTIAL DRIVE PINION BEARING SPACER
Install the bearing spacer.
41115F
22.INSTALL FRONT DIFFERENTIAL OIL STORAGE RING
41211B
23.INSTALL FRONT DRIVE PINION REAR TAPERED ROLLER BEARING (OUTER)
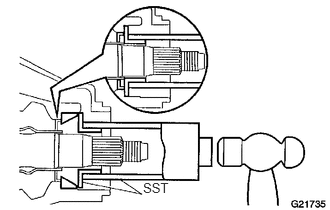
Using SST and a hammer, install the roller bearing (outer).
- SST
- 09316-60011 (09316-00011, 09316-00021)
41211B
24.INSTALL FRONT DRIVE PINION REAR TAPERED ROLLER BEARING (INNER)
Install the roller bearing (inner).
41214C
25.INSTALL FRONT DIFFERENTIAL DRIVE PINION OIL SLINGER
26.INSTALL FRONT DIFFERENTIAL CARRIER OIL SEAL
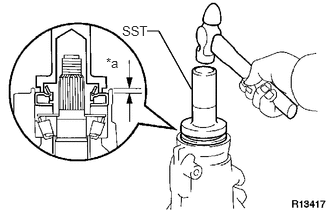
Apply MP grease to the lip of a new oil seal.
Using SST and a hammer, tap in the oil seal.
- SST
- 09554-22010
- Standard oil seal depth:
3.9 to 4.8 mm (0.154 to 0.189 in.)
41252A
27.INSTALL FRONT DIFFERENTIAL DUST DEFLECTOR
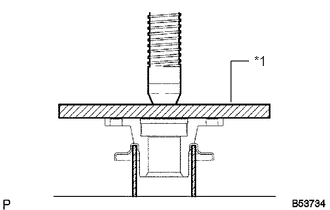
Using a steel plate and press, press in a new dust deflector.
| *1 | Plate |
- NOTICE:
-
Do not damage the dust deflector.
41204D
28.INSTALL FRONT DRIVE PINION COMPANION FLANGE SUB-ASSEMBLY
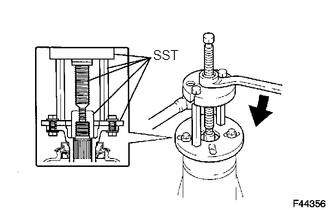
Place the companion flange on the drive pinion.
Coat the threads of a new nut with hypoid gear oil.
Using SST, install the companion flange.
- SST
- 09950-30012 (09951-03010, 09953-03010, 09954-03010, 09955-03030, 09956-03020)
- NOTICE:
-
Before using SST (center bolt), apply hypoid gear oil to its threads and tip.
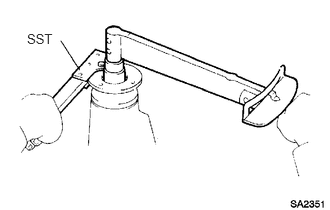
Using SST to hold the companion flange in place, then slowly tighten the nut within the drive pinion preload adjustment range so that it reaches the specified drive pinion preload (at Starting).
- SST
- 09330-00021 (09330-00030)
- Limit Torque Value:
370 N*m (3773 kgf*cm, 273 ft.*lbf) or less
29.INSTALL DIFFERENTIAL SIDE BEARING RETAINER
Using a scraper and wire brush, clean off the seal packing attached on the differential carrier and differential side bearing retainer, and then remove oil with detergent, etc.
- NOTICE:
-
Do not scratch the installation area.
Clean the differential side bearing retainer installation bolts.
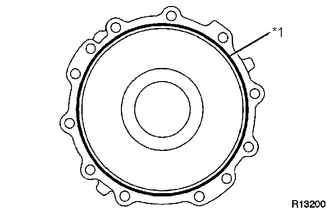
Apply seal packing and install the differential side retainer to the differential carrier.
- Seal packing:
Toyota Genuine Seal Packing 1281, Three Bond 1281 or equivalent
| *1 | Seal Packing |
- NOTICE:
- ·
Apply seal packing in a continuous line 1 to 2 mm in diameter.
·After applying the seal packing, install the differential side bearing retainer to the differential carrier within 3 minutes.
Apply adhesive to the threads of the 10 differential side bearing retainer installation bolts and install them.
- Adhesive:
Toyota Genuine Adhesive 1324, Three Bond 1324 or equivalent
- Torque:
- 75 N*m (765 kgf*cm, 55 ft.*lbf)
- NOTICE:
-
After installing the differential side bearing retainer, do not immediately add oil or drive the vehicle, and leave it as is for 1 hour or more.
-
Also, avoid sudden acceleration and deceleration for 12 hours or more.
30.INSPECT DRIVE PINION PRELOAD
Using a torque wrench, measure the preload of the backlash between the drive pinion and ring gear.
- Standard Preload (at Starting):
Item Specified Condition New bearing 0.98 to 1.57 N*m (10 to 16 kgf*cm, 8.7 to 14 in.*lbf) Used bearing 0.49 to 0.78 N*m (5 to 8 kgf*cm, 4.3 to 6.9 in.*lbf)
If the result not as specified, replace the bearing spacer.
If the preload is less than the minimum, retighten the nut with 13 N*m (130 kgf*cm, 9 ft.*lbf) of torque at a time until the specified preload is reached.
- Limit Torque Value:
370 N*m (3773 kgf*cm, 273 ft.*lbf) or less
If the maximum torque is exceeded while retightening the nut, replace the bearing spacer and repeat the preload adjusting procedure.
- HINT:
-
Do not loosen the pinion nut to reduce the preload.
31.INSPECT TOTAL PRELOAD
Using a torque wrench, measure the preload with the teeth of the drive pinion and ring gear in contact.
- Standard Total Preload (at Starting):
Item Specified Condition New bearing 1.2 to 2.45 N*m (12 to 25 kgf*cm, 10.6 to 21.7 in.*lbf) Used bearing 0.71 to 1.66 N*m (7.2 to 17 kgf*cm, 6.3 to 14.7 in.*lbf)
If necessary, disassemble and inspect the differential.
32.INSPECT DIFFERENTIAL RING GEAR BACKLASH
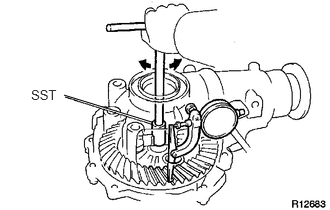
Using SST and a dial indicator, measure the ring gear backlash.
- SST
- 09564-32011
- Standard backlash:
0.09 to 0.21 mm (0.00355 to 0.00826 in.)
If the backlash is not within the specification, adjust the side bearing preload.
41204D
33.INSPECT FRONT DRIVE PINION COMPANION FLANGE SUB-ASSEMBLY
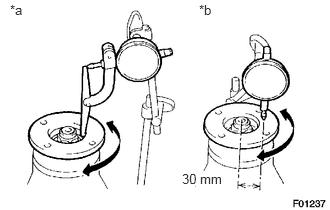
Using a dial indicator, measure the runout of the companion flange vertically and laterally.
- Distance from center to runout measurement point:
30 mm (1.18 in.)
- Maximum Runout:
Item Specified Condition Vertical runout 0.15 mm (0.00591 in.) Lateral runout 0.15 mm (0.00591 in.)
| *a | Vertical runout |
| *b | Lateral runout |
If the runout is more than the maximum, replace the companion flange.
41204E
34.STAKE FRONT DRIVE PINION COMPANION FLANGE NUT
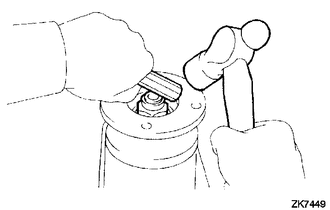
Using a chisel and hammer, stake the drive pinion nut.
41304P
35.INSTALL DIFFERENTIAL SIDE GEAR SHAFT OIL SEAL
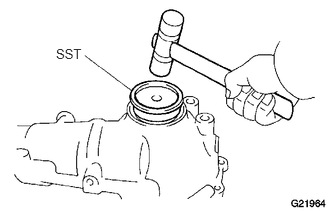
Coat the lip of a new oil seal with MP grease.
Using SST and a plastic-faced hammer, tap in the oil seal until its surface is flush with the differential carrier end.
- SST
- 09608-32010
- Standard oil seal depth:
-0.45 to 0.45 mm (-0.0177 to 0.0177 in.)
41183B
36.INSTALL FRONT DIFFERENTIAL SIDE BEARING RETAINER DEFLECTOR
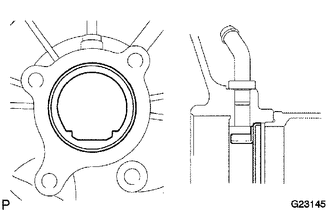
Using a brass bar and hammer, tap in the side bearing retainer deflector.
- NOTICE:
-
Install the side bearing retainer deflector so that it is facing in the correct direction.
41320
37.INSTALL FRONT DIFFERENTIAL TUBE ASSEMBLY
Remove any old FIPG material from the contact surfaces of the differential and clutch case.
- NOTICE:
-
Do not drop oil on the contact surfaces of the differential and clutch case.
Wipe off any residual FIPG material on the contact surface using gasoline or alcohol.
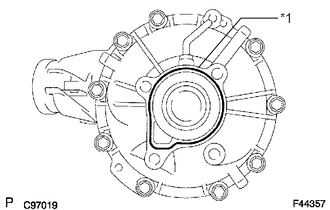
Apply seal packing to the differential as shown in the illustration.
- Seal packing:
Toyota Genuine Seal Packing 1281, Three Bond 1281 or equivalent
| *1 | Seal Packing |
- HINT:
-
Install the differential tube within 10 minutes of applying seal packing.
Install the differential tube to the differential.
Clean the threads of the 4 bolts and retainer bolt holes with toluene or trichloroethylene.
Apply adhesive to 2 or 3 threads at the tip of each bolt.
- Adhesive:
Toyota Genuine Adhesive 1324, Three Bond 1324 or equivalent
Using an E14 "TORX" socket wrench, install the 4 bolts.
- Torque:
- 110 N*m (1120 kgf*cm, 81 ft.*lbf)