SEAT FRONT POWER SEAT CONTROL SYSTEM(w/ Memory) Front Power Seat does not Operate with Front Power Seat Switch
DESCRIPTION
When a signal is input into the front power seat switch (seat ECU), the ECU manages the signals received from the front power seat switch and operates each motor. When 2 or more signals are input, the motors only operate when the signals are from the slide switch and reclining switch.
WIRING DIAGRAM
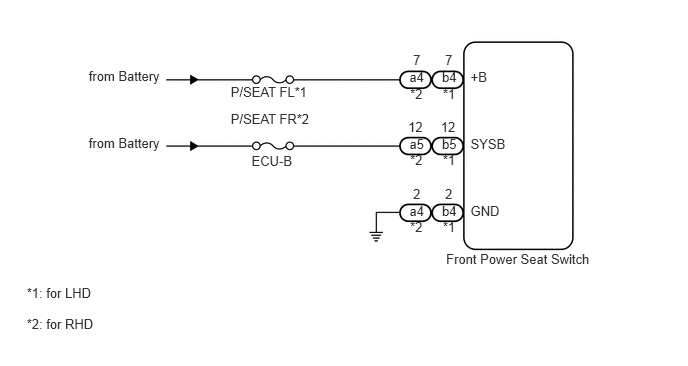
CAUTION / NOTICE / HINT
- HINT:
-
Inspect the fuses for circuits related to this system before performing the following inspection procedure.
PROCEDURE
Using the intelligent tester, read the Data List (See page Vehicle Interior>SEAT>FRONT POWER SEAT CONTROL SYSTEM (w/ Memory)>DATA LIST / ACTIVE TEST).
| Tester Display | Measurement Item/Range | Normal Condition | Diagnostic Note |
|---|---|---|---|
| Reclining Rear | Reclining switch signal (Rearward) / ON or OFF | ON: Reclining switch (Rearward) on
OFF: Reclining switch (Rearward) off |
- |
| Reclining Front | Reclining switch signal (Forward) / ON or OFF | ON: Reclining switch (Forward) on
OFF: Reclining switch (Forward) off |
- |
| Front Vertical Down | Front vertical switch signal (Downward) / ON or OFF | ON: Front vertical switch (Downward) on
OFF: Front vertical switch (Downward) off |
- |
| Front Vertical Up | Front vertical switch signal (Upward) / ON or OFF | ON: Front vertical switch (Upward) on
OFF: Front vertical switch (Upward) off |
- |
| Lifter Switch Down | Lifter switch signal (Downward) / ON or OFF | ON: Lifter switch (Downward) on
OFF: Lifter switch (Downward) off |
- |
| Lifter Switch Up | Lifter switch signal (Upward) / ON or OFF | ON: Lifter switch (Upward) on
OFF: Lifter switch (Upward) off |
- |
| Slide Rear | Sliding switch signal (Rearward) / ON or OFF | ON: Sliding switch (Rearward) on
OFF: Sliding switch (Rearward) off |
- |
| Slide Front | Sliding switch signal (Forward) / ON or OFF | ON: Sliding switch (Forward) on
OFF: Sliding switch (Forward) off |
- |
- OK:
On intelligent tester screen, each item changes between ON and OFF according to above chart.
OK
(See pageGeneral>INTRODUCTION>HOW TO TROUBLESHOOT ECU CONTROLLED SYSTEMS>HOW TO PROCEED WITH TROUBLESHOOTING)
NG
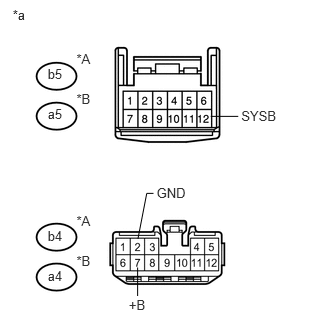
for LHD:
Disconnect the b4 and b5 switch connectors.
for RHD:
Disconnect the a4 and a5 switch connectors.
Measure the voltage according to the value(s) in the table below.
- Standard Voltage:
for LHD Tester Connection Condition Specified Condition b4-7 (+B) - Body ground Always 11 to 14 V b5-12 (SYSB) - Body ground Always 11 to 14 V
for RHD Tester Connection Condition Specified Condition a4-7 (+B) - Body ground Always 11 to 14 V a5-12 (SYSB) - Body ground Always 11 to 14 V
Measure the resistance according to the value(s) in the table below.
- Standard Resistance:
for LHD Tester Connection Condition Specified Condition b4-2 (GND) - Body ground Always Below 1 Ω
for RHD Tester Connection Condition Specified Condition a4-2 (GND) - Body ground Always Below 1 Ω
| *A | for LHD |
| *B | for RHD |
| *a | Front view of wire harness connector
(to Front Power Seat Switch) |
OK
NG