SEAT REAR NO. 1 SEAT ASSEMBLY(for 60/40 Split Slide Walk-in Seat Type RH Side) REASSEMBLY
CAUTION / NOTICE / HINT
- CAUTION:
-
Wear protective gloves. Sharp areas on the parts may injure your hands.
- HINT:
- ·
Use the same procedure for RHD and LHD vehicles.
·The procedure listed below is for LHD vehicles.
·A bolt without a torque specification is shown in the standard bolt chart (See page General>SPECIFICATIONS>STANDARD BOLT>SPECIFIED TORQUE FOR STANDARD BOLTS).
PROCEDURE

 72173A
1.INSTALL REAR SEAT TRACK ADJUSTING HANDLE RH
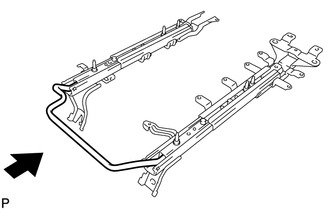
Install the rear seat track adjusting handle RH.
- HINT:
-
Make sure the rear seat track adjusting handle RH is straight when installing it, and check that it is centered.
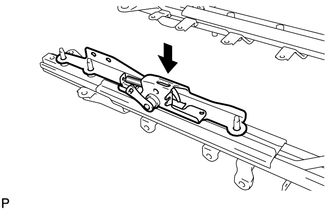
Install the seat cushion side frame sub-assembly RH.
71015A
2.INSTALL REAR SEAT CUSHION FRAME SUB-ASSEMBLY RH
Install the rear seat cushion frame sub-assembly RH and No. 1 seat leg plate with the 6 nuts.
- Torque:
- 32 N*m (326 kgf*cm, 24 ft.*lbf)
71461
3.INSTALL REAR SEAT CUSHION SPRING
Attach the 2 hooks to install the rear seat cushion spring.
72995A
4.INSTALL REAR SEAT COVER
Install the rear seat cover with the screw.
71017
5.INSTALL REAR SEATBACK FRAME SUB-ASSEMBLY RH
Temporarily install the rear seatback frame sub-assembly RH with the 4 "TORX" bolts.
Using a T45 "TORX" socket wrench, tighten the 4 "TORX" bolts.
- Torque:
- 42 N*m (428 kgf*cm, 31 ft.*lbf)
72631
6.INSTALL REAR SEATBACK LOCK PLATE LH
Install the rear seatback lock plate LH with the nut.
- Torque:
- 18 N*m (184 kgf*cm, 13 ft.*lbf)
Attach the 2 cable clamps and connect the cable.
71246A
7.INSTALL REAR SEAT CUSHION SET PLATE
Install the rear seat cushion set plate with the 2 nuts.
- Torque:
- 18 N*m (184 kgf*cm, 13 ft.*lbf)
82193
8.INSTALL REAR SEAT WIRE RH (w/ Seat Heater System)
Attach the clamp to install the rear seat wire RH to the rear seat cushion frame sub-assembly RH.
Attach the claw to connect the rear seat wire connector to the rear seat upper track rail sub-assembly RH.
87501D
9.INSTALL SEAT HEATER CONTROL SUB-ASSEMBLY (w/ Seat Heater System)
72704B
10.INSTALL REAR NO. 2 SEAT RECLINING CONTROL CABLE
Install the rear No. 2 seat reclining control cable.
Attach the cable clamp and connect the rear No. 2 seat reclining control cable.
72704A
11.INSTALL REAR SEAT RECLINING CONTROL CABLE
Install the rear seat reclining control cable.
Attach the 2 cable clamps and connect the rear seat reclining control cable.
Install 3 new cable ties.
71499D
12.INSTALL REAR SEATBACK SPRING DAMPER (w/ Dynamic Damper)
Install the rear seatback spring damper with the 2 nuts.
- Torque:
- 19 N*m (194 kgf*cm, 14 ft.*lbf)
71499C
13.INSTALL REAR SEAT CUSHION SPRING DAMPER
Install the rear seat cushion spring damper with the 2 nuts.
- Torque:
- 19 N*m (194 kgf*cm, 14 ft.*lbf)
71875E
14.INSTALL RECLINING ADJUSTER INSIDE COVER RH
Attach the claw and guide to install the reclining adjuster inside cover RH.
71876C
15.INSTALL RECLINING ADJUSTER INSIDE COVER RH
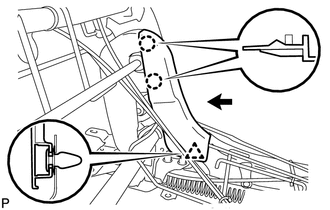
Move the reclining adjuster inside cover RH in the direction of the arrow to attach the 2 claws.
Attach the clip to install the reclining adjuster inside cover RH.
71875J
16.INSTALL RECLINING ADJUSTER INSIDE COVER RH
Attach the 2 claws to install the reclining adjuster inside cover RH.
Install the 2 screws.
71879C
17.INSTALL REAR SEAT INNER RECLINING COVER RH
Attach the guide and install the rear seat inner reclining cover RH with the 2 screws.
71697
18.INSTALL REAR SEATBACK EDGE PROTECTOR
Install the rear seatback edge protector to the rear seatback frame sub-assembly RH.
87510Q
19.INSTALL REAR SEATBACK HEATER ASSEMBLY (w/ Seat Heater System)
71077S
20.INSTALL SEPARATE TYPE REAR SEATBACK COVER
Set the separate type rear seatback cover in place.
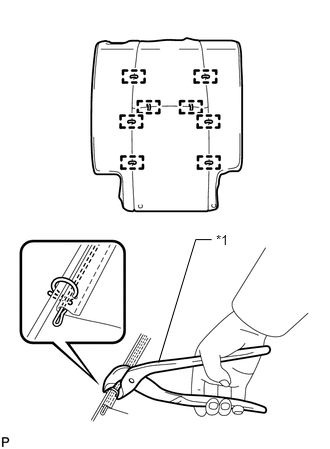
Using hog ring pliers, install the separate type rear seatback cover to the separate type rear seatback pad with 8 new hog rings.
| *1 | Hog Ring Pliers |
- NOTICE:
- ·
Be careful not to damage the separate type rear seatback cover.
·Be sure to securely install the hog rings as shown in the illustration while preventing wrinkles from forming on the separate type rear seatback cover.
w/ Seat Heater System:
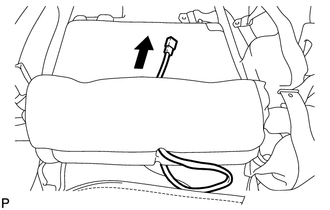
Connect the rear seatback heater assembly wire harness to the separate type rear seatback pad.
21.INSTALL SEATBACK COVER WITH PAD
w/ Seat Heater System:
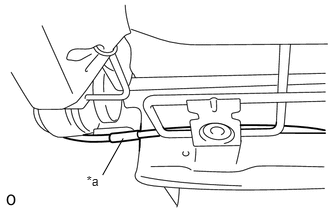
Install the wire harness as shown in the illustration.
| *a | Paint Mark |
Attach the hooks.
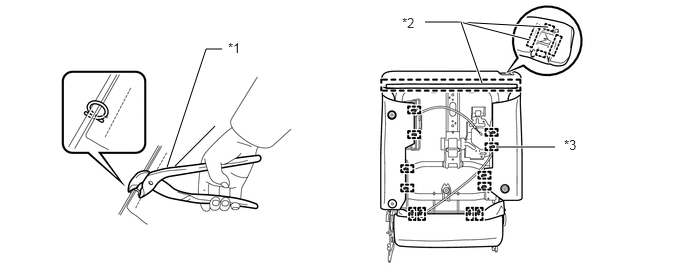
| *1 | Hog Ring Pliers |
| *2 | Hook |
| *3 | Hog Ring |
Using hog ring pliers, install the seatback cover with pad with 14 new hog rings.
- NOTICE:
- ·
Be careful not to damage the separate type rear seatback cover.
·Be sure to securely install the hog rings as shown in the illustration while preventing wrinkles from forming on the separate type rear seatback cover.
71931B
22.INSTALL REAR NO. 1 SEAT HEADREST SUPPORT ASSEMBLY
Attach the 4 claws to install the 2 rear No. 1 seat headrest support assemblies.
71880A
23.INSTALL REAR SEATBACK BOARD CARPET ASSEMBLY RH
Attach the 7 clips to install the rear seatback board carpet assembly RH.
72996A
24.INSTALL REAR SEATBACK COVER
Attach the 4 claws to install the rear seatback cover.
72067A
25.INSTALL REAR CENTER BACK LOCK CONTROL LEVER
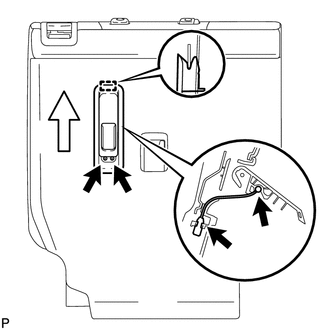
Attach the cable clamp to connect the cable to the rear center back lock control lever.
Move the rear center back lock control lever in the direction of the arrow to attach the guide.
Install the rear center back lock control lever with the 2 screws.
71845C
26.INSTALL REAR SEAT COVER CAP
Attach the guide and claw to install the rear seat cover cap.
72057
27.INSTALL REAR SEAT LOCK CONTROL LEVER SUB-ASSEMBLY RH
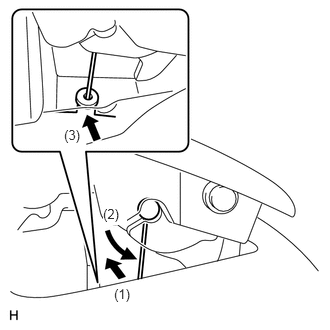
Connect the cable in the order shown in the illustration to install the rear seat lock control lever sub-assembly RH.
Install the 2 screws.
72572B
28.INSTALL RECLINING ADJUSTER KNOB CAP RH
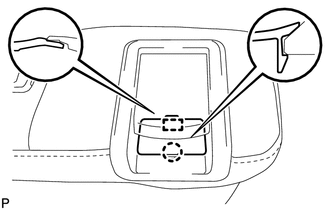
Attach the guide and claw to install the reclining adjuster knob cap RH.
87510P
29.INSTALL REAR SEAT CUSHION HEATER ASSEMBLY (w/ Seat Heater System)
71075S
30.INSTALL SEPARATE TYPE REAR SEAT CUSHION COVER
Set the separate type rear seat cushion cover in place.
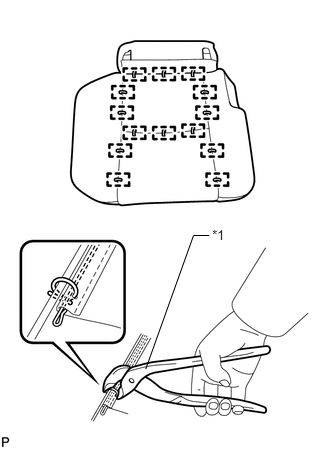
Using hog ring pliers, install the separate type rear seat cushion cover to the separate type rear seat cushion pad with 14 new hog rings.
| *1 | Hog Ring Pliers |
- NOTICE:
- ·
Be careful not to damage the separate type rear seat cushion cover.
·Be sure to securely install the hog rings as shown in the illustration while preventing wrinkles from forming on the separate type rear seat cushion cover.
71647
31.INSTALL REAR SEAT CUSHION EDGE PROTECTOR
Install the rear seat cushion edge protector to the cushion spring.
71696
32.INSTALL REAR NO. 2 SEAT PROTECTOR
Install the 2 rear No. 2 seat protectors to the separate type rear seat cushion pad.
33.INSTALL SEAT CUSHION COVER WITH PAD
w/ Seat Heater System:
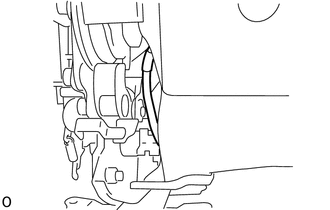
Pass the wire harness as shown in the illustration.
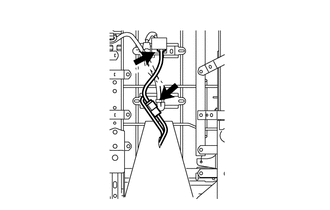
Connect the 2 rear seat heater connectors.
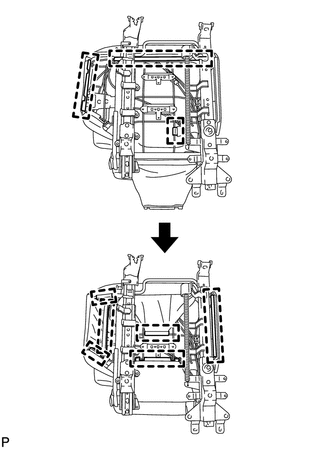
Attach the hooks to install the seat cushion cover with pad.
72615A
34.INSTALL REAR SEATBACK LOCK STRIKER COVER RH
Attach the 3 clips to install the rear seatback lock striker cover RH.
73390A
35.INSTALL REAR SEAT INNER BELT ASSEMBLY
73380C
36.INSTALL REAR NO. 1 SEAT INNER BELT ASSEMBLY RH
71829B
37.INSTALL REAR SEAT REAR CUSHION MOULDING LH
Attach the 2 guides and 3 claws to install the rear seat rear cushion moulding LH.
Install the screw.
71825B
38.INSTALL REAR SEAT CUSHION MOULDING RH
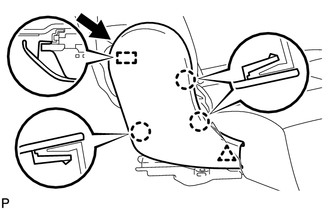
Move the rear seat cushion moulding RH in the direction of the arrow to attach the guide and install the rear seat cushion moulding RH.
Attach the 3 claws and clip to install the rear seat cushion moulding RH.
72525B
39.INSTALL RECLINING ADJUSTER RELEASE HANDLE RH
Install the reclining adjuster release handle RH with the 3 screws.
71845A
40.INSTALL REAR SEAT UPPER RECLINING COVER RH
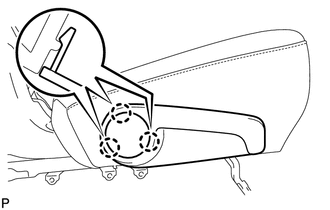
Attach the 3 claws to install the rear seat upper reclining cover RH.