SEAT BELT FRONT SEAT OUTER BELT ASSEMBLY(for 5 Door) INSTALLATION
CAUTION / NOTICE / HINT
- HINT:
- ·
Use the same procedure for the RH and LH sides.
·The procedure listed below is for the LH side.
·A bolt without a torque specification is shown in the standard bolt chart (See page General>SPECIFICATIONS>STANDARD BOLT>SPECIFIED TORQUE FOR STANDARD BOLTS).
PROCEDURE

 73024
1.INSTALL FRONT SHOULDER BELT ANCHOR PLATE SUB-ASSEMBLY LH
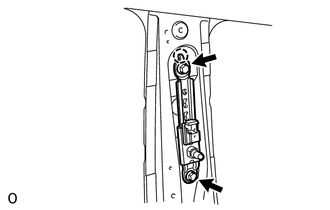
Align the claw with the anchor plate positioning hole, and install the anchor plate with the 2 bolts.
- Torque:
- 42 N*m (428 kgf*cm, 31 ft.*lbf)
- HINT:
-
First install the lower bolt, and then install the upper bolt.
73220
2.INSTALL FRONT SEAT OUTER BELT ASSEMBLY LH
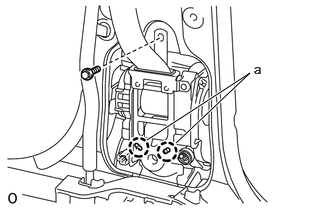
- NOTICE:
-
When installing the retractor, make sure the 2 claws of the vehicle (labeled "a" in the illustration) only contact the installation areas of the retractor.
Align the seat belt retractor positioning holes with the 2 claws of the vehicle.
Install the seat belt with the bolt.
- Torque:
- 8.5 N*m (87 kgf*cm, 75 in.*lbf)
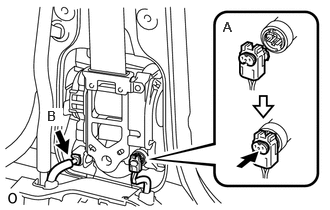
Connect the pretensioner connector labeled A as shown in the illustration.
w/ Pre-Crash Safety System:
Connect the pre-crash safety connector labeled B.
Install the shoulder anchor to the shoulder belt anchor adjuster with the nut.
- Torque:
- 42 N*m (428 kgf*cm, 31 ft.*lbf)
62412
3.INSTALL CENTER PILLAR GARNISH LH
74611G
4.INSTALL NO. 2 ASSIST GRIP
74638
5.INSTALL NO. 2 ASSIST GRIP PLUG LH
62414A
6.INSTALL LOWER CENTER PILLAR GARNISH LH
Attach the 4 claws and 2 clips to install the lower center pillar garnish.
Install the front seat outer belt floor anchor with the bolt.
- Torque:
- 42 N*m (428 kgf*cm, 31 ft.*lbf)
73233
7.INSTALL OUTER LAP BELT ANCHOR COVER
62332C
8.INSTALL REAR DOOR OPENING TRIM WEATHERSTRIP LH
67918D
9.INSTALL REAR DOOR SCUFF PLATE LH
67934
10.INSTALL QUARTER SCUFF PLATE LH (w/ Rear No. 2 Seat)
58371F
11.INSTALL REAR NO. 1 FLOOR STEP COVER (w/ Rear No. 2 Seat)
62312B
12.INSTALL FRONT DOOR OPENING TRIM WEATHERSTRIP LH
67920
13.INSTALL DOOR SCUFF PLATE ASSEMBLY LH
14.CONNECT CABLE TO NEGATIVE BATTERY TERMINAL
- NOTICE:
-
When disconnecting the cable, some systems need to be initialized after the cable is reconnected (See page General>INTRODUCTION>REPAIR INSTRUCTION>INITIALIZATION).
15.CHECK SRS WARNING LIGHT
Check the SRS warning light (See page Vehicle Interior>SUPPLEMENTAL RESTRAINT SYSTEMS>AIRBAG SYSTEM>DIAGNOSIS SYSTEM).