INTERIOR PANELS / TRIM ROOF HEADLINING(for 5 Door) INSTALLATION
CAUTION / NOTICE / HINT
- HINT:
- ·
Use the same procedure for RHD and LHD vehicles.
·The procedure listed below is for LHD vehicles.
·A bolt without a torque specification is shown in the standard bolt chart (See page General>SPECIFICATIONS>STANDARD BOLT>SPECIFIED TORQUE FOR STANDARD BOLTS).
PROCEDURE

 66426B
1.INSTALL REAR NO. 3 SIDE RAIL SPACER LH
Attach the 2 claws to install the rear No. 3 side rail spacer.
66416
2.INSTALL REAR NO. 3 SIDE RAIL SPACER RH
- HINT:
-
Use the same procedure described for the LH side.
66425A
3.INSTALL REAR NO. 2 SIDE RAIL SPACER LH (w/o Curtain Shield Airbag)
Attach the 2 claws to install the rear No. 2 side rail spacer.
66415A
4.INSTALL REAR NO. 2 SIDE RAIL SPACER RH (w/o Curtain Shield Airbag)
- HINT:
-
Use the same procedure described for the LH side.
66424
5.INSTALL REAR SIDE RAIL SPACER LH (w/o Curtain Shield Airbag)
Attach the 2 claws to install the rear side rail spacer.
66414A
6.INSTALL REAR SIDE RAIL SPACER RH (w/o Curtain Shield Airbag)
- HINT:
-
Use the same procedure described for the LH side.
64715C
7.INSTALL DECK SIDE TRIM COVER LH
Attach the 3 claws and 2 guides to install the deck side trim cover.
64766B
8.INSTALL QUARTER TRIM JACK COVER
Attach the 3 claws and 2 guides to install the quarter trim jack cover.
62627B
9.INSTALL QUARTER TRIM COVER
- HINT:
-
Use the same procedure for the other quarter trim cover.
Attach the 2 claws to install the quarter trim cover.
73372
10.INSTALL REAR SEAT SHOULDER BELT HANGER LH
Attach the claw and guide to install the rear seat shoulder belt hanger.
73371
11.INSTALL REAR SEAT SHOULDER BELT HANGER RH
- HINT:
-
Use the same procedure described for the LH side.
62477A
12.INSTALL ROOF SIDE INNER GARNISH CAP LH (w/o Rear No. 2 Seat)
Attach the 4 claws and 2 guides to install the roof side inner garnish cap.
62476A
13.INSTALL ROOF SIDE INNER GARNISH CAP RH (w/o Rear No. 2 Seat)
- HINT:
-
Use the same procedure described for the LH side.
73034
14.INSTALL REAR SHOULDER BELT ANCHOR PLATE SUB-ASSEMBLY LH
Attach the 6 claws to install the rear belt anchor plate.
73033
15.INSTALL REAR SHOULDER BELT ANCHOR PLATE SUB-ASSEMBLY RH
- HINT:
-
Use the same procedure described for the LH side.
73024
16.INSTALL FRONT SHOULDER BELT ANCHOR PLATE SUB-ASSEMBLY LH
Attach the 5 claws to install the front belt anchor plate.
73023
17.INSTALL FRONT SHOULDER BELT ANCHOR PLATE SUB-ASSEMBLY RH
- HINT:
-
Use the same procedure described for the LH side.
63310
18.INSTALL ROOF HEADLINING ASSEMBLY
Place the roof headlining into the vehicle through the back door.
- NOTICE:
-
Be careful not to damage the roof headlining when placing it in the cabin.
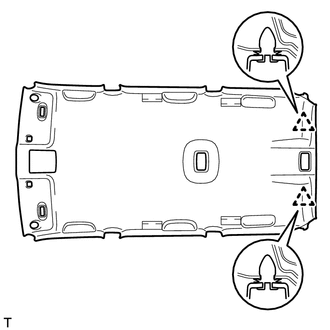
w/o Sliding Roof:
Attach the 2 clips to install the roof headlining.
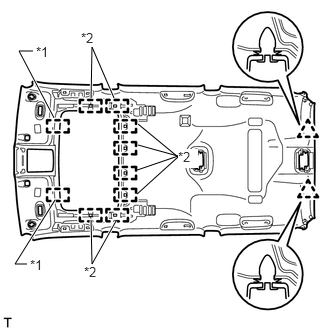
w/ Sliding Roof:
Attach the 2 clips, 2 guides and 8 fasteners to install the roof headlining.
| *1 | Guide |
| *2 | Fastener |
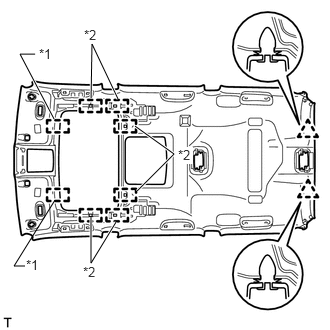
w/ Rear Seat Entertainment System:
Attach the 2 clips, 2 guides and 6 fasteners to install the roof headlining.
| *1 | Guide |
| *2 | Fastener |
w/ Rear Seat Entertainment System:
Connect the 2 connectors.
Connect the connector and attach the 3 clamps to the rear pillar RH.
Connect the 2 connectors and attach the clamp to the rear pillar LH.
Connect the 2 connectors and attach the 3 clamps to the front pillar RH.
Install the bolt.
Connect the 2 connectors and attach the 3 clamps to the front pillar LH.
w/ Digital Audio Broadcasting Antenna:
Connect the connector and attach the wire harness clamp.
w/ Sliding Roof
Connect the drive gear connector.
w/ Rain Sensor:
Connect the rain sensor connector.
w/ EC Mirror:
Connect the inner mirror connector.
86160T
19.INSTALL REAR HEADER SPEAKER ASSEMBLY (w/ Rear Air Conditioning System)
87217D
20.INSTALL REAR SIDE NO. 1 AIR DUCT (w/ Rear Air Conditioning System)
62432B
21.INSTALL NO. 1 ROOF SIDE RAIL GARNISH LH
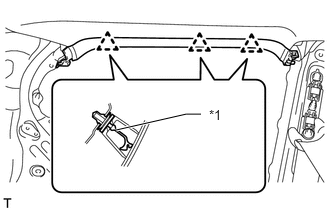
Install 3 new clips to the No. 1 roof side rail garnish LH.
| *1 | New Clip |
Attach the 3 clips to install the No. 1 roof side rail garnish LH.
62431B
22.INSTALL NO. 1 ROOF SIDE RAIL GARNISH RH
- HINT:
-
Use the same procedure described for the LH side.
86295
23.INSTALL TELEVISION BASE (w/ Rear Seat Entertainment System)
81240D
24.INSTALL NO. 2 ROOM LIGHT ASSEMBLY
Install the No. 1 room light assembly (See page Vehicle Interior>LIGHTING (INT)>ROOM LIGHT(for Rear)>INSTALLATION).
81240
25.INSTALL NO. 1 ROOM LIGHT ASSEMBLY
Install the No. 2 room light assembly (See page Vehicle Interior>LIGHTING (INT)>ROOM LIGHT(for Center)>INSTALLATION).
87834
26.INSTALL INNER REAR VIEW MIRROR STAY HOLDER COVER (w/ EC Mirror)
89943
27.INSTALL RAIN SENSOR COVER (w/ Rain Sensor)
81260A
28.INSTALL MAP LIGHT ASSEMBLY
74348
29.INSTALL VISOR HOLDER
- HINT:
-
Use the same procedure for the other visor holder.
Attach the 2 claws.
Push in the visor holder to install it.
74320
30.INSTALL VISOR ASSEMBLY LH
Install the visor with the 2 screws.
74310
31.INSTALL VISOR ASSEMBLY RH
- HINT:
-
Use the same procedure described for the LH side.
74318
32.INSTALL VISOR BRACKET COVER LH
- HINT:
-
Use the same procedure for the other visor bracket cover.
Attach the 4 claws to install the visor bracket cover.
74317
33.INSTALL VISOR BRACKET COVER RH
- HINT:
-
Use the same procedure described for the LH side.
74611B
34.INSTALL ASSIST GRIP (w/ Rear No. 2 Seat)
- HINT:
-
Use the same procedure for the other assist grip.
Install the assist grip with the 2 bolts.
Attach the 4 claws to close the 2 covers.
74610U
35.INSTALL REAR ASSIST GRIP ASSEMBLY LH
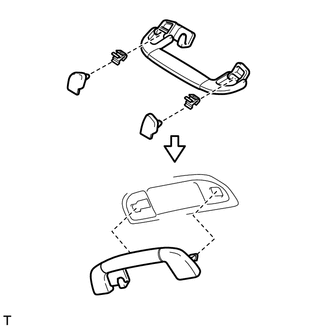
Assemble the assist grip, 2 clips and 2 covers as shown in the illustration.
Install the assist grip.
74610V
36.INSTALL REAR ASSIST GRIP ASSEMBLY RH
- HINT:
-
Use the same procedure described for the LH side.
74610A
37.INSTALL ASSIST GRIP SUB-ASSEMBLY
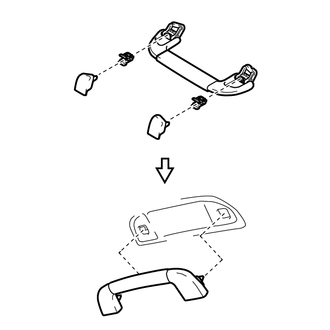
Assemble the assist grip, 2 clips and 2 covers as shown in the illustration.
Install the assist grip.
62640P
38.INSTALL REAR QUARTER TRIM PANEL ASSEMBLY LH
w/ Rear No. 2 Seat:
Attach the 4 clips and 2 guides and pass the rear No. 2 seat outer belt floor anchor through the rear quarter trim panel.
Attach the 7 clips and 2 guides to install the rear quarter trim panel.
62630P
39.INSTALL REAR QUARTER TRIM PANEL ASSEMBLY RH
- HINT:
-
Use the same procedure described for the LH side.
62520P
40.INSTALL FRONT QUARTER TRIM PANEL ASSEMBLY LH
Pass the rear No. 1 seat outer belt floor anchor through the front quarter trim panel.
Attach the 2 clips and 2 guides to install the front quarter trim panel.
62510P
41.INSTALL FRONT QUARTER TRIM PANEL ASSEMBLY RH
- HINT:
-
Use the same procedure described for the LH side.
64740C
42.INSTALL DECK TRIM SIDE PANEL ASSEMBLY LH
w/o Rear No. 2 Seat:
Pass the rear seatback lock control lever base through the deck trim side panel.
Attach the 5 clips and 8 claws to install the deck trim side panel.
Install the 4 bolts and 2 screws.
Attach the 6 claws and 2 guides to install the rear seatback lock control lever base to the deck trim side panel.
Install the rear No. 1 seat outer belt floor anchor with the bolt.
- Torque:
- 42 N*m (428 kgf*cm, 31 ft.*lbf)
w/ Rear No. 2 Seat:
Attach the 4 clips and 8 claws to install the deck trim side panel.
Install the 2 bolts and 2 screws.
Install the rear No. 2 seat outer belt floor anchor with the bolt.
- Torque:
- 42 N*m (428 kgf*cm, 31 ft.*lbf)
Install the rear No. 1 seat outer belt floor anchor with the bolt.
- Torque:
- 42 N*m (428 kgf*cm, 31 ft.*lbf)
64730B
43.INSTALL DECK TRIM SIDE PANEL ASSEMBLY RH
w/o Rear No. 2 Seat:
Connect each connector.
Pass the rear seatback lock control lever base through the deck trim side panel.
Attach the 5 clips and 8 claws to install the deck trim side panel.
Install the 4 bolts and screw.
Attach the 6 claws and 2 guides to install the rear seatback lock control lever base to the deck trim side panel.
Install the rear No. 1 seat outer belt floor anchor with the bolt.
- Torque:
- 42 N*m (428 kgf*cm, 31 ft.*lbf)
w/ Rear No. 2 Seat:
Connect each connector.
Attach the 4 clips and 8 claws to install the deck trim side panel.
Install the 2 bolts and screw.
Install the rear No. 2 seat outer belt floor anchor with the bolt.
- Torque:
- 42 N*m (428 kgf*cm, 31 ft.*lbf)
Install the rear No. 1 seat outer belt floor anchor with the bolt.
- Torque:
- 42 N*m (428 kgf*cm, 31 ft.*lbf)
74603C
44.INSTALL ASSIST GRIP SUB-ASSEMBLY (w/ Rear No. 2 Seat)
- HINT:
-
Use the same procedure for the other assist grip.
Install the assist grip with the 2 bolts.
74617A
45.INSTALL ASSIST GRIP PLUG (w/ Rear No. 2 Seat)
- HINT:
-
Use the same procedure for all assist grip plugs.
Attach the 2 claws to install the assist grip plug.
64712F
46.INSTALL FRONT DECK SIDE TRIM COVER (w/ Tonneau Cover)
- HINT:
-
Use the same procedure for the other front deck side trim cover.
Attach the 2 claws to install the front deck side trim cover
64937A
47.INSTALL NO. 1 TONNEAU COVER HOLDER CAP (w/o Tonneau Cover)
- HINT:
-
Use the same procedure for the other No. 1 tonneau cover holder cap.
Attach the 2 claws to install the No. 1 tonneau cover holder cap.
64725D
48.INSTALL NO. 1 LUGGAGE COMPARTMENT TRIM HOOK
- HINT:
-
Use the same procedure for the other No. 1 luggage compartment trim hook.
Install the No. 1 luggage compartment trim hook by turning it clockwise.
73233A
49.INSTALL REAR NO. 1 SEAT OUTER LAP BELT ANCHOR COVER
- HINT:
-
Use the same procedure for the other rear No. 1 seat outer lap belt anchor cover.
Attach the 3 claws to install the rear No. 1 seat outer lap belt anchor cover.
58570C
50.INSTALL REAR FLOOR CARPET ASSEMBLY (w/o Rear No. 2 Seat)
Attach the 4 claws to install the rear floor carpet.
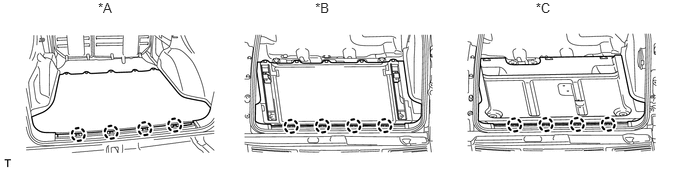
| *A | w/o Deck Rail | *B | w/ Deck Rail |
| *C | for Face to Face Seat Type | - | - |
57412C
51.INSTALL FLOOR SIDE RAIL LH (w/ Deck Rail)
Install the floor side rail with the 3 bolts.
57411D
52.INSTALL FLOOR SIDE RAIL RH (w/ Deck Rail)
- HINT:
-
Use the same procedure described for the LH side.
58574A
53.INSTALL REAR FLOOR MAT REAR SUPPORT PLATE (w/o Rear No. 2 Seat)
Attach the 5 clips and 4 claws to install the rear floor mat rear support plate.
58401A
54.INSTALL NO. 1 DECK BOARD SUB-ASSEMBLY (w/o Rear No. 2 Seat)
Attach the clip to install the No. 1 deck board.
64717A
55.INSTALL FRONT LUGGAGE COMPARTMENT TRIM COVER (w/o Rear No. 2 Seat)
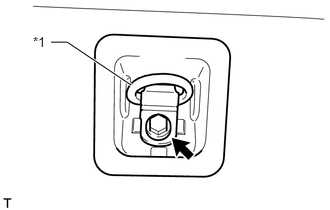
- HINT:
-
Use the same procedure for the other front luggage compartment trim cover.
Install the luggage hold belt striker and front luggage compartment trim cover with the bolt.
| *1 | Luggage Hold Belt Striker |
Attach the 4 claws to install the cap.
64910M
56.INSTALL TONNEAU COVER ASSEMBLY (w/ Tonneau Cover)
Install the tonneau cover.
62412
57.INSTALL CENTER PILLAR GARNISH LH
Pass the front seat outer belt floor anchor through the center pillar garnish.
Attach the 2 clips and 2 guides to install the center pillar garnish.
Install the bolt.
62411
58.INSTALL CENTER PILLAR GARNISH RH
- HINT:
-
Use the same procedure described for the LH side.
74611G
59.INSTALL NO. 2 ASSIST GRIP
- HINT:
-
Use the same procedure for the other No. 2 assist grip.
Attach the 2 claws to install the No. 2 assist grip.
Install the 2 bolts.
74638
60.INSTALL NO. 2 ASSIST GRIP PLUG LH
- HINT:
-
Use the same procedure for the other front No. 2 assist grip plug.
Attach the 2 claws to install the front No. 2 assist grip plug LH.
74637
61.INSTALL NO. 2 ASSIST GRIP PLUG RH
- HINT:
-
Use the same procedure described for the LH side.
62414A
62.INSTALL LOWER CENTER PILLAR GARNISH LH
Attach the 4 claws and 2 clips to install the lower center pillar garnish.
Install the front seat outer belt floor anchor with the bolt.
- Torque:
- 42 N*m (428 kgf*cm, 31 ft.*lbf)
62413A
63.INSTALL LOWER CENTER PILLAR GARNISH RH
- HINT:
-
Use the same procedure described for the LH side.
73233
64.INSTALL OUTER LAP BELT ANCHOR COVER
- HINT:
-
Use the same procedure for the other outer lap belt anchor cover.
Attach the 3 claws to install the outer lap belt anchor cover
62332C
65.INSTALL REAR DOOR OPENING TRIM WEATHERSTRIP LH
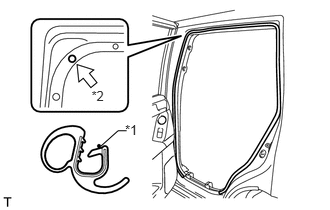
Align the paint mark on the rear door opening trim weatherstrip with the mark position on the vehicle and install the rear door opening trim weatherstrip as shown in the illustration.
| *1 | Paint Mark |
| *2 | Mark Position |
62331C
66.INSTALL REAR DOOR OPENING TRIM WEATHERSTRIP RH
- HINT:
-
Use the same procedure described for the LH side.
67918D
67.INSTALL REAR DOOR SCUFF PLATE LH
Attach the 3 clips, 6 claws and 2 guides to install the rear door scuff plate.
67917C
68.INSTALL REAR DOOR SCUFF PLATE RH
- HINT:
-
Use the same procedure described for the LH side.
67934
69.INSTALL QUARTER SCUFF PLATE LH (w/ Rear No. 2 Seat)
Install the quarter scuff plate with the 2 bolts.
67933
70.INSTALL QUARTER SCUFF PLATE RH (w/ Rear No. 2 Seat)
- HINT:
-
Use the same procedure described for the LH side.
58371F
71.INSTALL REAR NO. 1 FLOOR STEP COVER (w/ Rear No. 2 Seat)
- HINT:
-
Use the same procedure for all rear No. 1 floor step covers.
Attach the 2 claws to install the rear No. 1 floor step cover.
62212
72.INSTALL FRONT PILLAR GARNISH LH
Attach the 3 guides to install the front pillar garnish.
62211
73.INSTALL FRONT PILLAR GARNISH RH
- HINT:
-
Use the same procedure described for the LH side.
74611F
74.INSTALL NO. 1 ASSIST GRIP
- HINT:
-
Use the same procedure for the other No. 1 assist grip.
Attach the 2 claws to install the No. 1 assist grip.
Install the 2 bolts.
74616C
75.INSTALL FRONT NO. 1 ASSIST GRIP PLUG LH
- HINT:
-
Use the same procedure for the other front No. 1 assist grip plug.
Attach the 2 claws to install the front No. 1 assist grip plug.
74615E
76.INSTALL FRONT NO. 1 ASSIST GRIP PLUG RH
- HINT:
-
Use the same procedure described for the LH side.
62312B
77.INSTALL FRONT DOOR OPENING TRIM WEATHERSTRIP LH
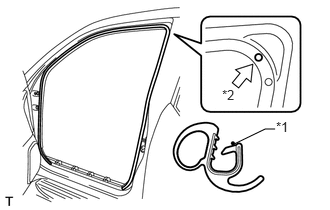
Align the paint mark on the front door opening trim weatherstrip with the mark position on the vehicle and install the front door opening trim weatherstrip as shown in the illustration.
| *1 | Paint Mark |
| *2 | Mark Position |
62311B
78.INSTALL FRONT DOOR OPENING TRIM WEATHERSTRIP RH
- HINT:
-
Use the same procedure described for the LH side.
62112
79.INSTALL COWL SIDE TRIM BOARD LH
Attach the clip and claw to install the cowl side trim board.
Install the clip.
62111C
80.INSTALL COWL SIDE TRIM BOARD RH
- HINT:
-
Use the same procedure described for the LH side.
67920
81.INSTALL DOOR SCUFF PLATE ASSEMBLY LH
Attach the 4 clips, 10 claws and 2 guides to install the door scuff plate.
67910
82.INSTALL DOOR SCUFF PLATE ASSEMBLY RH
- HINT:
-
Use the same procedure described for the LH side.
83.INSTALL REAR NO. 1 SEATBACK ASSEMBLY (w/ Rear No. 1 Seat)
for 60/40 Split Double-folding Seat Type LH Side:
Install the rear No. 1 seatback assembly (See page Vehicle Interior>SEAT>REAR NO. 1 SEAT ASSEMBLY (for 60/40 Split Double-folding Seat Type LH Side)>INSTALLATION).
for 60/40 Split Double-folding Seat Type RH Side:
Install the rear No. 1 seatback assembly (See page Vehicle Interior>SEAT>REAR NO. 1 SEAT ASSEMBLY (for 60/40 Split Double-folding Seat Type RH Side)>INSTALLATION).
84.INSTALL REAR NO. 1 SEAT ASSEMBLY (w/ Rear No. 1 Seat)
for 60/40 Split Slide Walk-in Seat Type LH Side:
Install the rear No. 1 seat assembly (See page Vehicle Interior>SEAT>REAR NO. 1 SEAT ASSEMBLY (for 60/40 Split Slide Walk-in Seat Type LH Side)>INSTALLATION).
for 60/40 Split Slide Walk-in Seat Type RH Side:
Install the rear No. 1 seat assembly (See page Vehicle Interior>SEAT>REAR NO. 1 SEAT ASSEMBLY (for 60/40 Split Slide Walk-in Seat Type RH Side)>INSTALLATION).
85.INSTALL REAR NO. 2 SEAT ASSEMBLY (w/ Rear No. 2 Seat)
for Manual Seat Type:
Install the rear No. 2 seat assembly (See page Vehicle Interior>SEAT>REAR NO. 2 SEAT ASSEMBLY (for Manual Seat Type LH Side)>INSTALLATION).
for Power Seat Type:
Install the rear No. 2 seat assembly (See page Vehicle Interior>SEAT>REAR NO. 2 SEAT ASSEMBLY (for Power Seat Type LH Side)>INSTALLATION).
for Face to Face Seat Type:
Install the rear No. 2 seat assembly (See page Vehicle Interior>SEAT>REAR NO. 2 SEAT ASSEMBLY(for Face to Face Seat Type)>INSTALLATION).
86.CONNECT CABLE TO NEGATIVE BATTERY TERMINAL
- NOTICE:
-
When disconnecting the cable, some systems need to be initialized after the cable is reconnected (See page General>INTRODUCTION>REPAIR INSTRUCTION>INITIALIZATION).