HEATING / AIR CONDITIONING CONDENSER FAN INSTALLATION
CAUTION / NOTICE / HINT
- HINT:
-
A bolt without a torque specification is shown in the standard bolt chart.
-
Click hereGeneral>SPECIFICATIONS>STANDARD BOLT>SPECIFIED TORQUE FOR STANDARD BOLTS
PROCEDURE

 88590
1.INSTALL SHROUD BLOWER ASSEMBLY
Install the shroud blower assembly with the bolt.
- Torque:
- 5.4 N*m (55 kgf*cm, 48 in.*lbf)
Connect the connector.
88710
2.INSTALL AIR CONDITIONING TUBE ASSEMBLY
Remove the attached vinyl tape from the air conditioning tube assembly.
Sufficiently apply compressor oil to a new O-ring and the fitting surface of the cooler condenser assembly.
- Compressor oil:
ND-OIL 8 or equivalent
Install the O-ring to the air conditioning tube assembly.
Attach the clamp to install the air conditioning tube assembly.
Install the 2 bolts.
- Torque:
- 5.4 N*m (55 kgf*cm, 48 in.*lbf)
Connect the connector.
53209B
3.INSTALL HOOD LOCK SUPPORT BRACE SUB-ASSEMBLY
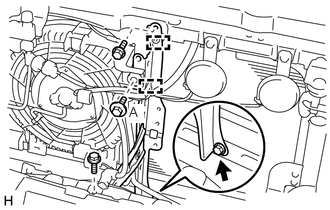
Install the hood lock support brace sub-assembly with the 4 bolts.
- Torque:
- Bolt A : 5.4 N*m (55 kgf*cm, 48 in.*lbf)
Attach the each clamp.
53510
4.INSTALL HOOD LOCK ASSEMBLY
for LHD:
Install the hood lock assembly (See page Vehicle Exterior>DOOR / HATCH>HOOD LOCK CONTROL CABLE ASSEMBLY>INSTALLATION).
for RHD:
Install the hood lock assembly (See page Vehicle Exterior>DOOR / HATCH>HOOD LOCK CONTROL CABLE ASSEMBLY>INSTALLATION).
53525
5.INSTALL HOOD LOCK RELEASE LEVER PROTECTOR
88211B
6.INSTALL MILLIMETER WAVE RADAR SENSOR ASSEMBLY (w/ Dynamic Radar Cruise Control System)
53111
7.INSTALL RADIATOR GRILLE
8.CHARGE REFRIGERANT
9.WARM UP ENGINE
10.CHECK FOR REFRIGERANT GAS LEAK
88211B
11.ADJUST MILLIMETER WAVE RADAR SENSOR ASSEMBLY (w/ Dynamic Radar Cruise Control System)
53292A
12.INSTALL UPPER RADIATOR SUPPORT SEAL