INTERIOR PANELS / TRIM FRONT CONSOLE BOX(for Manual Transmission) REMOVAL
CAUTION / NOTICE / HINT
- HINT:
- ·
Use the same procedure for RHD and LHD vehicles.
·The procedure listed below is for LHD vehicles.
PROCEDURE

 84010A
1.REMOVE INTEGRATION CONTROL AND PANEL ASSEMBLY
55436A
2.REMOVE INSTRUMENT PANEL FINISH PANEL END LH
55449C
3.REMOVE NO. 2 INSTRUMENT PANEL FINISH PANEL CUSHION
55435A
4.REMOVE INSTRUMENT PANEL FINISH PANEL END RH
55448A
5.REMOVE NO. 1 INSTRUMENT PANEL FINISH PANEL CUSHION
- HINT:
-
Use the same procedure described for the No. 2 instrument panel finish panel cushion.
58831A
6.REMOVE FRONT CONSOLE UPPER PANEL GARNISH
w/o Seat Heater System:
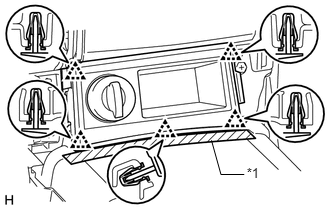
Put protective tape around the front console upper panel garnish.
| *1 | Protective Tape |
Detach the 5 clips and remove the front console upper panel garnish.
Disconnect the connector.
w/o Seat Heater System:
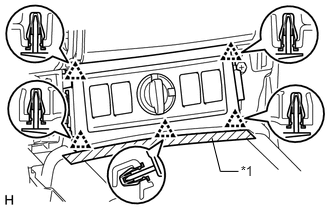
Put protective tape around the front console upper panel garnish.
| *1 | Protective Tape |
Detach the 5 clips and remove the front console upper panel garnish.
Disconnect each connector.
w/ Climate Control Seat System:
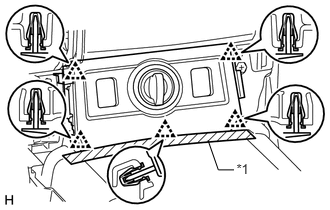
Put protective tape around the front console upper panel garnish.
| *1 | Protective Tape |
Detach the 5 clips and remove the front console upper panel garnish.
Disconnect each connector.
55606
7.REMOVE NO. 1 INSTRUMENT PANEL UNDER COVER SUB-ASSEMBLY
58816B
8.REMOVE FRONT NO. 1 CONSOLE BOX INSERT
55607
9.REMOVE NO. 2 INSTRUMENT PANEL UNDER COVER SUB-ASSEMBLY
58817A
10.REMOVE FRONT NO. 2 CONSOLE BOX INSERT
33504F
11.REMOVE SHIFT LEVER KNOB SUB-ASSEMBLY
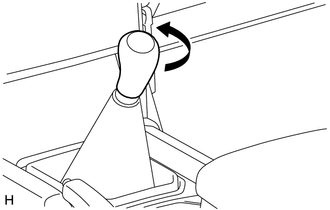
Twist the shift lever knob in the direction indicated by the arrow and remove it.
12.REMOVE CONSOLE PANEL SUB-ASSEMBLY
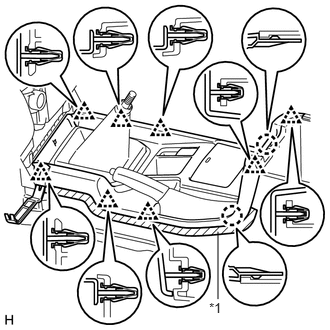
Put protective tape around the console panel.
| *1 | Protective Tape |
Using a moulding remover, detach the 8 clips and 2 claws.
Disconnect each connector and remove the console panel.
55084E
13.REMOVE NO. 1 HEATER TO REGISTER DUCT SUB-ASSEMBLY (w/ Cool Box)
58861B
14.REMOVE NO. 1 CONSOLE BOX DUCT (for Single Air Conditioning System)
58903A
15.REMOVE REAR CONSOLE END PANEL SUB-ASSEMBLY
58910C
16.REMOVE REAR CONSOLE BOX ASSEMBLY
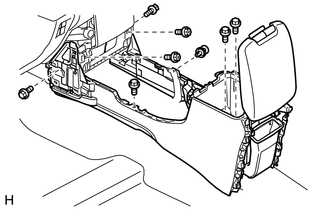
Remove the 2 screws, clip and 5 bolts.
Disconnect each connector and remove the rear console box.