MIRROR (EXT) OUTER REAR VIEW MIRROR REASSEMBLY
CAUTION / NOTICE / HINT
- HINT:
- ·
Use the same procedure for the RH and LH sides.
·The procedure listed below is for the LH side.
·w/ Side Monitor System:
When installing only the side television camera assembly, refer to TELEVISION CAMERA (for Side) (See page Audio / Visual / Telematics>PARK ASSIST / MONITORING>TELEVISION CAMERA (for Side)>INSTALLATION).
PROCEDURE

 86790C
1.INSTALL SIDE TELEVISION CAMERA ASSEMBLY (w/ Side Monitor System)
Install the side television camera assembly (See page Audio / Visual / Telematics>PARK ASSIST / MONITORING>TELEVISION CAMERA (for Side)>INSTALLATION).
87966
2.INSTALL OUTER MIRROR RETRACTOR LH
Attach the 6 claws to install the 2 support springs, and then install the 2 screws.
Attach the claw to install the wire clip.
Install the actuator sub-assembly.
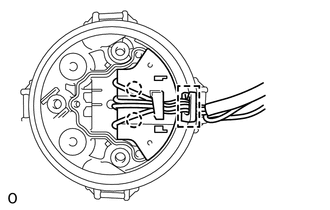
Attach the 2 claws to connect the connector of a new wire harness sub-assembly.
Install the actuator sub-assembly with the 3 screws.
Install the wire harness sub-assembly.
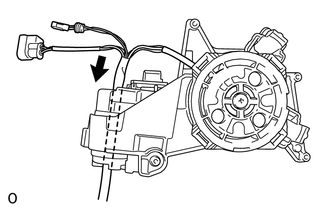
Pass the wire harness sub-assembly through the hole in the top of the support sub-assembly in the direction indicated by the arrow in the illustration.
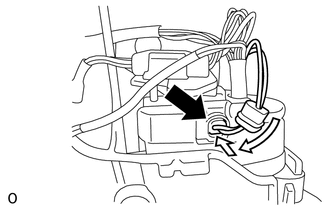
Connect the connector and slide the cover as shown in the illustration.
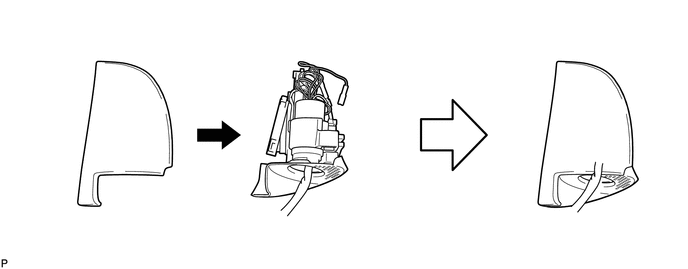
Install the body.
Pass the wire harness sub-assembly through the hole in the cover body.
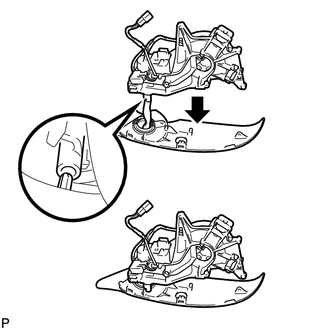
Attach the claw as shown in the illustration to attach the body cover to the support sub-assembly.
Attach the outer mirror body as shown in the illustration.
Install the outer mirror body with the 5 screws.
w/ Side Monitor System:
Connect the connector of the side television camera assembly to the wire harness sub-assembly and install the connector to the wire clip.
Install the cover base.
Pass the wire harness sub-assembly through the hole in the cover base.
Using a T25 "TORX" socket wrench, install the cover base with 3 new screws.
- NOTICE:
-
Make sure that the wire harness sub-assembly is not pinched between parts.
- Torque:
- 3.8 N*m (39 kgf*cm, 34 in.*lbf)
Attach the 6 claws to install the lower mirror cover.
Install the outer rear view mirror gasket LH.
Pass the wire harness sub-assembly through a new outer rear view mirror gasket LH.
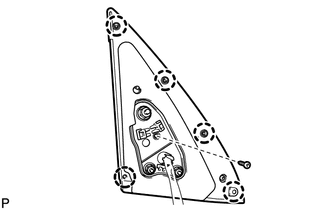
Attach the 5 claws to install the outer rear view mirror gasket LH.
Install the screw.
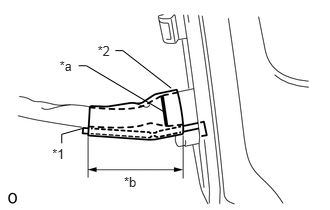
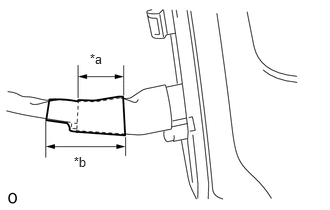
Align the mark of the wire harness sub-assembly with the end of the protrusion of the outer rear view mirror gasket LH into which the wire harness is inserted, and then secure the wire harness and clamp with tape as shown in the illustration.
| *1 | Clamp |
| *2 | Tape |
| *a | Mark |
| *b | 50 mm |
- NOTICE:
- ·
Overlap 2 pieces of tape over the clamp.
·Make sure there is no gap between the tape and wire harness when applying tape.
| *a | 30 mm of overlap |
| *b | 50 mm |
w/ Side Monitor System:
Assemble the connector.
Move the retainer to the unlock position.
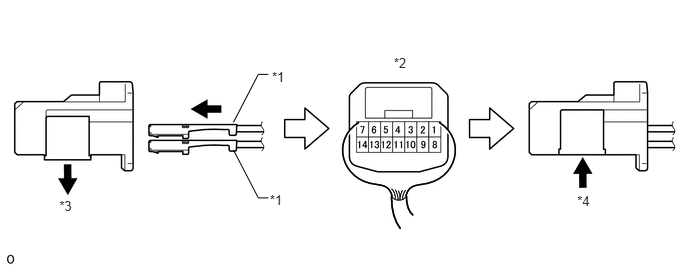
| *1 | Wire Harness Pin | *2 | Rear View of Connector |
| *3 | Retainer Unlock Position | *4 | Retainer Lock Position |
Insert the pins of the wire harness sub-assembly into the back of a new connector until they lock.
| 1 | 2 | 3 | 4 | 5 | 6 | 7 |
|---|---|---|---|---|---|---|
| Purple | - | Light Blue | Black/Green | Green | Yellow | White |
| 8 | 9 | 10 | 11 | 12 | 13 | 14 |
|---|---|---|---|---|---|---|
| Brown | Red | Yellow-green | Black/Green | Black | Blue | Pink |
Move the retainer to the lock position.
- NOTICE:
- ·
When inserting the pins of the wire harness, compare the new connector with the connector that was cut off during removal and make sure that the arrangement of the wire colors of the pins is the same as before.
·Confirm that the pins of the wire harness are securely locked and cannot be pulled out.
·When a pin of the wire harness is locked, it cannot be pulled out. Therefore, be sure to insert each pin into the correct location.
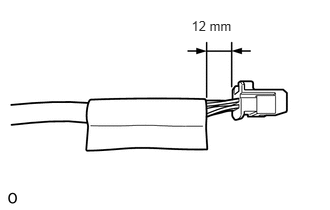
Install a new plastic sheet to the location shown in the illustration.
w/o Side Monitor System:
Assemble the connector.
Wrap the longer wire harness around the shorter one as shown in the part of the illustration labeled 1 until they are the same length.
Attach the 4 claws to connect the 2 connectors to the adapter.
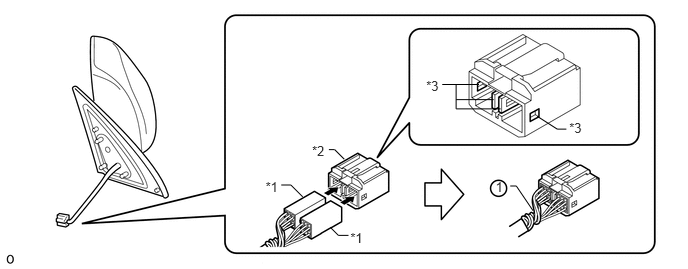
| *1 | Connector | *2 | Adapter |
| *3 | Claw | - | - |
81740
3.INSTALL SIDE TURN SIGNAL LIGHT ASSEMBLY LH
87945C
4.INSTALL OUTER MIRROR COVER LH
Install the outer mirror cover.
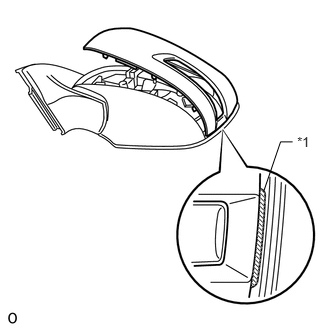
Insert the rib on the outer edge of the cover into the groove of the mirror body.
- NOTICE:
-
Do not scratch the turn light.
| *1 | Rib |
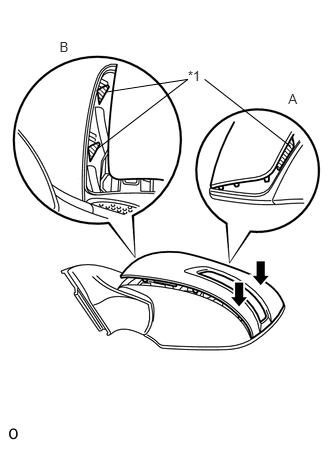
Confirm that the cover and mirror body are aligned properly, and then push the outer end of the cover to attach the outer claws.
- NOTICE:
- ·
Make sure that the upper ribs of the cover shown in part A of the illustration are properly attached to the mirror body.
·Make sure that the ribs of the mirror body shown in part B of the illustration are not protruding from the cover.
Text in Illustration *1 Rib
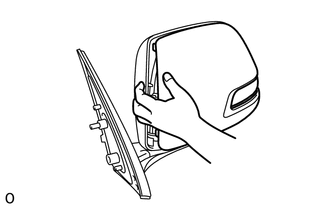
While making sure that the rib of the cover fits properly into the groove of the mirror body, squeeze the inner end of the cover and the mirror body together to attach the inner claws.
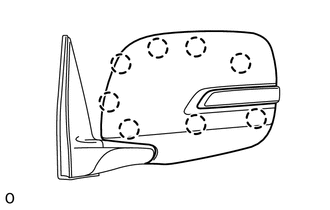
Push on the cover at the locations of the 8 claws to confirm that the claws are attached properly.
87961
5.INSTALL OUTER REAR VIEW MIRROR GLASS