1GD-FTV FUEL FUEL TANK(for 5 Door) INSTALLATION
PROCEDURE

 77213B
1.INSTALL FUEL TANK TO FILLER PIPE HOSE
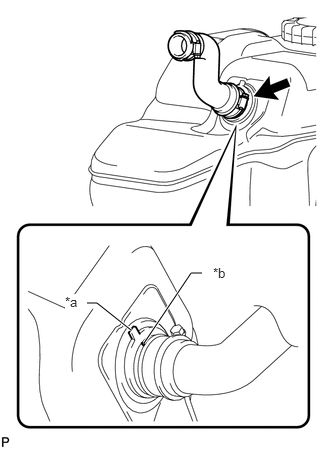
| *a | Fuel Tank Side Mark |
| *b | Hose Side Mark |
Align the fuel tank side mark with the hose side mark.
Install the fuel tank to filler pipe hose to the fuel tank sub-assembly, and tighten the clamp to secure the hose.
77643A
2.INSTALL NO. 3 FUEL TANK PROTECTOR
Install the No. 3 fuel tank protector and attach the 4 clamps.
Install the 2 bolts.
- Torque:
- 5.0 N*m (51 kgf*cm, 44 in.*lbf)
77010
3.INSTALL FUEL TANK VENT TUBE ASSEMBLY (for Single Tank Type)
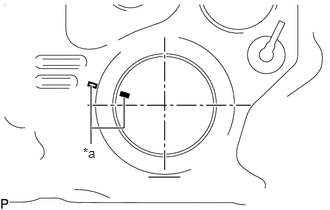
| *a | Co-rotation Prevention Check Mark |
Apply a co-rotation prevention check mark to the fuel tank vent tube assembly.
- HINT:
-
Perform this procedure when replacement of the fuel tank vent tube assembly is necessary.
Apply a light coat of diesel fuel or grease to a new gasket and install the gasket to the fuel tank sub-assembly.
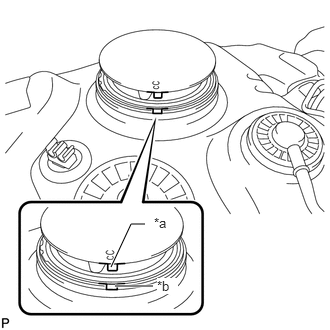
| *a | Protrusion |
| *b | Groove |
Set the fuel tank vent tube assembly to the fuel tank sub-assembly.
- NOTICE:
-
Be careful not to bend the arm of the fuel sender gauge assembly.
- HINT:
-
Align the cutout of the fuel tank vent tube assembly to the groove of the fuel tank sub-assembly.
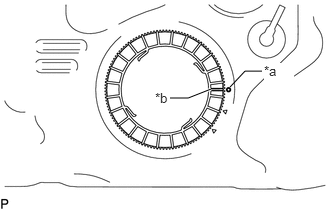
| *a | Rotational Start Point Mark (Fuel Tank Sub-assembly Side) |
| *b | Rotational Start Point Mark (Fuel Pump Gauge Retainer Side) |
Temporarily place the fuel pump gauge retainer by aligning the rotational start point mark of a new fuel pump gauge retainer with the rotational start point mark of the fuel tank sub-assembly while pressing the fuel tank vent tube assembly into the fuel tank sub-assembly.
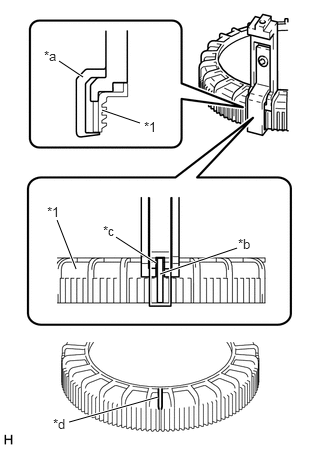
| *1 | Fuel Pump Gauge Retainer |
| *a | SST (Claw Set) |
| *b | Rib |
| *c | Cutout |
| *d | SST (Claw Set) Incorrect Installation Point (Rotational Start Point Mark of Fuel Pump Gauge Retainer) |
Set 4 SSTs (claw sets) to the fuel pump gauge retainer and temporarily install.
- SST
- 09808-14031 (09808-01080, 09808-01090, 09808-01100)
- NOTICE:
- ·
Align the cutout of SST (claw set) to the rib of the fuel pump gauge retainer.
·Do not place SST on the rotational start point mark of the fuel pump gauge retainer, otherwise SST (claw set) cannot be set correctly.
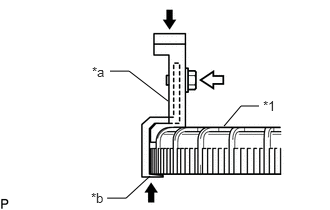
| *1 | Fuel Pump Gauge Retainer |
| *a | SST (Claw Set) |
| *b | Hook |

|
Press |

|
SST (Bolt) |
While firmly pressing the claw of SST (claw set) into rib of the fuel pump gauge retainer, tighten the bolt.
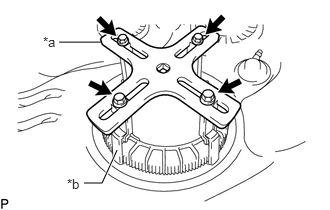
| *a | SST (Plate) |
| *b | SST (Claw Set) |
|
|
SST (Bolt) |
Temporarily install SST (plate) to SST (claw set) with 4 SSTs (bolts).
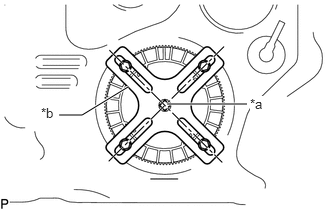
| *a | Center of Fuel Pump Gauge Retainer |
| *b | SST (Plate) |
Adjust the position of SST (plate) so that the setting hole of SST (handle) aligns with the center of the fuel pump gauge retainer.
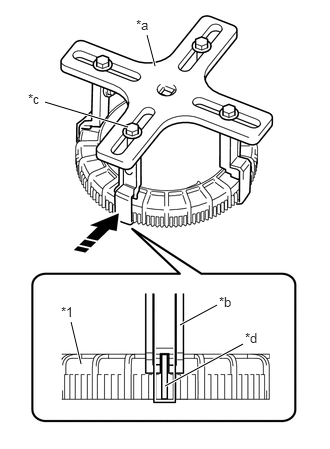
| *1 | Fuel Pump Gauge Retainer |
| *a | SST (Plate) |
| *b | SST (Claw Set) |
| *c | SST (Bolt) |
| *d | Rib |

|
Press |
While firmly pressing the SST (claw set) into rib of the fuel pump gauge retainer, tighten SST (bolt).
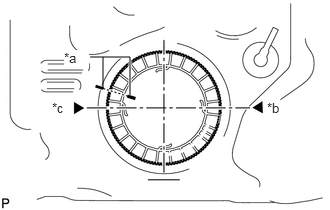
| *a | Co-rotation Prevention Check Mark |
| *b | Tightening Start Position |
| *c | One and Half Rotation Position |
While one person presses the fuel tank vent tube assembly into the fuel tank sub-assembly, have another person firmly press the fuel pump gauge retainer into the threads of the fuel tank sub-assembly and tighten approximately one and a half turns.
- NOTICE:
- ·
Do not use any tools other than SST, such as a screwdriver, etc.
·Do not use excessive force when pressing down on SST, as the fuel tank vent tube assembly will place excessive force on the pump gauge retainer and be difficult to remove, and parts may be damaged.
·Do not use an impact wrench or turn the SST handle with excessive force, as parts may be damaged.
·Do not rotate the fuel pump gauge retainer when the co-rotation prevention check mark is out of place.
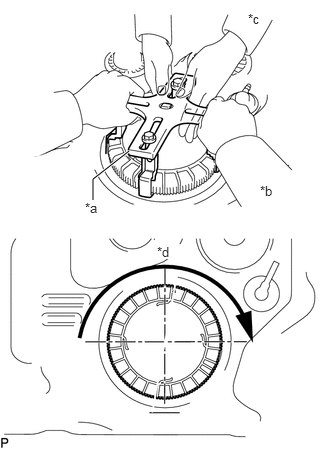
| *a | SST (Plate) |
| *b | Person in Charge of Tightening |
| *c | Person in Charge of Supporting |
| *d | Approximately 180° |
While one person presses the fuel tank vent tube assembly into the fuel tank sub-assembly, have another person slowly tighten approximately 180°.
Check the tightening condition of the fuel pump gauge retainer.
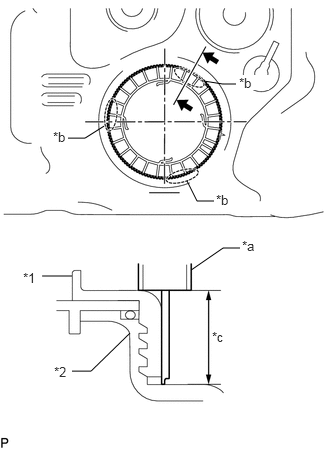
| *1 | Fuel Pump Gauge Retainer |
| *2 | Fuel Tank Sub-assembly |
| *a | Vernier Caliper |
| *b | Measurement Position |
| *c | Measurement Height |
Using a vernier caliper, measure the upper surface dimensions of the fuel tank sub-assembly at the 3 positions as shown in the illustration.
- Standard:
Measurement difference is within 3 mm.
- NOTICE:
-
If the measurement difference is approximately 6 mm, the threads misaligned by 1 threads (6 mm) and the fuel pump gauge retainer must be installed again.
Install SST (handle) to SST (plate).
- SST
- 09808-14031 (09808-01010, 09808-01020)
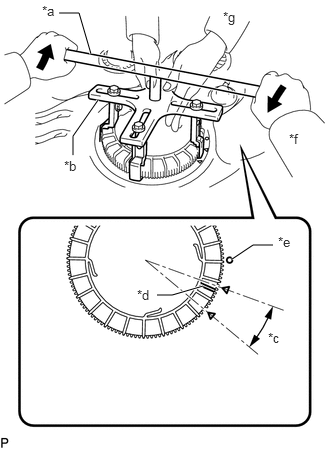
| *a | SST (Handle) |
| *b | SST (Plate) |
| *c | Tightening Complete Position |
| *d | Rotational Start Point Mark of Fuel Pump Gauge Retainer |
| *e | Rotational Start Point Mark of Fuel Tank Sub-assembly |
| *f | Person in Charge of Tightening |
| *g | Person in Charge of Supporting |
|
|
Tighten |
While one person presses the fuel tank vent tube assembly onto the fuel tank sub-assembly, have another person use SST (handle) and slowly tighten the fuel pump gauge retainer until it reaches the tightening complete position.
77020A
4.INSTALL FUEL SUCTION WITH PUMP AND GAUGE TUBE ASSEMBLY (for Double Tank Type)
77207A
5.INSTALL FUEL RETURN TUBE SUB-ASSEMBLY AND FUEL TANK MAIN TUBE SUB-ASSEMBLY (for Single Tank Type)
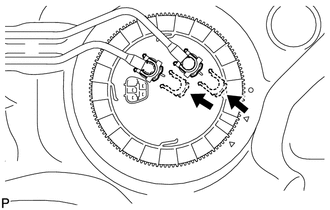
Install the fuel return tube sub-assembly and fuel tank main tube sub-assembly with the 2 fuel tube joint clips.
- NOTICE:
- ·
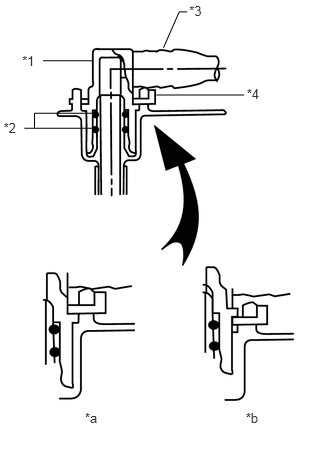 2.57,0.9 2.764,1.046 0.194,0.146 10 *4 2.543,0.989 1.629,0.989 false 0.231,0.553 0.425,0.7 0.194,0.146 10 *1 0.973,0.633 0.448,0.633 false 0.037,1.255 0.23,1.401 0.194,0.146 10 *2 0.973,1.335 0.253,1.335 false 0.973,1.179 0.359,1.179 0.359,1.179 0.359,1.334 false 1.971,0.033 2.165,0.179 0.194,0.146 10 *3 1.949,0.123 1.866,0.123 1.866,0.123 1.703,0.496 false 0.884,4.269 1.078,4.416 0.194,0.146 10 *a 2.56,4.269 2.754,4.416 0.194,0.146 10 *b
*1 Fuel Tube Joint *2 O-Ring *3 Fuel Tube *4 Fuel Tube Joint Clip *a CORRECT *b INCORRECT
Check that there are no scratches or foreign objects on the connecting parts.
·Check that the fuel tube joints are inserted securely.
·Check that the fuel tube joint clips are on the collars of the fuel tube joints.
·After installing the fuel tube joint clips, check that the fuel tube joints cannot be pulled off.
Install the fuel return tube sub-assembly and fuel tank main tube sub-assembly to the fuel tank sub-assembly.
77209D
6.INSTALL FUEL TANK MAIN TUBE SUB-ASSEMBLY, FUEL RETURN TUBE SUB-ASSEMBLY AND NO. 2 FUEL MAIN TUBE SUB-ASSEMBLY (for Double Tank Type)
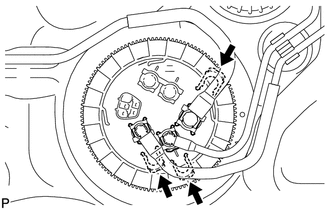
Install the fuel tank main tube sub-assembly, fuel return tube sub-assembly and No. 2 fuel main tube sub-assembly with the 3 fuel tube joint clips.
- NOTICE:
- ·
2.57,0.9 2.764,1.046 0.194,0.146 10 *4 2.543,0.989 1.629,0.989 false 0.231,0.553 0.425,0.7 0.194,0.146 10 *1 0.973,0.633 0.448,0.633 false 0.037,1.255 0.23,1.401 0.194,0.146 10 *2 0.973,1.335 0.253,1.335 false 0.973,1.179 0.359,1.179 0.359,1.179 0.359,1.334 false 1.971,0.033 2.165,0.179 0.194,0.146 10 *3 1.949,0.123 1.866,0.123 1.866,0.123 1.703,0.496 false 0.884,4.269 1.078,4.416 0.194,0.146 10 *a 2.56,4.269 2.754,4.416 0.194,0.146 10 *b
*1 Fuel Tube Joint *2 O-Ring *3 Fuel Tube *4 Fuel Tube Joint Clip *a CORRECT *b INCORRECT
Check that there are no scratches or foreign objects on the connecting parts.
·Check that the fuel tube joints are inserted securely.
·Check that the fuel tube joint clips are on the collars of the fuel tube joints.
·After installing the fuel tube joint clips, check that the fuel tube joints cannot be pulled off.
Install the fuel tank main tube sub-assembly to the fuel tank sub-assembly.
Install the fuel return tube sub-assembly to the fuel tank sub-assembly and attach the clamp.
Install the No. 2 fuel main tube sub-assembly to the fuel tank sub-assembly and attach the clamp.
77208A
7.INSTALL NO. 4 FUEL MAIN TUBE SUB-ASSEMBLY AND FUEL SUCTION TUBE SUB-ASSEMBLY (for Double Tank Type)
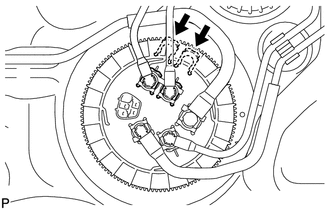
Install the No. 4 fuel main tube sub-assembly and fuel suction tube sub-assembly with the 2 fuel tube joint clips.
- NOTICE:
- ·
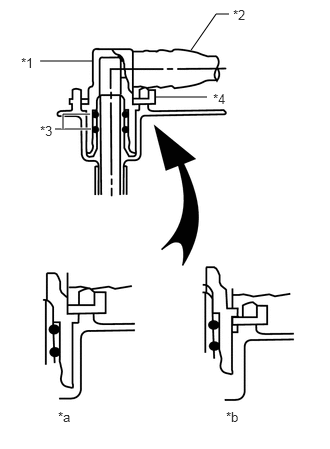 2.385,0.146 2.25,0.146 2.25,0.146 1.99,0.521 false 1.625,1.01 2.156,1.01 false 0.948,1.344 0.573,1.344 true 0.938,1.188 0.656,1.188 0.656,1.188 0.656,1.344 true 0.417,0.635 0.958,0.635 false 0.219,0.573 0.542,0.844 0.323,0.271 10 false *1 2.427,0.073 2.75,0.333 0.323,0.26 10 false *2 0.417,1.281 0.708,1.531 0.292,0.25 10 false *3 2.219,0.948 2.5,1.219 0.281,0.271 10 false *4 0.604,4.26 0.896,4.479 0.292,0.219 10 false *a 2.354,4.26 2.667,4.552 0.313,0.292 10 false *b
*1 Fuel Tube Joint *2 O-Ring *3 Fuel Tube *4 Fuel Tube Joint Clip *a CORRECT *b INCORRECT
Check that there are no scratches or foreign objects on the connecting parts.
·Check that the fuel tube joints are inserted securely.
·Check that the fuel tube joint clips are on the collars of the fuel tube joints.
·After installing the fuel tube joint clips, check that the fuel tube joints cannot be pulled off.
Install the fuel suction tube sub-assembly to the fuel tank sub-assembly and attach the clamp.
Install the No. 4 fuel main tube sub-assembly to the fuel tank sub-assembly and attach the clamp.
77651A
8.INSTALL FUEL TANK CUSHION
Install 3 new fuel tank cushions to the fuel tank sub-assembly.
77100U
9.INSTALL FUEL TANK SUB-ASSEMBLY
Set the fuel tank sub-assembly on a transmission jack and lift up the transmission jack.
- NOTICE:
-
Do not allow the fuel tank sub-assembly to contact the vehicle, especially the differential.
Install the 2 fuel tank bands with the 2 pins and 2 clips.
Connect the 2 fuel tank bands with the 2 bolts.
- Torque:
- 40 N*m (408 kgf*cm, 30 ft.*lbf)
77213B
10.CONNECT FUEL TANK TO FILLER PIPE HOSE
Connect the fuel tank to filler pipe hose to the filler pipe, and tighten the clamp to secure the hose.
77012
11.CONNECT FUEL TANK BREATHER TUBE SUB-ASSEMBLY (for Single Tank Type)
Connect the fuel tank breather tube sub-assembly (See page Engine / Hybrid System>1GD-FTV (FUEL)>FUEL SYSTEM>PRECAUTION).
12.CONNECT FUEL CUT OFF TUBE (for Single Tank Type)
Connect the fuel cut off tube (See page Engine / Hybrid System>1GD-FTV (FUEL)>FUEL SYSTEM>PRECAUTION).
77012
13.CONNECT FUEL TANK BREATHER TUBE SUB-ASSEMBLY (for Double Tank Type)
Connect the fuel tank breather tube sub-assembly (See page Engine / Hybrid System>1GD-FTV (FUEL)>FUEL SYSTEM>PRECAUTION).
77207A
14.CONNECT FUEL RETURN TUBE SUB-ASSEMBLY AND NO. 2 FUEL MAIN TUBE SUB-ASSEMBLY (for Double Tank Type)
Connect the fuel return tube sub-assembly and No. 2 fuel main tube sub-assembly (See page Engine / Hybrid System>1GD-FTV (FUEL)>FUEL SYSTEM>PRECAUTION).
15.CONNECT FUEL CUT OFF TUBE (for Double Tank Type)
Connect the fuel cut off tube (See page Engine / Hybrid System>1GD-FTV (FUEL)>FUEL SYSTEM>PRECAUTION).
77208A
16.CONNECT NO. 4 FUEL MAIN TUBE SUB-ASSEMBLY AND FUEL SUCTION TUBE SUB-ASSEMBLY (for Double Tank Type)
Connect the No. 4 fuel main tube sub-assembly and fuel suction tube sub-assembly (See page Engine / Hybrid System>1GD-FTV (FUEL)>FUEL SYSTEM>PRECAUTION).
77207A
17.CONNECT FUEL RETURN TUBE SUB-ASSEMBLY (for Single Tank Type)
Connect the fuel return tube sub-assembly (See page Engine / Hybrid System>1GD-FTV (FUEL)>FUEL SYSTEM>PRECAUTION).
77209D
18.CONNECT FUEL TANK MAIN TUBE SUB-ASSEMBLY (for Single Tank Type)
Connect the fuel tank main tube sub-assembly (See page Engine / Hybrid System>1GD-FTV (FUEL)>FUEL SYSTEM>PRECAUTION).
77209D
19.CONNECT FUEL TANK MAIN TUBE SUB-ASSEMBLY (for Double Tank Type)
Connect the fuel tank main tube sub-assembly (See page Engine / Hybrid System>1GD-FTV (FUEL)>FUEL SYSTEM>PRECAUTION).
77606
20.INSTALL NO. 1 FUEL TANK PROTECTOR SUB-ASSEMBLY
for Type A:
Install the No. 1 fuel tank protector sub-assembly with the 6 bolts.
- Torque:
- 20 N*m (204 kgf*cm, 15 ft.*lbf)
for Type B:
Install the No. 1 fuel tank protector sub-assembly with the 4 bolts.
- Torque:
- 20 N*m (204 kgf*cm, 15 ft.*lbf)
58325E
21.INSTALL REAR FLOOR SERVICE HOLE COVER
Connect the fuel pump and fuel sender gauge connector.
Install the rear floor service hole cover with the 3 screws.
67918D
22.INSTALL REAR DOOR SCUFF PLATE LH
67934
23.INSTALL QUARTER SCUFF PLATE LH (w/ Rear No. 2 Seat)
58371F
24.INSTALL REAR NO. 1 FLOOR STEP COVER (w/ Rear No. 2 Seat)
25.INSTALL REAR SEAT ASSEMBLY LH
for 60/40 Split Double-folding Seat Type LH Side:
for 60/40 Split Slide Walk-in Seat Type LH Side:
26.CONNECT CABLE TO NEGATIVE BATTERY TERMINAL
- NOTICE:
-
When disconnecting the cable, some systems need to be initialized after the cable is reconnected (See page General>INTRODUCTION>REPAIR INSTRUCTION>INITIALIZATION).
27.BLEED AIR FROM FUEL SYSTEM
28.INSPECT FOR FUEL LEAK