AUDIO / VIDEO RADIO RECEIVER(for Radio and Display Type) INSTALLATION
CAUTION / NOTICE / HINT
- HINT:
- ·
Use the same procedure for RHD and LHD vehicles.
·The procedure listed below is for LHD vehicles.
PROCEDURE

 86140A
1.INSTALL RADIO AND DISPLAY RECEIVER ASSEMBLY
55670A
2.INSTALL CENTER INSTRUMENT PANEL REGISTER ASSEMBLY
Attach the 7 claws to install the center instrument panel register assembly.
86212C
3.INSTALL NO. 2 RADIO RECEIVER BRACKET
Install the No. 2 radio receiver bracket with the 3 screws.
- Torque:
- 3.0 N*m (31 kgf*cm, 27 in.*lbf)
86211J
4.INSTALL NO. 1 RADIO RECEIVER BRACKET
Install the No. 1 radio receiver bracket with the 3 screws.
- Torque:
- 3.0 N*m (31 kgf*cm, 27 in.*lbf)
5.INSTALL RADIO AND DISPLAY RECEIVER ASSEMBLY WITH BRACKET
Connect each connector.
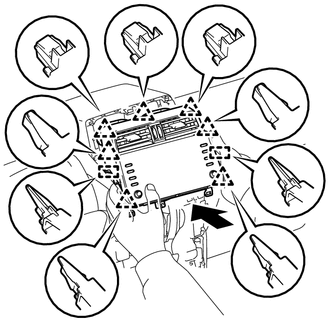
Insert the radio and display receiver assembly with bracket and attach the 2 guides, 7 clips on the backside of the radio and display receiver assembly with bracket.
- NOTICE:
-
When inserting the receiver, do not press the knobs on it.
Install the radio and display receiver assembly with bracket with the 4 bolts.
- Torque:
- 12 N*m (122 kgf*cm, 9 ft.*lbf)
84010A
6.INSTALL INTEGRATION CONTROL AND PANEL ASSEMBLY
7.CONNECT CABLE TO NEGATIVE BATTERY TERMINAL
8. INITIALIZATION AFTER RECONNECTING BATTERY TERMINAL
Click hereGeneral>SETUP>WHEN DISCONNECTING OR RECONNECTING BATTERY TERMINAL>WORK PROCEDURE
- HINT:
-
When disconnecting and reconnecting the auxiliary battery, there is an automatic learning function that completes learning when the respective system is used.
-
Click hereGeneral>SETUP>WHEN DISCONNECTING OR RECONNECTING BATTERY TERMINAL>AUTOMATIC LEARNING CHART