AUDIO / VIDEO RADIO ANTENNA CORD REMOVAL
PROCEDURE

 1. PRECAUTION
- NOTICE:
-
After turning the ignition switch off, waiting time may be required before disconnecting the cable from the negative (-) battery terminal.
-
Click hereGeneral>INTRODUCTION>REPAIR INSTRUCTION>PRECAUTION
2.DISCONNECT CABLE FROM NEGATIVE BATTERY TERMINAL
63310
3.REMOVE ROOF HEADLINING ASSEMBLY
for 5 Door:
Click hereVehicle Interior>INTERIOR PANELS / TRIM>ROOF HEADLINING (for 5 Door)>REMOVAL
for 3 Door:
Click hereVehicle Interior>INTERIOR PANELS / TRIM>ROOF HEADLINING (for 3 Door)>REMOVAL
86101J
4.REMOVE NO. 2 ANTENNA CORD SUB-ASSEMBLY (for 5 Door)
w/o Sliding Roof:
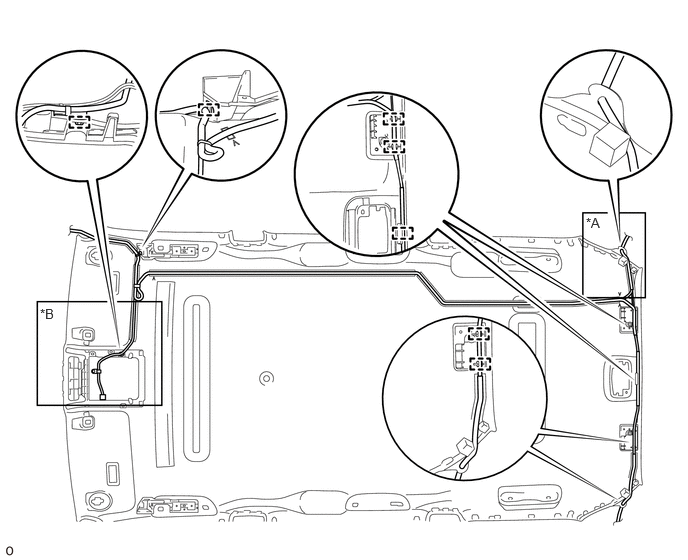
| *A | for Diversity | *B | for Diversity, w/ Digital Audio Broadcasting |
Detach the No. 2 antenna cord sub-assembly from the 6 clamps and the notch on the rear of the roof headlining assembly.
for Diversity:
Detach the No. 2 antenna cord sub-assembly from the 6 clamps and the 2 notches on the rear of the roof headlining assembly.
for Diversity, w/ Digital Audio Broadcasting:
Detach the No. 2 antenna cord sub-assembly from the 7 clamps and the 2 notches on the rear of the roof headlining assembly.
Remove the No. 2 antenna cord sub-assembly from the roof headlining assembly.
Remove the double-sided tape from the roof headlining assembly.
w/ Sliding Roof:
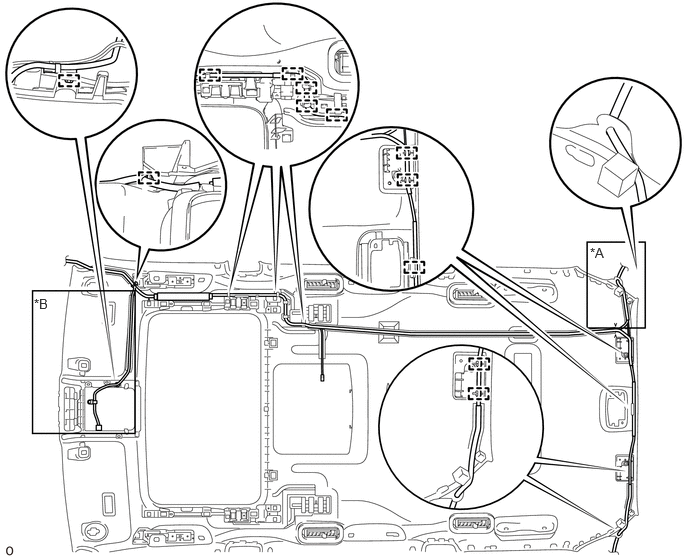
| *A | for Diversity | *B | for Diversity, w/ Digital Audio Broadcasting |
Detach the No. 2 antenna cord sub-assembly from the 11 clamps and the notch on the rear of the roof headlining assembly.
for Diversity:
Detach the No. 2 antenna cord sub-assembly from the 11 clamps and the 2 notches on the rear of the roof headlining assembly.
for Diversity, w/ Digital Audio Broadcasting:
Detach the No. 2 antenna cord sub-assembly from the 12 clamps and the 2 notches on the rear of the roof headlining assembly.
Remove the No. 2 antenna cord sub-assembly from the roof headlining assembly.
Remove the double-sided tape from the roof headlining assembly.
86101J
5.REMOVE NO. 2 ANTENNA CORD SUB-ASSEMBLY (for 3 Door)
w/o Sliding Roof:
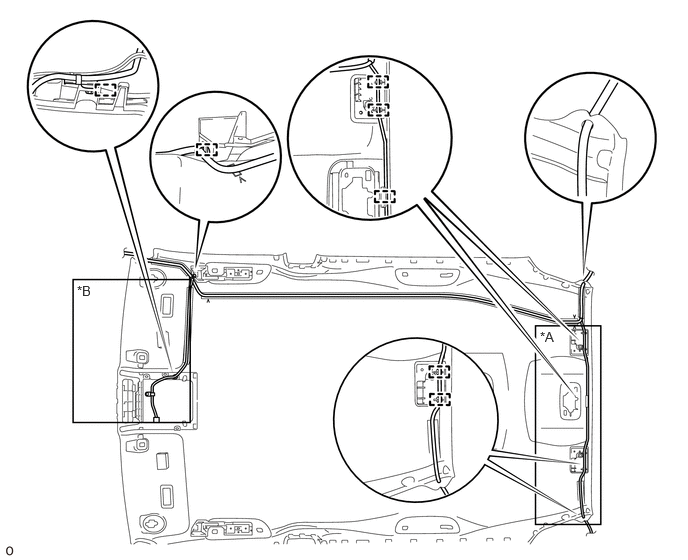
| *A | for Diversity | *B | for Diversity, w/ Digital Audio Broadcasting |
Detach the No. 2 antenna cord sub-assembly from the clamp and the notch on the rear of the roof headlining assembly.
for Diversity:
Detach the No. 2 antenna cord sub-assembly from the 6 clamps and the 2 notches on the rear of the roof headlining assembly.
for Diversity, w/ Digital Audio Broadcasting:
Detach the No. 2 antenna cord sub-assembly from the 7 clamps and the 2 notches on the rear of the roof headlining assembly.
Remove the No. 2 antenna cord sub-assembly from the roof headlining assembly.
Remove the double-sided tape from the roof headlining assembly.
w/ Sliding Roof:
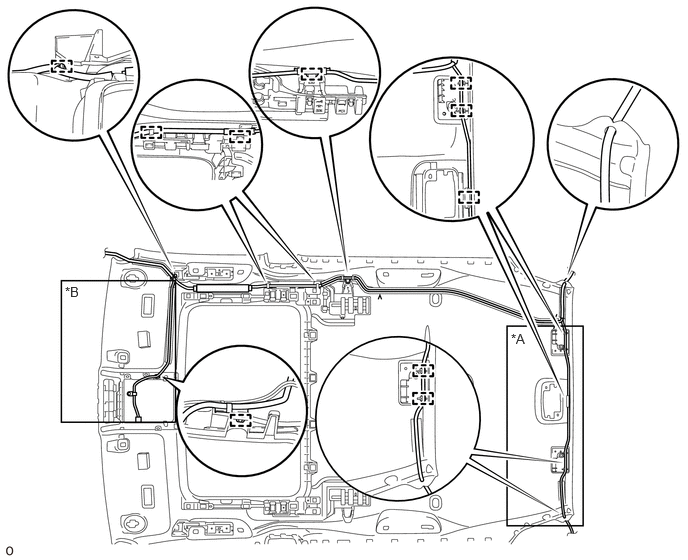
| *A | for Diversity | *B | for Diversity, w/ Digital Audio Broadcasting |
Detach the No. 2 antenna cord sub-assembly from the 4 clamps and the notch on the rear of the roof headlining assembly.
for Diversity:
Detach the No. 2 antenna cord sub-assembly from the 9 clamps and the 2 notches on the rear of the roof headlining assembly.
for Diversity, w/ Digital Audio Broadcasting:
Detach the No. 2 antenna cord sub-assembly from the 10 clamps and the 2 notches on the rear of the roof headlining assembly.
Remove the No. 2 antenna cord sub-assembly from the roof headlining assembly.
Remove the double-sided tape from the roof headlining assembly.