POWER DISTRIBUTION INTEGRATION RELAY INSTALLATION
CAUTION / NOTICE / HINT
- HINT:
- ·
Use the same procedure for RHD and LHD vehicles.
·The procedure listed below is for LHD vehicles.
PROCEDURE

 82641
1.INSTALL NO. 1 INTEGRATION RELAY
except 5L-E:
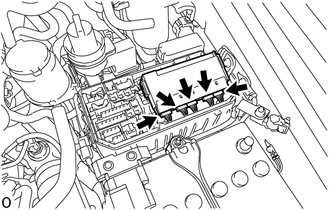
Connect the 5 connectors.
- NOTICE:
- ·
Make sure that the connectors are vertically inserted into the No. 1 integration relay. Additionally, when the connectors cannot be inserted properly, do not force or twist them into the socket.
·Do not drop the No. 1 integration relay or subject it to any strong impacts. Additionally, do not use a No. 1 integration relay that has been dropped.
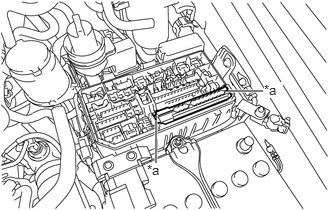
| *a | No. 1 Integration Relay Fixing Lock |
While pushing the No. 1 integration relay fixing lock shown in the illustration toward the center, push the No. 1 integration relay down to install it.
- NOTICE:
- ·
When installing the No. 1 integration relay to the engine room relay block, do not strike the head of the No. 1 integration relay with heavy objects. Additionally, do not push on the fuses during installation.
·Check that the installation area of the engine room relay block and No. 1 integration relay are properly connected.
for 5L-E:
Attach the 2 claws to install the No. 1 integration relay to the engine room junction block.
82662A
2.INSTALL NO. 1 RELAY BLOCK COVER
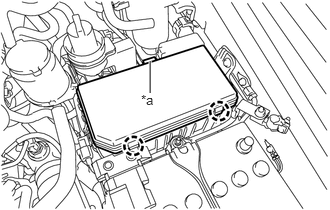
| *a | Lock |
Hook the 2 claws of the No. 1 relay block cover onto the engine room relay block.
Attach the claw of the No. 1 relay block cover lock to install the No. 1 relay block cover.
3.CONNECT CABLE TO NEGATIVE BATTERY TERMINAL
4. INITIALIZATION AFTER RECONNECTING AUXILIARY BATTERY TERMINAL
Click hereGeneral>SETUP>WHEN DISCONNECTING OR RECONNECTING BATTERY TERMINAL>WORK PROCEDURE
- HINT:
-
When disconnecting and reconnecting the auxiliary battery, there is an automatic learning function that completes learning when the respective system is used.
-
Click hereGeneral>SETUP>WHEN DISCONNECTING OR RECONNECTING BATTERY TERMINAL>AUTOMATIC LEARNING CHART