2TR-FE FUEL FUEL TANK(for 5 Door) REMOVAL
CAUTION / NOTICE / HINT
The necessary procedures (adjustment, calibration, initialization, or registration) that must be performed after parts are removed, installed, or replaced during the fuel tank sub-assembly removal/installation are shown below.
| Replaced Part or Performed Procedure | Necessary Procedure | Effect/Inoperative Function when Necessary Procedure not Performed | Link |
|---|---|---|---|
| Battery terminal is disconnected/reconnected | Correction of steering angle neutral point | Multi-terrain monitor system | ( ) |
- HINT:
-
When the cable is disconnected/reconnected to the battery terminal, systems temporarily stop operating. However, each system has a function that completes learning the first time the system is used.
- ·
Learning completes when vehicle is driven
Effect/Inoperative Function When Necessary Procedures are not Performed Necessary Procedures Link Lane departure alert system Drive the vehicle straight ahead at 40 km/h (25 mph) or more for 10 seconds or more. ( )
Pre-collision system Lighting system (EXT) (for LED Headlight) Stop and start system Drive the vehicle until stop and start control is permitted (approximately 5 to 60 minutes) ( )
Vehicle stability control system (for Hydraulic brake booster) Drive the vehicle straight ahead at 40 km/h (25 mph) or more for at least 10 seconds. ( )
PROCEDURE

 1.DISCHARGE FUEL SYSTEM PRESSURE
2. PRECAUTION
- NOTICE:
-
After turning the ignition switch off, waiting time may be required before disconnecting the cable from the battery terminal.
-
Click hereGeneral>INTRODUCTION>REPAIR INSTRUCTION>PRECAUTION
3.DISCONNECT CABLE FROM NEGATIVE BATTERY TERMINAL
4.REMOVE REAR SEAT ASSEMBLY LH
for 60/40 Split Double-folding Seat Type LH Side: (See page Vehicle Interior>SEAT>REAR NO. 1 SEAT ASSEMBLY (for 60/40 Split Double-folding Seat Type LH Side)>REMOVAL)
for 60/40 Split Slide Walk-in Seat Type LH Side: (See page Vehicle Interior>SEAT>REAR NO. 1 SEAT ASSEMBLY (for 60/40 Split Slide Walk-in Seat Type LH Side)>REMOVAL)
58371F
5.REMOVE REAR NO. 1 FLOOR STEP COVER (w/ Rear No. 2 Seat)
67934
6.REMOVE QUARTER SCUFF PLATE LH (w/ Rear No. 2 Seat)
67918D
7.REMOVE REAR DOOR SCUFF PLATE LH
58325E
8.REMOVE REAR FLOOR SERVICE HOLE COVER
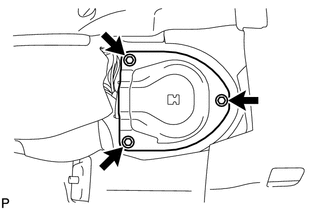
Remove the 3 screws and rear floor service hole cover.
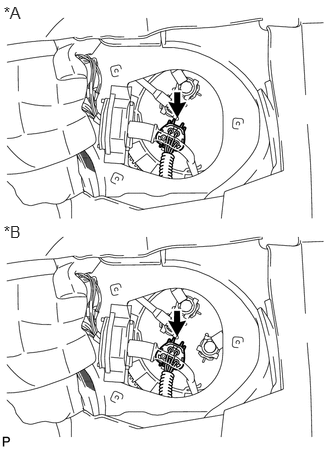
Disconnect the fuel pump and sender gauge connector.
| *A | for Single Tank Type |
| *B | for Double Tank Type |
77606
9.REMOVE NO. 1 FUEL TANK PROTECTOR SUB-ASSEMBLY
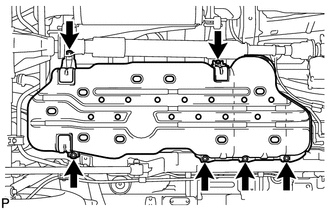
Remove the 6 bolts and No. 1 fuel tank protector sub-assembly.
77209D
10.DISCONNECT FUEL TANK MAIN TUBE SUB-ASSEMBLY
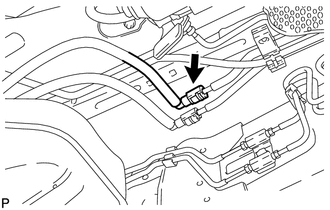
Disconnect the fuel tank main tube sub-assembly (See page Engine / Hybrid System>2TR-FE (FUEL)>FUEL SYSTEM>PRECAUTION).
11.DRAIN FUEL
Connect the GTS to the DLC3.
Turn the ignition switch to ON.
- NOTICE:
-
Do not start the engine.
Turn the GTS on.
Enter the following menus: Powertrain / Engine and ECT / Active Test / Control the Fuel Pump / Speed.
Operate the fuel pump and drain the fuel from the fuel tank main tube.
- CAUTION:
- ·
Do not smoke or be near an open flame when working on the fuel system.
·Secure good ventilation.
·Keep gasoline away from rubber or leather parts.
77207A
12.DISCONNECT FUEL RETURN TUBE SUB-ASSEMBLY
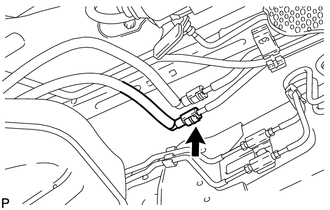
Disconnect the fuel return tube sub-assembly (See page Engine / Hybrid System>2TR-FE (FUEL)>FUEL SYSTEM>PRECAUTION).
13.DISCONNECT FUEL CUT OFF TUBE (for Single Tank Type)
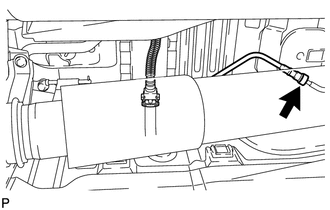
Disconnect the fuel cut off tube (See page Engine / Hybrid System>2TR-FE (FUEL)>FUEL SYSTEM>PRECAUTION).
14.DISCONNECT FUEL CUT OFF TUBE (for Double Tank Type)
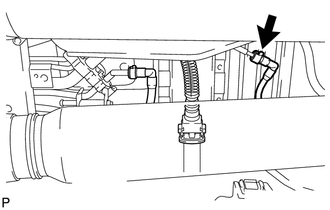
Disconnect the fuel cut off tube (See page Engine / Hybrid System>2TR-FE (FUEL)>FUEL SYSTEM>PRECAUTION).
77012
15.DISCONNECT FUEL TANK BREATHER TUBE SUB-ASSEMBLY (for Single Tank Type)
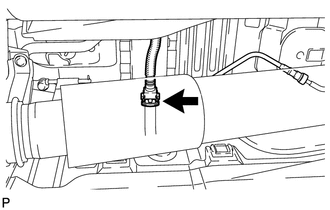
Disconnect the fuel tank breather tube sub-assembly (See page Engine / Hybrid System>2TR-FE (FUEL)>FUEL SYSTEM>PRECAUTION).
77012
16.DISCONNECT FUEL TANK BREATHER TUBE SUB-ASSEMBLY (for Double Tank Type)
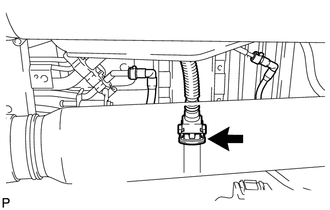
Disconnect the fuel tank breather tube sub-assembly (See page Engine / Hybrid System>2TR-FE (FUEL)>FUEL SYSTEM>PRECAUTION).
77206C
17.DISCONNECT NO. 2 FUEL MAIN TUBE SUB-ASSEMBLY (for Double Tank Type)
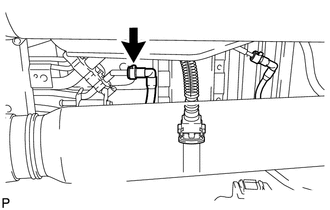
Disconnect the No. 2 fuel main tube sub-assembly (See page Engine / Hybrid System>2TR-FE (FUEL)>FUEL SYSTEM>PRECAUTION).
77213B
18.DISCONNECT FUEL TANK TO FILLER PIPE HOSE
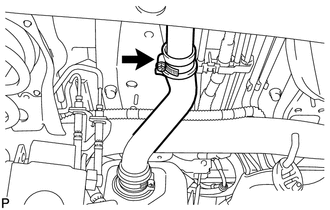
Disconnect the fuel tank to filler pipe hose from the filler pipe.
77100U
19.REMOVE FUEL TANK SUB-ASSEMBLY
Place an engine lifter under the fuel tank sub-assembly.
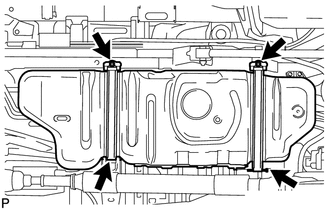
Remove the 2 bolts, 2 clips, 2 pins and 2 fuel tank band sub-assemblies.
Slowly lower the engine lifter slightly.
77651A
20.REMOVE FUEL TANK CUSHION
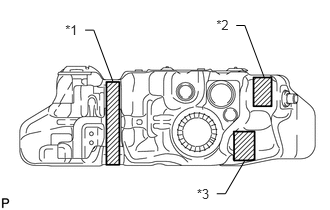
Remove the No. 1, No. 2 and No. 3 fuel tank cushions from the fuel tank.
| *1 | No. 1 Fuel Tank Cushion |
| *2 | No. 2 Fuel Tank Cushion |
| *3 | No. 3 Fuel Tank Cushion |
77209D
21.REMOVE FUEL TANK MAIN TUBE SUB-ASSEMBLY AND FUEL RETURN TUBE SUB-ASSEMBLY (for Single Tank Type)
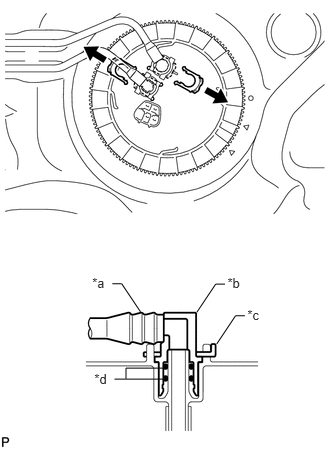
Remove the 2 fuel tube joint clips and pull out the fuel tank main tube sub-assembly and fuel return tube sub-assembly.
| *a | Fuel Tube |
| *b | Fuel Tube Joint |
| *c | Fuel Tube Joint Clip |
| *d | O-Ring |
- NOTICE:
- ·
Remove any dirt and foreign matter on the fuel tube joint before performing this work.
·Do not allow any scratches or foreign matter on the parts when disconnecting them, as the fuel tube joint contains the O-rings that seal the plug.
·Perform this work by hand. Do not use any tools.
·Do not forcibly bend, twist or turn the nylon tube.
·Protect the disconnected part by covering it with a plastic bag and tape after disconnecting the fuel tubes.
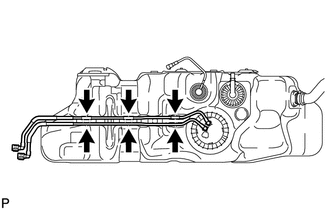
Remove the fuel tank main tube sub-assembly and fuel return tube sub-assembly from the fuel tank sub-assembly.
77209D
22.REMOVE FUEL TANK MAIN TUBE SUB-ASSEMBLY, FUEL RETURN TUBE SUB-ASSEMBLY AND NO. 2 FUEL MAIN TUBE SUB-ASSEMBLY (for Double Tank Type)
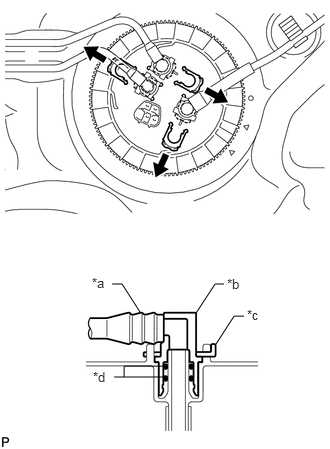
Remove the 3 fuel tube joint clips and pull out the fuel tank main tube sub-assembly, fuel return tube sub-assembly and No. 2 fuel main tube sub-assembly.
| *a | Fuel Tube |
| *b | Fuel Tube Joint |
| *c | Fuel Tube Joint Clip |
| *d | O-Ring |
- NOTICE:
- ·
Remove any dirt and foreign matter on the fuel tube joint before performing this work.
·Do not allow any scratches or foreign matter on the parts when disconnecting them, as the fuel tube joint contains the O-rings that seal the plug.
·Perform this work by hand. Do not use any tools.
·Do not forcibly bend, twist or turn the nylon tube.
·Protect the disconnected part by covering it with a plastic bag and tape after disconnecting the fuel tubes.
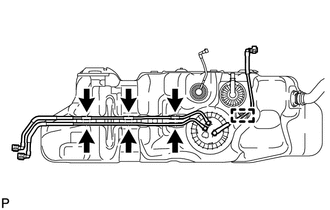
Detach the clamp and remove the No. 2 fuel main tube sub-assembly from the fuel tank sub-assembly.
Remove the fuel tank main tube sub-assembly and fuel return tube sub-assembly from the fuel tank sub-assembly.
77020A
23.REMOVE FUEL SUCTION WITH PUMP AND GAUGE TUBE ASSEMBLY
77643A
24.REMOVE NO. 3 FUEL TANK PROTECTOR
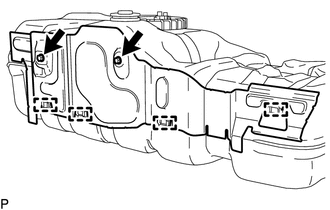
Remove the 2 bolts.
Detach the 4 clamps and remove the No. 3 fuel tank protector.
77213B
25.REMOVE FUEL TANK TO FILLER PIPE HOSE
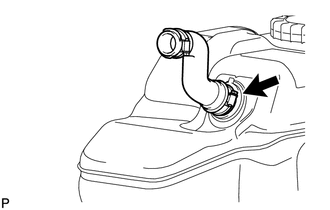
Remove the fuel tank to filler pipe hose from the fuel tank sub-assembly.