SEAT REAR NO. 2 SEAT ASSEMBLY(for Power Seat Type LH Side) INSTALLATION
CAUTION / NOTICE / HINT
- CAUTION:
-
Wear protective gloves. Sharp areas on the parts may injure your hands.
- NOTICE:
- ·
Under either of the following conditions, perform initialization (initial position memorization) of the fold seat control ECU (See page Vehicle Interior>SEAT>REAR POWER SEAT CONTROL SYSTEM>INITIALIZATION).
-The fold seat control ECU is replaced with a new one.
-Initialization (initial position reset) of the fold seat control ECU is performed.
- ·
Under any of the following conditions, perform initialization (initial position reset and initial position memorization) of the fold seat control ECU (See page Vehicle Interior>SEAT>REAR POWER SEAT CONTROL SYSTEM>INITIALIZATION).
-The fold seat control ECU is exchanged with one from another vehicle.
-The seatback frame and seat leg are inspected.
-The seat is disassembled and the positions of the seatback and seat cushion change with respect to one another.
-The seatback frame or seat leg is replaced.
-The cable is disconnected from the battery while the seatback or seat cushion is operating.
- HINT:
- ·
Use the same procedure for the RH and LH sides.
·The procedure listed below is for the LH side.
PROCEDURE

 1.INSTALL REAR NO. 2 SEAT ASSEMBLY LH
Place the rear No. 2 seat assembly in the cabin.
- NOTICE:
-
Be careful not to damage the vehicle body.
- HINT:
-
If installing the seat on the RH side with the LH side installed, install it with the No. 3 rear seat leg cover LH raised.
Temporarily install the 4 bolts.
Tighten the 4 bolts.
- Torque:
- 37 N*m (377 kgf*cm, 27 ft.*lbf)
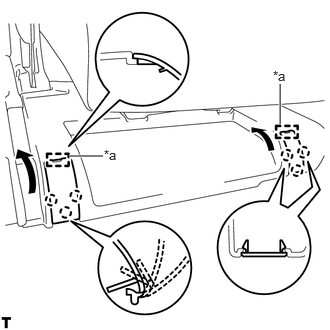
| *a | Guide |
Attach the 6 claws and 2 guides to close the 2 covers.
Connect the connector A.
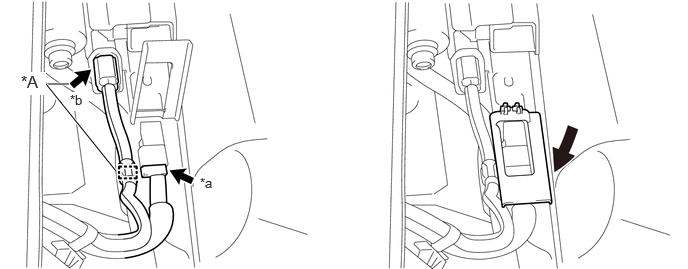
| *A | w/ Seat belt Warning Sytem | - | - |
| *a | Connector A | *b | Connector B |
w/ Seat Belt Warning System:
Attach the clamp andconnect the connector B.
Close the cover.
58417D
2.INSTALL NO. 1 DECK BOARD BRACKET LH
Install the bracket with the 2 bolts.
58439D
3.INSTALL DECK BOARD BRACKET REINFORCEMENT
Attach the 2 hooks.
Install the reinforcement with the 2 bolts.
58574A
4.INSTALL REAR FLOOR MAT SUPPORT PLATE
Attach the 5 clips and 2 guides.
Attach the 4 claws to install the plate.
Install the 3 bolts.
58417
5.INSTALL REAR NO. 3 FLOOR BOARD (w/o Rear Air Conditioning System)
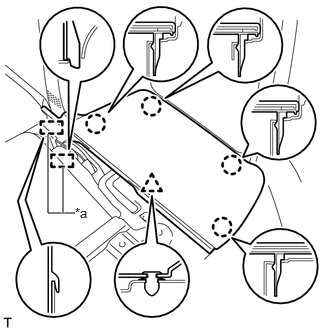
| *a | Guide |
Attach the 2 guides and 4 claws.
Attach the clip to install the board.
58417
6.INSTALL REAR NO. 3 FLOOR BOARD (w/ Rear Air Conditioning System)
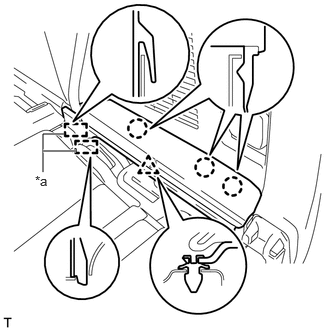
| *a | Guide |
Attach the 2 guides and 3 claws.
Attach the clip to install the board.
58418A
7.INSTALL REAR NO. 4 FLOOR BOARD
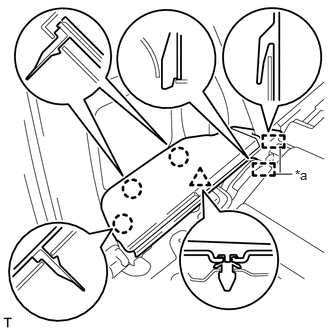
| *a | Guide |
Attach the 2 guides and 3 claws.
Attach the clip to install the board.
58410R
8.INSTALL DECK BOARD ASSEMBLY
Attach the 4 clips.
Install the deck board with the 2 bolts.
9.PERFORM INITIALIZATION
- NOTICE:
- ·
Under either of the following conditions, perform initialization (initial position memorization) of the fold seat control ECU (See page Vehicle Interior>SEAT>REAR POWER SEAT CONTROL SYSTEM>INITIALIZATION).
-The fold seat control ECU is replaced with a new one.
-Initialization (initial position reset) of the fold seat control ECU is performed.
- ·
Under any of the following conditions, perform initialization (initial position reset and initial position memorization) of the fold seat control ECU (See page Vehicle Interior>SEAT>REAR POWER SEAT CONTROL SYSTEM>INITIALIZATION).
-The fold seat control ECU is exchanged with one from another vehicle.
-The seatback frame and seat leg are inspected.
-The seat is disassembled and the positions of the seatback and seat cushion change with respect to one another.
-The seatback frame or seat leg is replaced.
-The cable is disconnected from the battery while the seatback or seat cushion is operating.
10.CHECK REAR NO. 2 SEAT
Check the power seat operation (See page Vehicle Interior>SEAT>REAR POWER SEAT CONTROL SYSTEM>OPERATION CHECK).
11.CHECK SEAT BELT WARNING SYSTEM (w/ Seat Belt Warning System)
12.ADJUST REAR SEAT LOCK CONTROL CABLE
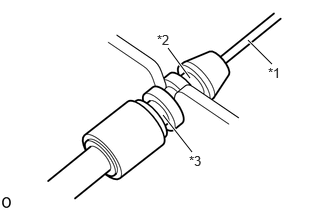
| *1 | Cable End Side |
| *2 | Tightening Direction |
| *3 | Loosening Direction |
If the rear seat headrest assembly does not operate correctly during the retraction operation, adjust in the tightening direction.
- NOTICE:
-
Tightening the rear seat lock control cable excessively will prevent the rear seat headrest assembly from locking. Therefore, after adjustment, check that the rear seat headrest assembly locks smoothly.