All Doors LOCK/UNLOCK Functions do not Operate Via Door Control Switch
Circuit diagnosis · Vehicles built from Jan 2012
DESCRIPTION
The main body ECU receives switch signals from the door control switch and activates the door lock motor on each door according to these signals.WIRING DIAGRAM
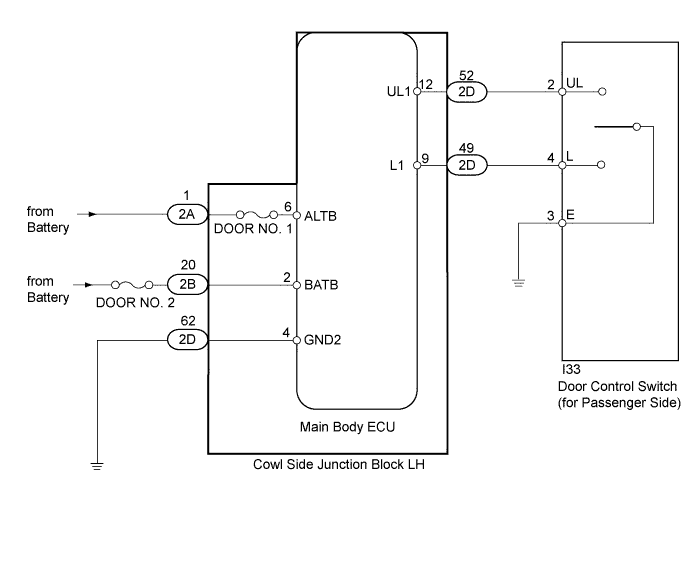

INSPECTION PROCEDURE
- NOTICE:
- Inspect the fuses for circuits related to this system before performing the following inspection procedure.
| 1. READ VALUE USING INTELLIGENT TESTER (DOOR LOCK AND UNLOCK SWITCH) |

Use the Data List to check if the door lock and unlock switches are functioning properly.
Main Body ECU Tester Display
Measurement Item/Range
Normal Condition
Diagnostic Note
Door Lock SW-Lock
Door manual lock switch signal / ON or OFF
ON: Front passenger side door control switch on (lock)
OFF: Front passenger side door control switch off
-
Door Unlock SW-Unlock
Door manual unlock switch signal / ON or OFF
ON: Front passenger side door control switch on (unlock)
OFF: Front passenger side door control switch off
-
- OK:
- On the intelligent tester screen, each item changes between ON and OFF according to above chart.
|
|
||||

| OK | |
 |
| 2. INSPECT FUSE (DOOR NO. 1, DOOR NO. 2) |
Remove the DOOR NO. 1 fuse from the main body ECU (cowl side junction block LH).
Remove the DOOR NO. 2 fuse from the engine room relay block.
Measure the resistance according to the value(s) in the table below.
- Standard Resistance:
Tester Connection
Condition
Specified Condition
DOOR NO. 1 fuse
Always
Below 1 Ω
DOOR NO. 2 fuse
Always
Below 1 Ω
|
|
||||

| OK | |
|
| 3. CHECK HARNESS AND CONNECTOR (MAIN BODY ECU - BATTERY AND BODY GROUND) |
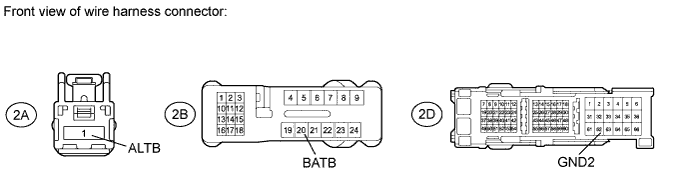
Disconnect the 2A, 2B, and 2D ECU connectors.
Measure the voltage according to the value(s) in the table below.
- Standard Voltage:
Tester Connection
Condition
Specified Condition
2A-1 (ALTB) - Body ground
Always
11 to 14 V
2B-20 (BATB) - Body ground
Always
11 to 14 V
Measure the resistance according to the value(s) in the table below.
- Standard Resistance:
Tester Connection
Condition
Specified Condition
2D-62 (GND2) - Body ground
Always
Below 1 Ω
|
|
||||
| OK | ||
 |
||
| ||
| 4. INSPECT DOOR CONTROL SWITCH ASSEMBLY (DOOR LOCK AND UNLOCK SWITCH) |
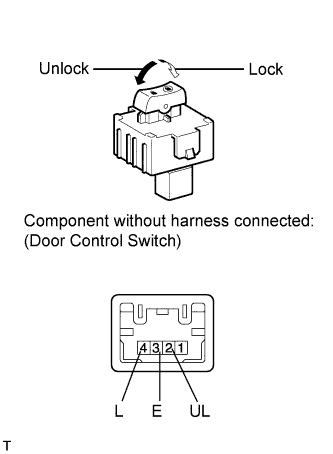 |
Remove the door control switch (Click here).
Measure the resistance according to the value(s) in the table below.
- Standard Resistance:
Tester Connection
Switch Condition
Specified Condition
2 (UL) - 3 (E)
Unlock
Below 1 Ω
2 (UL) - 3 (E)
4 (L) - 3 (E)
Off
10 kΩ or higher
4 (L) - 3 (E)
Lock
Below 1 Ω
|
|
||||
| OK | |
|
| 5. CHECK HARNESS AND CONNECTOR (MAIN BODY ECU - DOOR CONTROL SWITCH AND BODY GROUND) |
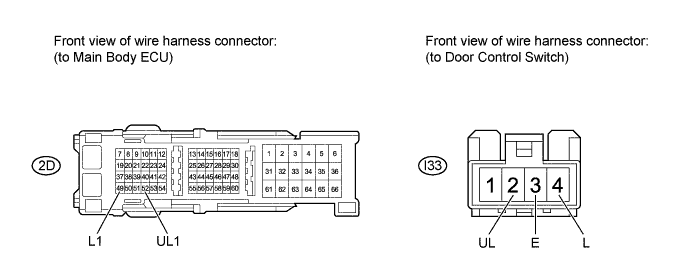
Disconnect the 2D ECU connector.
Disconnect the I33 switch connector.
Measure the resistance according to the value(s) in the table below.
- Standard Resistance:
Tester Connection
Condition
Specified Condition
2D-52 (UL1) - I33-2 (UL)
Always
Below 1 Ω
2D-49 (L1) - I33-4 (L)
Always
Below 1 Ω
I33-3 (E) - Body ground
Always
Below 1 Ω
I33-2 (UL) - Body ground
Always
10 kΩ or higher
I33-4 (L) - Body ground
Always
10 kΩ or higher
|
|
||||
| OK | ||
|
||
| ||