INSTALLATION
Removal / installation · Vehicles built from Sep 2011
| 1. INSTALL FRONT DRIVE SHAFT ASSEMBLY LH |

Coat the lip of the differential oil seal with MP grease.
- HINT:
- Inspect the oil seal for wear or damage.
Coat the spline of the inboard joint shaft assembly with hypoid gear oil.
Align the shaft splines and install the drive shaft with a brass bar and hammer.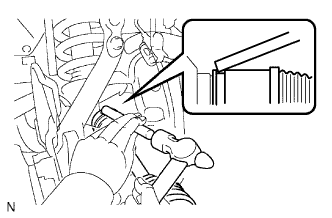

- NOTICE:
- Set the snap ring with the opening side facing downward.
- Be careful not to damage the oil seal.
- If the outboard joint shaft is new, remove the anti-rust oil on the screw end with non-residue solvent.
- Set the snap ring with the opening side facing downward.
- HINT:
- Whether the inboard joint shaft is in contact with the pinion shaft or not can be confirmed from the sound or feeling when tapping in the shaft.
| 2. INSTALL FRONT AXLE ASSEMBLY LH |
Install the front axle assembly (Click here).
| 3. ADD DIFFERENTIAL OIL |
Add differential oil so that the oil level is between 0 to 5 mm (0 to 0.197 in.) from the bottom lip of the differential filler plug hole.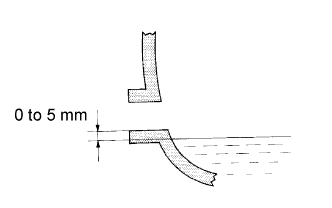
- NOTICE:
- Too much or too little oil will lead to differential problems.
- After changing the oil, drive the vehicle and then check the oil level again.
- Too much or too little oil will lead to differential problems.
- Front differential oil type and viscosity:
- Toyota Genuine Differential gear oil LT 75W-85 GL-5 or equivalent
- Rear Differential Oil Type and Viscosity:
Item
Oil Type and Viscosity
w/o LSD
Toyota Genuine Differential gear oil LT 75W-85 GL-5 or equivalent
w/ LSD
Toyota Genuine Differential gear oil LX 75W-85 GL-5 or equivalent
- Front differential capacity:
- 1.85 to 1.95 liters (1.96 to 2.06 US qts., 1.63 to 1.71 Imp. qts.)
- Rear Differential Capacity:
Item
Specified Condition
Standard
4.15 to 4.25 liters (4.39 to 4.49 US qts., 3.66 to 3.74 Imp. qts.)
w/ LSD
4.10 to 4.20 liters (4.34 to 4.43 US qts., 3.60 to 3.69 Imp. qts.)
w/ Differential lock
for Front Differential:
Using a 10 mm hexagon wrench, install a new gasket and the filler plug.
- Torque:
- 39 N*m{ 400 kgf*cm , 29 ft.*lbf }
Install the engine under cover.
for Rear Differential:
Install a new gasket and the filler plug.
- Torque:
- 49 N*m{ 500 kgf*cm , 36 ft.*lbf }
| 4. INSTALL FRONT FENDER SPLASH SHIELD SUB-ASSEMBLY LH |
 |
Push in the clip indicated by the arrow in the illustration to install the fender splash shield.
Install the 3 bolts and screw.
| 5. INSTALL FRONT FENDER SPLASH SHIELD SUB-ASSEMBLY RH |
- HINT:
- Use the same procedures described for the LH side.
| 6. INSTALL NO. 2 ENGINE UNDER COVER |
Install the No. 2 engine under cover with the 2 bolts.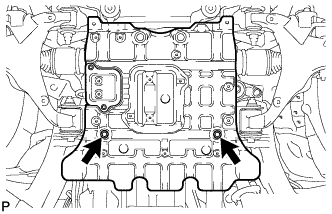
- Torque:
- 29 N*m{ 296 kgf*cm , 21 ft.*lbf }
| 7. INSTALL NO. 1 ENGINE UNDER COVER SUB-ASSEMBLY |
Install the No. 1 engine under cover with the 10 bolts.
- Torque:
- 29 N*m{ 296 kgf*cm , 21 ft.*lbf }