01-DF Master Error
Diagnostic trouble codes · Vehicles built from Jan 2012
Versions by build date: Sep 2011 – Dec 2011 from Jan 2012
DESCRIPTION
| DTC No. |
DTC Detection Condition |
Trouble Area |
| 01-DF *1 |
The device with a display fails and the master unit is switched to the audio device. Also when a communication error between the sub-master unit (audio) and master unit occurs, this DTC is stored. |
|
- HINT:
- *1: When 210 seconds have elapsed after disconnecting the power supply connector of the master component with the engine switch on (IG) or (ACC), this DTC is stored.
- NOTICE:
- Before starting troubleshooting, be sure to clear the DTCs stored due to the reason described in the HINT above. Then, check for DTCs and troubleshoot according to the output DTCs.
- The radio receiver assembly is the master unit.
- Be sure to clear and recheck for the DTCs after the inspection is completed to confirm that no DTCs are output.
- Before starting troubleshooting, be sure to clear the DTCs stored due to the reason described in the HINT above. Then, check for DTCs and troubleshoot according to the output DTCs.
INSPECTION PROCEDURE
- NOTICE:
- Be sure to read Description before performing the following procedure.
| 1. CHECK RADIO RECEIVER POWER SOURCE CIRCUIT |

- HINT:
- Refer to Radio Receiver Power Source Circuit (Click here).
| NEXT | |
 |
| 2. INSPECT RADIO RECEIVER ASSEMBLY |
Disconnect the F1 and F55 radio receiver assembly connectors.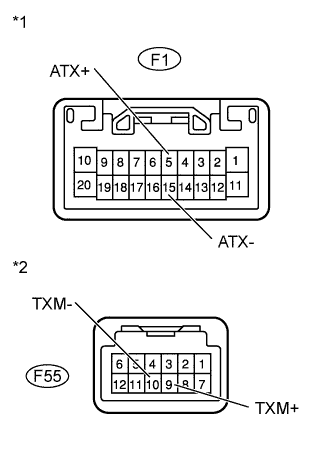

Measure the resistance according to the value(s) in the table below.
- Standard Resistance:
Tester Connection
Condition
Specified Condition
F1-5 (ATX+) - F1-15 (ATX-)
Always
60 to 80 Ω
F55-9 (TXM+) - F55-10 (TXM-)
Always
60 to 80 Ω
Text in Illustration *1
Component without harness connected
(Radio Receiver Assembly)
*2
Component without harness connected
(Radio Receiver Assembly)
|
|
||||

| OK | |
|
| 3. IDENTIFY COMPONENT WHICH HAS STORED THIS CODE |
Enter diagnostic mode.
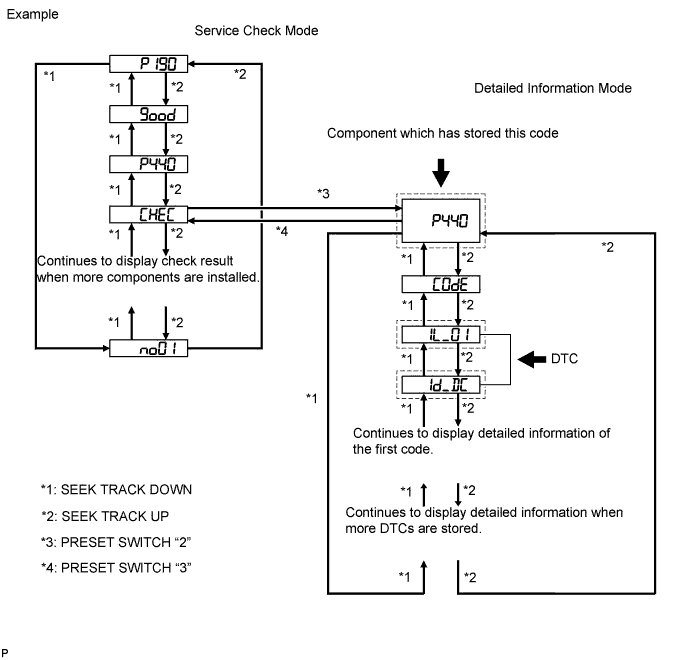
Press preset switch "2" to change the mode to "Detailed Information Mode".
Identify the component which has stored this code.
Component Table Component
Physical Address
Stereo component amplifier assembly
440
Radio receiver assembly
190
Multi-media interface ECU
388
- HINT:
- "P440" set by the stereo component amplifier assembly is shown in the preceding illustration as an example.
- For details of the DTC display, refer to DTC Check/Clear (Click here).
- "P440" set by the stereo component amplifier assembly is shown in the preceding illustration as an example.
| NEXT | |
|
| 4. CHECK COMPONENT SHOWN BY SUB-CODE |
Select the component shown by the sub-code.
Component Table Component
Proceed to
Except radio receiver assembly
A
Radio receiver assembly (190)
B
|
|
||||
| A | |
|
| 5. CHECK HARNESS AND CONNECTOR (AVC-LAN CIRCUIT) |
- HINT:
- For details of the connectors, refer to Terminals of ECU (Click here).
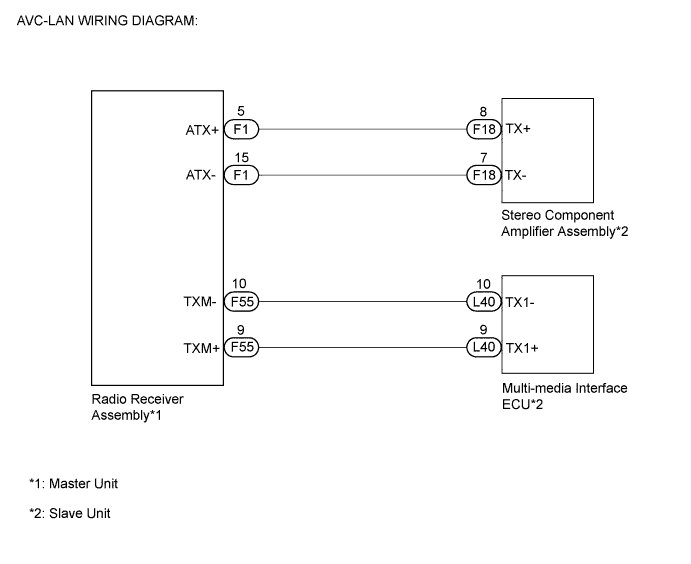
Referring to the following AVC-LAN wiring diagram, check the AVC-LAN circuit between the radio receiver assembly and component which has stored this code.
Disconnect all connectors between the radio receiver assembly and component which has stored this code.
Check for an open or short in the AVC-LAN circuit between the radio receiver assembly and component which has stored this code.
- OK:
- There is no open or short circuit.
|
|
||||
| OK | |
|
| 6. REPLACE RADIO RECEIVER ASSEMBLY |
Replace the radio receiver assembly with a known good one.
| NEXT | |
|
| 7. CLEAR DTC |
Clear the DTCs (Click here).
| NEXT | |
|
| 8. RECHECK FOR DTC |
Recheck for DTCs and check if the same problem occurs again.
- OK:
- Malfunction disappears.
|
|
||||
| OK | ||
 |
||
| ||