Radio Receiver Communication Error
Circuit diagnosis · Vehicles built from Jan 2012
Versions by build date: Sep 2011 – Dec 2011 from Jan 2012
INSPECTION PROCEDURE
| 1. IDENTIFY COMPONENT SHOWN BY SUB-CODE |
 |
Enter diagnostic mode.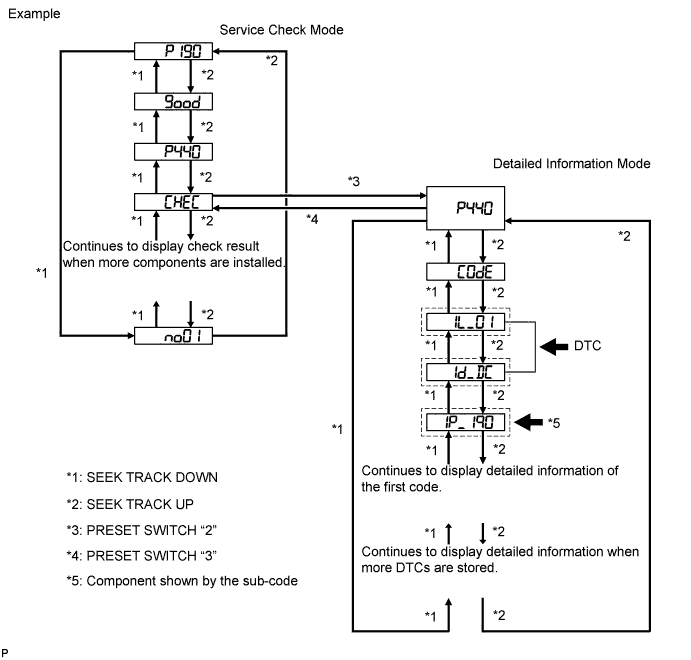

Press preset switch "2" to change the mode to "Detailed Information Mode".
Identify the component shown by the sub-code.
- HINT:
- "P190" set by the radio receiver assembly is shown in the preceding illustration as an example.
- For details of the DTC display, refer to DTC Check/Clear (Click here).
| NEXT |
|
 |
|
| 2. CHECK COMPONENT SHOWN BY SUB-CODE |
|
Select the component shown by the sub-code.
Component Table
Component
|
Proceed to
|
Except radio receiver assembly
|
A
|
Radio receiver assembly (190)
|
B
|
|
B |
 |
|
|
|
| A |
|
|
|
| 3. CHECK POWER SOURCE CIRCUIT OF COMPONENT SHOWN BY SUB-CODE |
|
Inspect the power source circuit of the component shown by the sub-code.If the power source circuit is operating normally, proceed to the next step.
Component Table
Component
|
Proceed to
|
Stereo component amplifier assembly (440)
|
Stereo component amplifier power source circuit (Click here)
|
Multi-media interface ECU (388)
|
Multi-media interface ECU power source circuit (Click here)
|
| NEXT |
|
|
|
| 4. INSPECT RADIO RECEIVER ASSEMBLY |
|
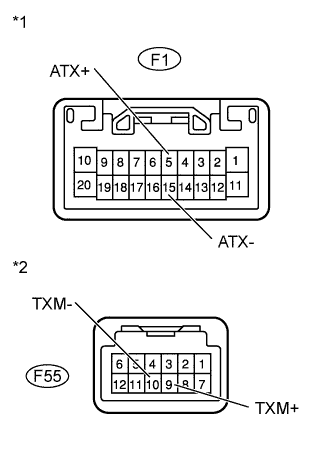
- Disconnect the F1 and F55 radio receiver assembly connectors.
Measure the resistance according to the value(s) in the table below.
- Standard Resistance:
Tester Connection
|
Condition
|
Specified Condition
|
F1-5 (ATX+) - F1-15 (ATX-)
|
Always
|
60 to 80 Ω
|
F55-9 (TXM+) - F55-10 (TXM-)
|
Always
|
60 to 80 Ω
|
Text in Illustration
*1
|
Component without harness connected
(Radio Receiver Assembly)
|
*2
|
Component without harness connected
(Radio Receiver Assembly)
|
|
NG |
|
|
|
|
| OK |
|
|
|
| 5. CHECK HARNESS AND CONNECTOR (RADIO RECEIVER ASSEMBLY - COMPONENT SHOWN BY SUB-CODE) |
|
- HINT:
- Start the check from the circuit that is near the component shown by the sub-code first.
- For details of the connectors, refer to Terminals of ECU (Click here).
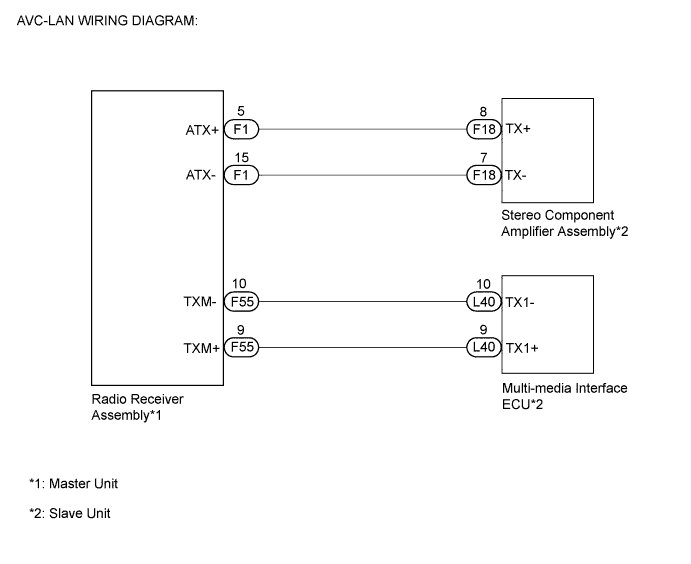
Referring to the following AVC-LAN wiring diagram, check the AVC-LAN circuit between the radio receiver assembly and component shown by the sub-code.
Disconnect all connectors between the radio receiver assembly and component shown by the sub-code.
Check for an open or short in the AVC-LAN circuit between the radio receiver assembly and component shown by the sub-code.
- OK:
- There is no open or short circuit.
|
NG |
|
|
| REPAIR OR REPLACE HARNESS OR CONNECTOR |
|
|
| OK |
|
|
|
| 6. REPLACE COMPONENT SHOWN BY SUB-CODE |
|
Replace the component shown by the sub-code with a known good one and check if the same problem occurs again.
- OK:
- Malfunction disappears.
|
NG |
|
|
|
|
| OK |
|
 |
|
|