P0122 Throttle / Pedal Position Sensor / Switch "A" Circuit Low Input
Diagnostic trouble codes · Vehicles built from Jan 2012
Also covers:
- P0123 Throttle / Pedal Position Sensor / Switch "A" Circuit High Input
- P0222 Throttle / Pedal Position Sensor / Switch "B" Circuit Low Input
- P0223 Throttle / Pedal Position Sensor / Switch "B" Circuit High Input
DESCRIPTION
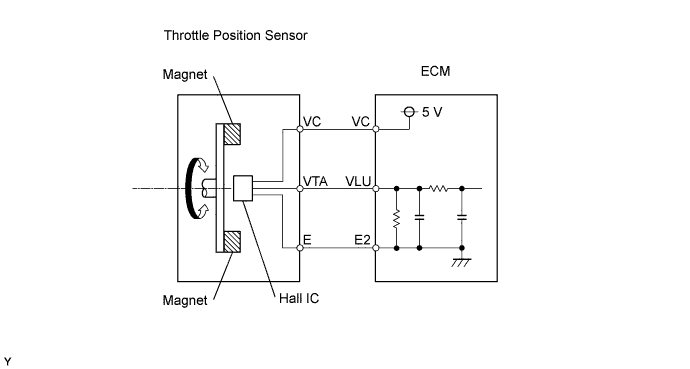
The throttle position sensor is mounted on the diesel throttle body assembly and detects the opening angle of the throttle valve. This sensor is an electronic sensor and uses Hall-effect elements.When the throttle valve is fully closed, a voltage of approximately 0.7 V is applied to terminal VLU of the ECM. The voltage applied to terminal VLU of the ECM increases in proportion to the opening angle of the throttle valve and becomes approximately 3.5 to 4.0 V when the throttle valve is fully opened.
The ECM determines the vehicle driving conditions from the signals input to its VLU terminal. The data is one of the pieces of information used for EGR control, etc.

| DTC Detection Drive Pattern |
DTC Detection Condition |
Trouble Area |
| Engine switch on (IG) for 3 seconds |
Throttle position sensor output (VLU, VLU2) is below 0.2 V for 3 seconds. (1 trip detection logic) |
|
| DTC Detection Drive Pattern |
DTC Detection Condition |
Trouble Area |
| Engine switch on (IG) for 3 seconds |
Throttle position sensor output (VLU, VLU2) is higher than 4.8 V for 3 seconds. (1 trip detection logic) |
|
- HINT:
- If DTC P0122, P0123, P0222 and/or P0223 is stored, the following symptoms may appear:
- - Intake booming noise
- - Black smoke
- - Lack of power
- - Vibration at engine stop
- - Turbo overspeed, turbo damage
MONITOR DESCRIPTION
When the output voltage of the throttle position sensor deviates from the normal operating range (between 0.2 V and 4.8 V) for more than 3 seconds, the ECM interprets this as a malfunction of the sensor circuit and illuminates the MIL.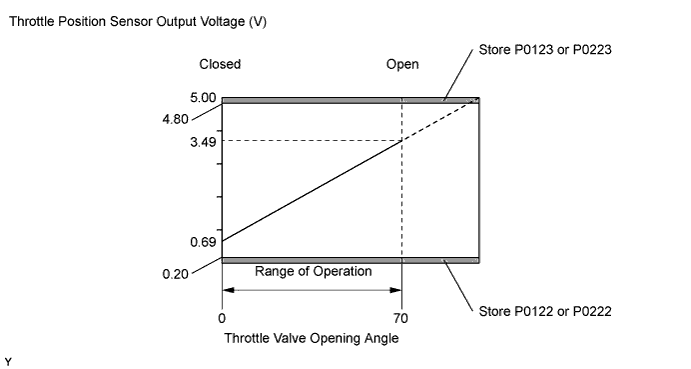
WIRING DIAGRAM
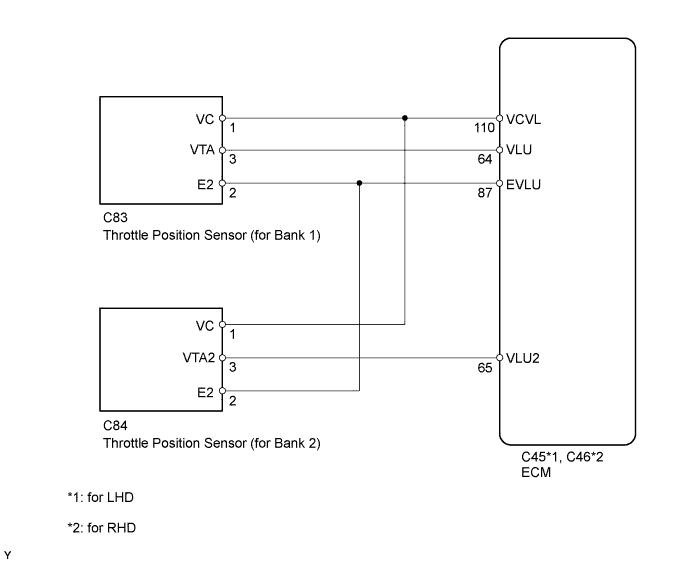
INSPECTION PROCEDURE
- NOTICE:
- After replacing the ECM, the new ECM needs registration (Click here) and initialization (Click here).
- After replacing the fuel supply pump assembly, the ECM needs initialization (Click here).
- After replacing an injector assembly, the ECM needs registration (Click here).
- After replacing the ECM, the new ECM needs registration (Click here) and initialization (Click here).
- HINT:
- Read freeze frame data using the GTS. Freeze frame data records the engine condition when malfunctions are detected. When troubleshooting, freeze frame data can help determine if the vehicle was moving or stationary, if the engine was warmed up or not, and other data from the time the malfunction occurred.
| 1. CHECK HARNESS AND CONNECTOR (THROTTLE POSITION SENSOR - ECM) |

Disconnect the throttle position sensor connector.
Disconnect the ECM connector.
Measure the resistance according to the value(s) in the table below.
- Standard Resistance:
for LHD Tester Connection
Condition
Specified Condition
C83-1 (VC) - C45-110 (VCVL)
Always
Below 1 Ω
C83-3 (VTA) - C45-64 (VLU)
Always
Below 1 Ω
C83-2 (E2) - C45-87 (EVLU)
Always
Below 1 Ω
C84-1 (VC) - C45-110 (VCVL)
Always
Below 1 Ω
C84-3 (VTA2) - C45-65 (VLU2)
Always
Below 1 Ω
C84-2 (E2) - C45-87 (EVLU)
Always
Below 1 Ω
C83-1 (VC) or C45-110 (VCVL) - Body ground
Always
10 kΩ or higher
C83-3 (VTA) or C45-64 (VLU) - Body ground
Always
10 kΩ or higher
C84-1 (VC) or C45-110 (VCVL) - Body ground
Always
10 kΩ or higher
C84-3 (VTA2) or C45-65 (VLU2) - Body ground
Always
10 kΩ or higher
- Standard Resistance:
for RHD Tester Connection
Condition
Specified Condition
C83-1 (VC) - C46-110 (VCVL)
Always
Below 1 Ω
C83-3 (VTA) - C46-64 (VLU)
Always
Below 1 Ω
C83-2 (E2) - C46-87 (EVLU)
Always
Below 1 Ω
C84-1 (VC) - C46-110 (VCVL)
Always
Below 1 Ω
C84-3 (VTA2) - C46-65 (VLU2)
Always
Below 1 Ω
C84-2 (E2) - C46-87 (EVLU)
Always
Below 1 Ω
C83-1 (VC) or C46-110 (VCVL) - Body ground
Always
10 kΩ or higher
C83-3 (VTA) or C46-64 (VLU) - Body ground
Always
10 kΩ or higher
C84-1 (VC) or C46-110 (VCVL) - Body ground
Always
10 kΩ or higher
C84-3 (VTA2) or C46-65 (VLU2) - Body ground
Always
10 kΩ or higher
Reconnect the throttle position sensor connector.
Reconnect the ECM connector.
|
|
||||

| OK | |
 |
| 2. CHECK ECM TERMINAL VOLTAGE (VC TERMINAL) |
Disconnect the throttle position sensor connector.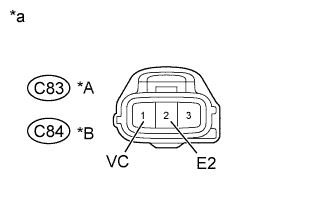
Measure the voltage according to the value(s) in the table below.
- Standard Voltage:
Tester Connection
Switch Condition
Specified Condition
C83-1 (VC) - C83-2 (E2)
Engine switch on (IG)
4.5 to 5.5 V
C84-1 (VC) - C84-2 (E2)
Engine switch on (IG)
4.5 to 5.5 V
Text in Illustration *A
for Bank 1
*B
for Bank 2
*a
Front view of wire harness connector
(to Throttle Position Sensor)
Reconnect the throttle position sensor connector.
|
|
||||
| OK | |
|
| 3. REPLACE DIESEL THROTTLE BODY ASSEMBLY |
- Replace the diesel throttle body assembly (for bank 1) (Click here).
- Replace the diesel throttle body assembly (for bank 2) (Click here).
| NEXT | |
|
| 4. READ VALUE USING GTS |
Connect the GTS to the DLC3.
Turn the engine switch on (IG) and turn the GTS on.
Clear the DTCs (Click here).
Enter the following menus: Engine and ECT / Data List / Actual Throttle position, Actual Throttle position #2.
Check the movement of the throttle valve when idling the engine after starting it from engine switch on (IG).
- OK:
Condition
GTS Display
Engine switch on (IG)
95 to 105%
Idling
5 to 15%
|
|
||||
| OK | ||
 |
||
| ||
| 5. REPLACE ECM |
Replace the ECM (Click here).
|
|
||||
| 6. REPAIR OR REPLACE HARNESS OR CONNECTOR |
Repair or replace the harness or connector.
| NEXT | |
|
| 7. CONFIRM WHETHER MALFUNCTION HAS BEEN SUCCESSFULLY REPAIRED |
Connect the GTS to the DLC3.
Clear the DTCs (Click here).
Turn the engine switch off.
Turn the engine switch on (IG) for 3 seconds.
Enter the following menus: Engine and ECT / Trouble Codes.
Confirm that the DTC is not output again.
| NEXT | ||
|
||
| ||