PTC Heater Circuit
Circuit diagnosis · Vehicles built Sep 2011 – Dec 2011
Versions by build date: Sep 2011 – Dec 2011 from Jan 2012
DESCRIPTION
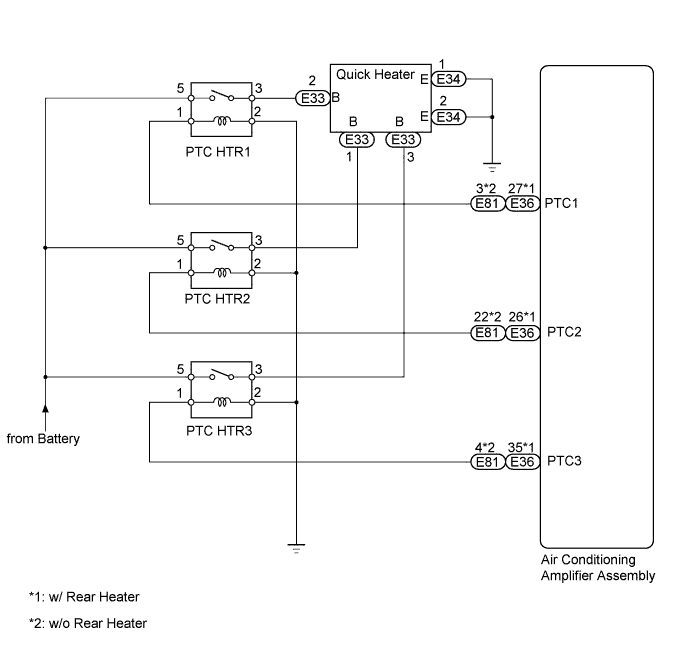
PTC heater relays are closed in accordance with signals from the air conditioning amplifier assembly and power is supplied to the quick heater assembly installed on the radiator heater unit.WIRING DIAGRAM

INSPECTION PROCEDURE
| 1. INSPECT PTC HEATER RELAY (PTC HTR1) |

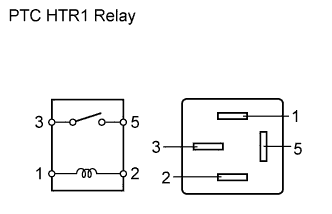 |
Remove the PTC HTR1 relay from the engine room relay block.
Measure the resistance according to the value(s) in the table below.
- Standard Resistance:
Tester Connection
Condition
Specified Condition
3 - 5
Battery voltage not applied between terminals 1 and 2
10 kΩ or higher
Battery voltage applied to terminals 1 and 2
Below 1 Ω
|
|
||||

| OK | |
 |
| 2. INSPECT PTC HEATER RELAY (PTC HTR2) |
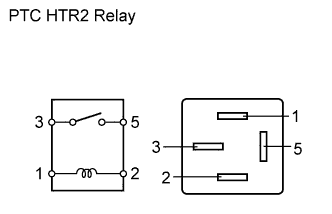 |
Remove the PTC HTR2 relay from the engine room relay block.
Measure the resistance according to the value(s) in the table below.
- Standard Resistance:
Tester Connection
Condition
Specified Condition
3 - 5
Battery voltage not applied between terminals 1 and 2
10 kΩ or higher
Battery voltage applied to terminals 1 and 2
Below 1 Ω
|
|
||||
| OK | |
|
| 3. INSPECT PTC HEATER RELAY (PTC HTR3) |
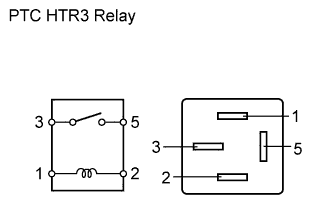 |
Remove the PTC HTR3 relay from the engine room relay block.
Measure the resistance according to the value(s) in the table below.
- Standard Resistance:
Tester Connection
Condition
Specified Condition
3 - 5
Battery voltage not applied between terminals 1 and 2
10 kΩ or higher
Battery voltage applied to terminals 1 and 2
Below 1 Ω
|
|
||||
| OK | |
|
| 4. CHECK AIR CONDITIONING AMPLIFIER ASSEMBLY |
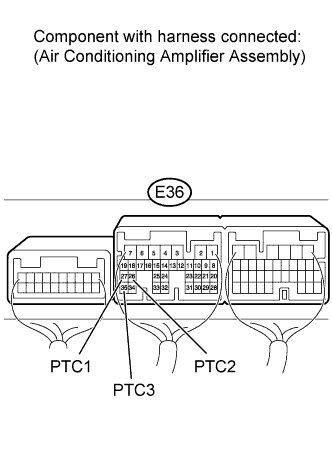 |
w/ Rear Heater
Remove the air conditioning amplifier assembly with its connectors still connected (Click here).
Measure the voltage according to the value(s) in the table below.
- Standard Voltage:
Tester Connection
Condition
Specified Condition
E36-27 (PTC1) - Body ground
Engine switch on (IG)
Temperature setting: MAX, HOT
MODE switch: FOOT
Engine coolant temperature: 55°C (131°F) or less
Blower switch: off
11 to 14 V
E36-26 (PTC2) - Body ground
E36-35 (PTC3) - Body ground
w/o Rear Heater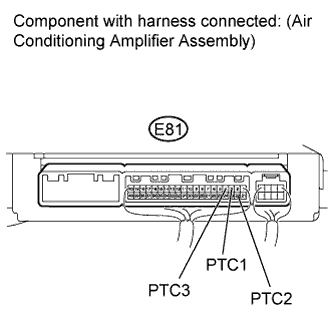
Remove the air conditioning amplifier assembly with its connectors still connected (Click here).
Measure the voltage according to the value(s) in the table below.
- Standard Voltage:
Tester Connection
Condition
Specified Condition
E81-3 (PTC1) - Body ground
Engine switch on (IG)
Temperature setting: MAX, HOT
MODE switch: FOOT
Engine coolant temperature: 55°C (131°F) or less
Blower switch: off
11 to 14 V
E81-22 (PTC2) - Body ground
E81-4 (PTC3) - Body ground
|
|
||||

| OK | |
|
| 5. CHECK HARNESS AND CONNECTOR (PTC HEATER RELAY - QUICK HEATER) |
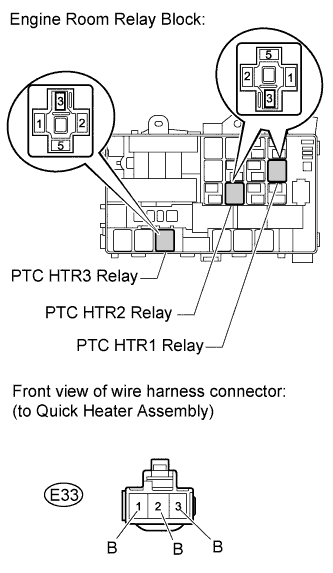 |
Remove the quick heater relays from the engine room relay block.
Disconnect the E33 quick heater assembly connector.
Measure the resistance according to the value(s) in the table below.
- Standard Resistance:
Tester Connection
Condition
Specified Condition
PTC HTR2 terminal 3 - E33-1 (B)
Always
Below 1 Ω
PTC HTR1 terminal 3 - E33-2 (B)
PTC HTR3 terminal 3 - E33-3 (B)
PTC HTR2 terminal 3 - Body ground
Always
10 kΩ or higher
PTC HTR1 terminal 3 - Body ground
PTC HTR3 terminal 3 - Body ground
|
|
||||
| OK | |
|
| 6. INSPECT QUICK HEATER ASSEMBLY |
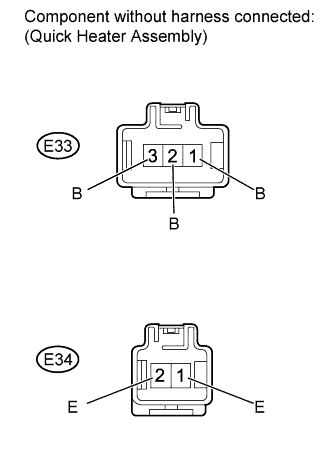 |
Disconnect the E33 and E34 quick heater connectors.
Measure the resistance according to the value(s) in the table below.
- Standard Resistance:
Tester Connection
Condition
Specified Condition
E33-1 (B) - E34-1 (E)
Always
Below 1 Ω
E33-2 (B) - E34-1 (E)
E33-3 (B) - E34-2 (E)
|
|
||||
| OK | |
|
| 7. CHECK HARNESS AND CONNECTOR (QUICK HEATER - BODY GROUND) |
Disconnect the E34 quick heater assembly connector.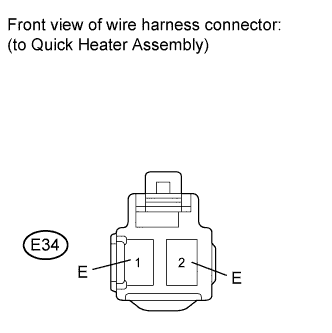
Measure the resistance according to the value(s) in the table below.
- Standard Resistance:
Tester Connection
Condition
Specified Condition
E34-1 (E) - Body ground
Always
10 kΩ or higher
E34-2 (E) - Body ground
|
|
||||
| OK | |
|
| 8. CHECK HARNESS AND CONNECTOR (AIR CONDITIONING AMPLIFIER - PTC HTR RELAY) |
 |
w/ Rear Heater
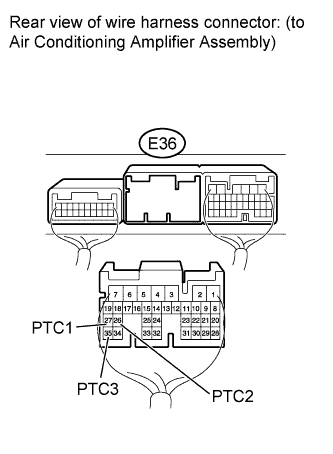
Disconnect the E36 amplifier connector.
Measure the resistance according to the value(s) in the table below.
- Standard Resistance:
Tester Connection
Condition
Specified Condition
E36-27 (PTC1) - Body ground
Always
Below 1 Ω
E36-26 (PTC2) - Body ground
E36-35 (PTC3) - Body ground
w/o Rear Heater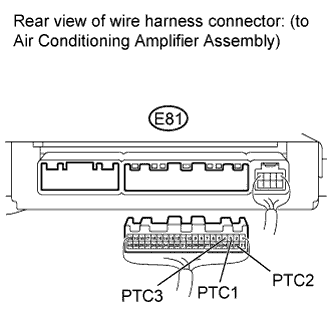
Disconnect the E81 amplifier connector.
Measure the resistance according to the value(s) in the table below.
- Standard Resistance:
Tester Connection
Condition
Specified Condition
E81-3 (PTC1) - Body ground
Always
Below 1 Ω
E81-22 (PTC2) - Body ground
E81-4 (PTC3) - Body ground
Result Result
Proceed to
OK (for LHD)
A
OK (for RHD)
B
NG
C
|
|
||||
| OK | ||
 |
||
| ||