REMOVAL
Removal / installation · Vehicles built Sep 2011 – Dec 2011
Versions by build date: Sep 2011 – Dec 2011 from Jan 2012
| 1. DISCHARGE FUEL SYSTEM PRESSURE |

| 2. DISCONNECT CABLE FROM NEGATIVE BATTERY TERMINAL |
- NOTICE:
- When disconnecting the cable, some systems need to be initialized after the cable is reconnected (Click here).
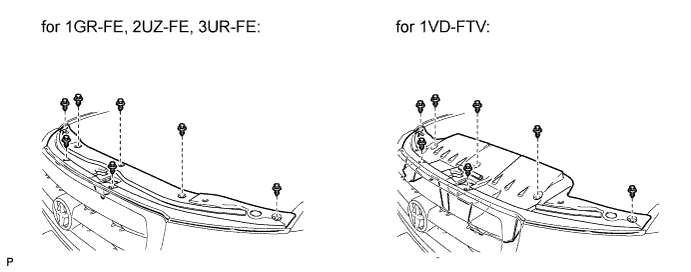
| 3. REMOVE UPPER RADIATOR SUPPORT SEAL |
Remove the 7 clips and radiator support seal.

| 4. REMOVE RADIATOR GRILLE |
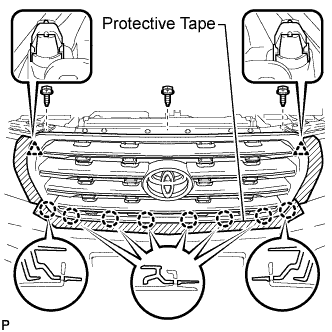 |
Put protective tape around the radiator grille.
Remove the 3 screws.
Detach the 2 clips and 8 claws, and remove the radiator grille.
| 5. REMOVE FRONT BUMPER COVER |
- HINT:
- For the front bumper cover with garnish, use the procedures described below.
Put protective tape around the bumper cover.
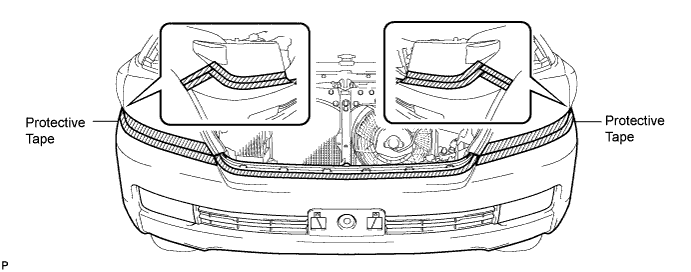
Using a T30 "TORX" socket, remove the 6 screws.
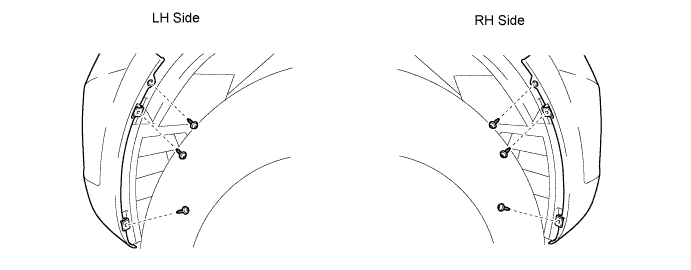
Remove the 3 clips, 4 screws and 4 bolts.
w/o TOYOTA Parking Assist-sensor System, w/o Fog Light:
Detach the 10 claws and remove the bumper cover.
w/ TOYOTA Parking Assist-sensor System or w/ Fog Light:
Detach the 10 claws, disconnect the No. 4 engine room wire connector and remove the bumper cover.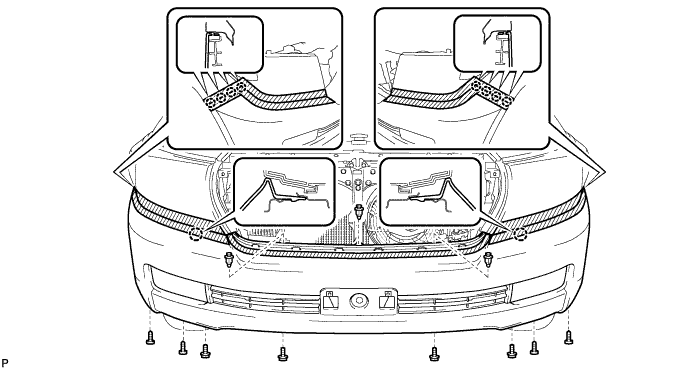
w/ Headlight Cleaner System: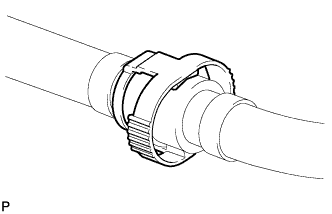
Disconnect the headlight cleaner hose and remove the bumper cover.
| 6. REMOVE TRANSMISSION OIL COOLER AIR DUCT |
Remove the 4 bolts and oil cooler air duct.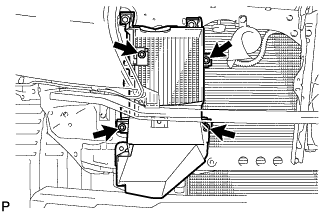
| 7. DISCONNECT RADIATOR SIDE DEFLECTOR LH |
Using a clip remover, remove the 4 clips and disconnect the side deflector.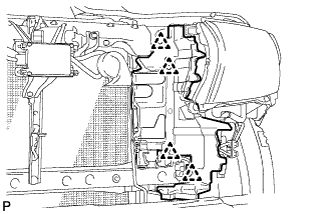
| 8. REMOVE FRONT FENDER MAIN SEAL LH |
Using a clip remover, detach the 3 clips and remove the fender main seal.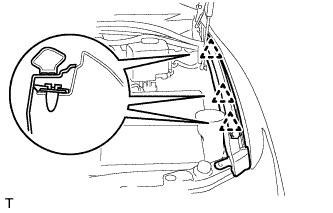
| 9. REMOVE FRONT FENDER MAIN SEAL RH |
- HINT:
- Use the same procedures described for the LH side.
| 10. REMOVE FRONT WIPER ARM LH |
Remove the nut, wiper arm and blade.
| 11. REMOVE FRONT WIPER ARM RH |
Remove the nut, wiper arm and blade.
| 12. REMOVE HOOD TO COWL TOP SEAL |
Using a clip remover, detach the 12 clips, 4 clamps and remove the hood to cowl top seal.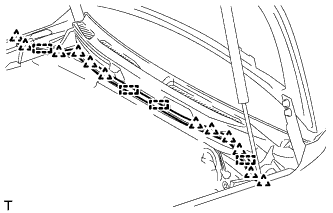
| 13. REMOVE COWL TOP VENTILATOR LOUVER SUB-ASSEMBLY |
Remove the washer hose.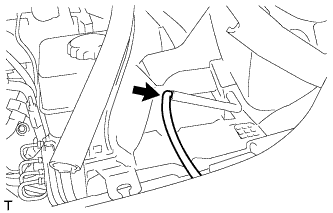
Remove the 2 clips.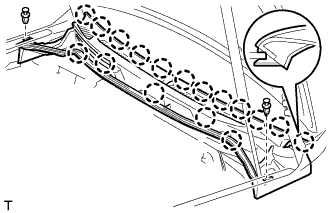
Detach the 17 claws and remove the cowl top ventilator louver sub-assembly.
| 14. REMOVE FRONT FENDER SPLASH SHIELD SUB-ASSEMBLY LH |
 |
Remove the 3 bolts and screw.
Turn the clip indicated by the arrow in the illustration to remove the fender splash shield.
| 15. REMOVE FRONT FENDER SPLASH SHIELD SUB-ASSEMBLY RH |
- HINT:
- Use the same procedures described for the LH side.
| 16. REMOVE NO. 1 ENGINE UNDER COVER SUB-ASSEMBLY |
Remove the 10 bolts and No. 1 engine under cover.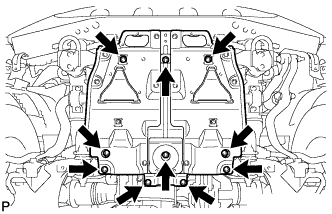
| 17. REMOVE NO. 2 ENGINE UNDER COVER |
Remove the 2 bolts and No. 2 engine under cover.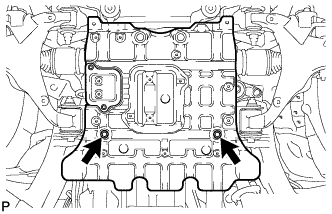
| 18. REMOVE FRONT FENDER APRON SEAL LH |
Using a clip remover, remove the 3 clips and fender apron seal.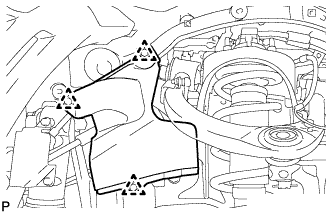
| 19. REMOVE FRONT FENDER APRON SEAL FRONT RH |
Using a clip remover, remove the 3 clips and fender apron seal.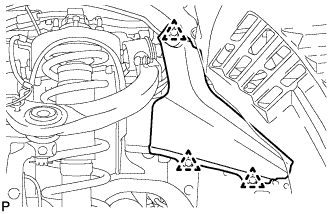
| 20. DRAIN ENGINE OIL |
Remove the oil filler cap.
Remove the 2 bolts and No. 2 engine under cover seal.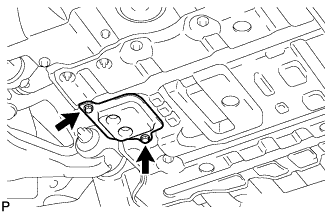
Remove the oil pan drain plug and gasket, and drain the engine oil into a container.
Install a new gasket and the oil pan drain plug.
- Torque:
- 40 N*m{ 408 kgf*cm , 30 ft.*lbf }
| 21. DRAIN ENGINE COOLANT |
- CAUTION:
- Do not remove the radiator cap while the engine and radiator are still hot. Pressurized, hot engine coolant and steam may be released and cause serious burns.
Loosen the radiator drain cock plug.
- HINT:
- Collect the coolant in a container and dispose of it according to the regulations in your area.
Remove the radiator cap. Then drain the coolant from the radiator.
Loosen the 2 cylinder block drain cock plugs. Then drain the coolant from the engine.
Tighten the 2 cylinder block drain cock plugs.
- Torque:
- 13 N*m{ 133 kgf*cm , 10 ft.*lbf }
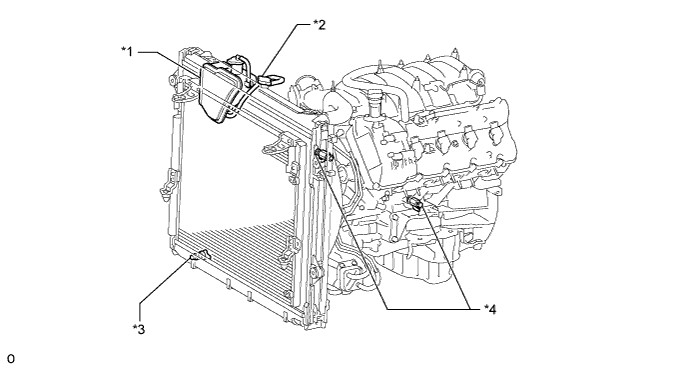
Text in Illustration *1
Radiator Reservoir
*2
Radiator Cap
*3
Radiator Drain Cock Plug
*4
Cylinder Block Drain Cock Plug
Tighten the radiator drain cock plug by hand.
| 22. REMOVE V-BANK COVER SUB-ASSEMBLY |
Raise the front of the V-bank cover to detach the 3 pins. Then remove the 2 V-bank cover hooks from the bracket, and remove the V-bank cover.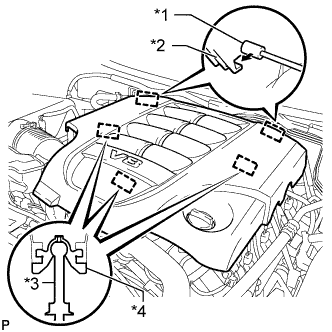
Text in Illustration *1
Bracket
*2
Hook
*3
Pin
*4
Grommet
| 23. REMOVE AIR CLEANER HOSE ASSEMBLY |
Disconnect the vacuum hose and No. 2 ventilation hose.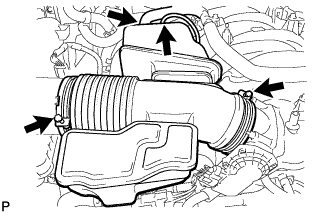
Loosen the 2 hose clamps.
Remove the air cleaner hose.
| 24. REMOVE AIR CLEANER ASSEMBLY |
Remove the 3 bolts and air cleaner.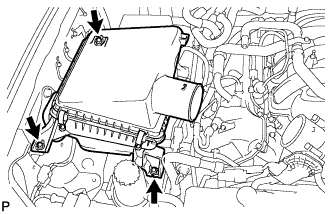
| 25. REMOVE NO. 1 RADIATOR HOSE |
| 26. REMOVE NO. 2 RADIATOR HOSE |
| 27. REMOVE FAN SHROUD |
Loosen the 4 nuts holding the fluid coupling fan.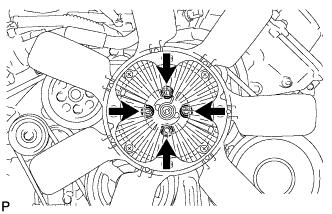
Remove the fan and generator V-belt (Click here).
Disconnect the reservoir hose from the upper radiator tank.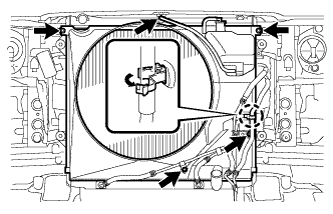
Detach the claw to open the flexible hose clamp.
Remove the 2 bolts and disconnect the oil cooler tube from the fan shroud.
Remove the 2 bolts holding the fan shroud.
Remove the 4 nuts of the fluid coupling fan, and then remove the shroud together with the coupling fan.
- NOTICE:
- Be careful not to damage the radiator core.
Remove the fan pulley.
| 28. REMOVE RADIATOR ASSEMBLY |
Disconnect the 2 oil cooler hoses.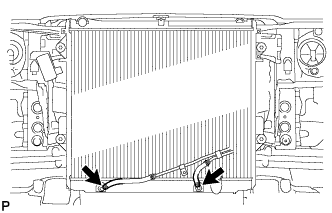
Remove the 4 bolts and radiator.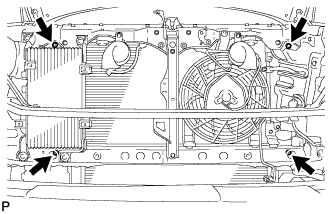
| 29. DISCONNECT ENGINE WIRE |
Engine Room LH Side:
Remove the engine room relay block cover.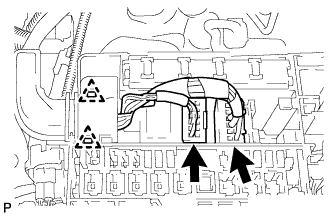
Disconnect the 2 connectors and 2 clips from the engine room junction block.
Disconnect the injector connector.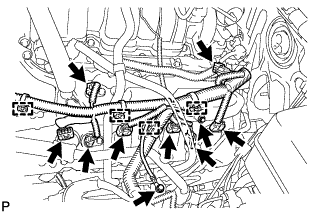
Disconnect the 4 ignition coil connectors.
Disconnect the 2 VVT sensor connectors.
Disconnect the 4 clamps.
Remove the 2 bolts and ground wire.
Disconnect the noise filter connector.
Disconnect the engine coolant temperature sensor connector.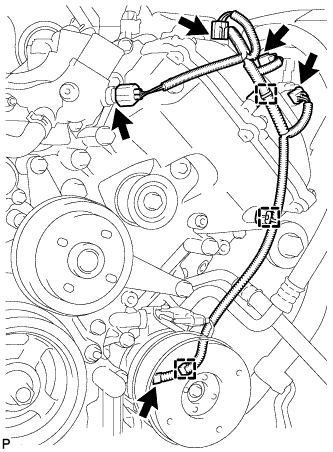
Disconnect the 2 camshaft timing oil control valve connectors.
Disconnect the camshaft position sensor connector.
Disconnect the 3 clamps.
Disconnect the cooler compressor connector.
Engine Room RH Side: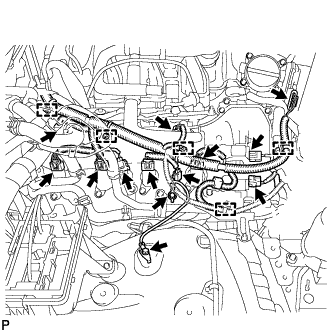
Disconnect the 2 camshaft timing oil control valve connectors.
Disconnect the 4 ignition coil connectors.
Disconnect the injector connector.
Disconnect the 2 VVT sensor connectors.
Disconnect the noise filter connector.
Remove the 2 bolts and ground wire.
Disconnect the throttle position sensor and throttle control motor connector.
Disconnect the 5 clamps.
Disconnect the 2 clamps and power steering oil pressure switch connector.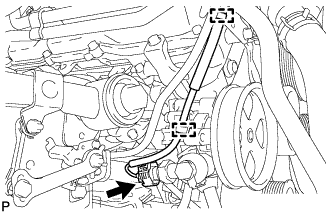
| 30. DISCONNECT WATER PIPE AND HOSE SUB-ASSEMBLY |
Disconnect the 3 hoses.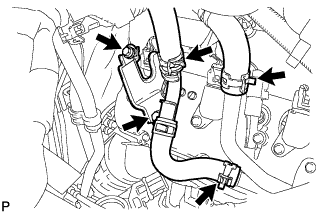
Remove the 2 bolts and disconnect the water pipe and hose from the cylinder head cover.
| 31. DISCONNECT COOLER COMPRESSOR ASSEMBLY |
Remove the 3 bolts, nut and stud bolt, and disconnect the cooler compressor.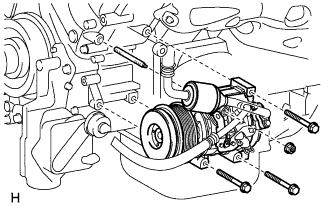
- HINT:
- It is not necessary to completely remove the compressor. With the hoses connected to the compressor, hang the compressor on the vehicle body with a rope.
| 32. DISCONNECT NO. 2 FUEL TUBE SUB-ASSEMBLY |
Remove the 2 bolts and disconnect the fuel tube.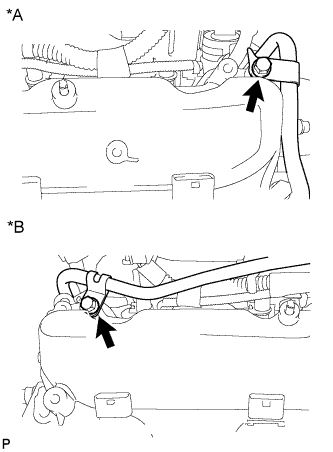
Text in Illustration *A
LH Side
*B
RH Side
| 33. REMOVE OIL FILTER ELEMENT |
Connect a hose with an inside diameter of 15 mm (0.591 in.) to the pipe.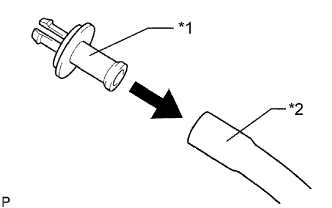
Text in Illustration *1
Pipe
*2
Hose
Remove the oil filter drain plug.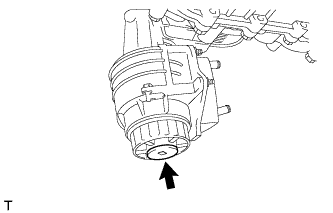
Install the pipe to the oil filter cap.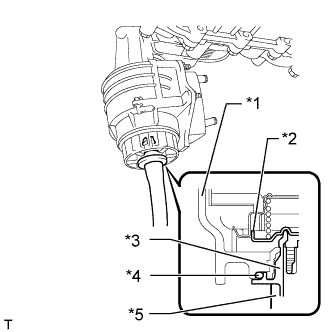
Text in Illustration *1
Cap
*2
Valve
*3
Pipe
*4
O-Ring
*5
Hose
- NOTICE:
- If the O-ring is removed with the drain plug, install the O-ring together with the pipe.
- HINT:
- Use a container to catch the draining oil.
Check that oil is drained from the oil filter. Then disconnect the pipe and remove the O-ring as shown in the illustration.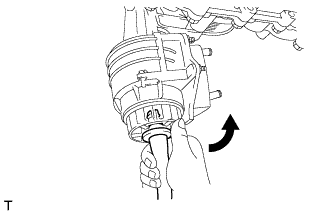
Using SST, remove the oil filter cap.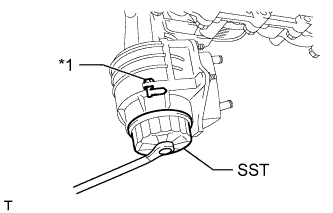
- SST
- 09228-06501
Text in Illustration *1
Oil Filter Bracket Clip
- NOTICE:
- Do not remove the oil filter bracket clip.
Remove the oil filter element and O-ring from the oil filter cap.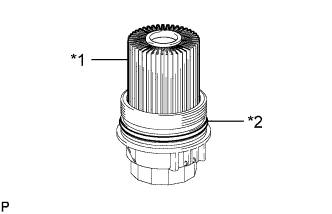
Text in Illustration *1
Oil Filter Element
*2
O-Ring
- NOTICE:
- Be sure to remove the cap O-ring by hand, without using any tools, to prevent damage to the cap O-ring groove.
| 34. REMOVE ENGINE OIL LEVEL DIPSTICK GUIDE |
Disconnect the wire harness clamp.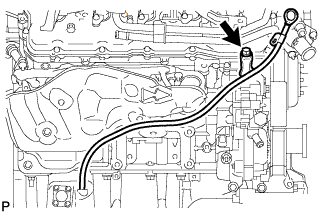
Remove the dipstick.
Remove the bolt and dipstick guide.
Remove the O-ring from the dipstick guide.
| 35. REMOVE OIL PRESSURE SENDER GAUGE ASSEMBLY |
Disconnect the sender gauge connector.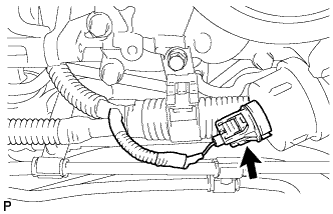
Remove the oil pressure sender gauge.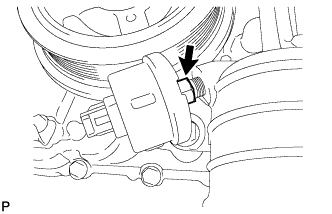
| 36. REMOVE NO. 2 WATER BY-PASS PIPE SUB-ASSEMBLY |
Remove the 3 bolts.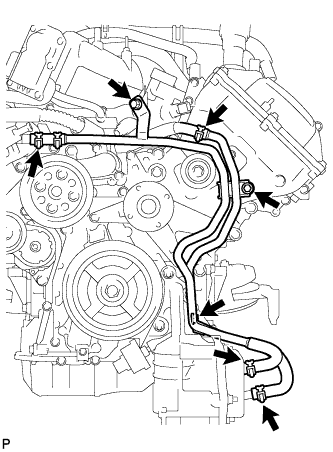
Disconnect the 4 hoses and remove the water by-pass pipe.
| 37. REMOVE NO. 1 OIL COOLER BRACKET |
Remove the 2 nuts and bracket.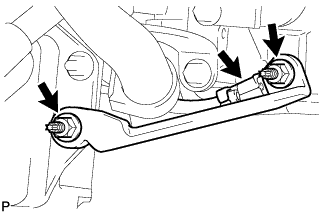
Disconnect the ground wire from the cylinder block.
| 38. REMOVE OIL FILTER BRACKET |
Connect a hose with an inside diameter of 15 mm (0.591 in.) to the pipe.
Text in Illustration *1
Pipe
*2
Hose
Remove the oil filter drain plug.
Install the pipe to the oil filter cap.
Text in Illustration *1
Cap
*2
Valve
*3
Pipe
*4
O-Ring
*5
Hose
- NOTICE:
- If the O-ring is removed with the drain plug, install the O-ring together with the pipe.
- HINT:
- Use a container to catch the draining oil.
Check that oil is drained from the oil filter. Then disconnect the pipe and remove the O-ring as shown in the illustration.
Using SST, remove the oil filter cap.
- SST
- 09228-06501
Text in Illustration *1
Oil Filter Bracket Clip
- NOTICE:
- Do not remove the oil filter bracket clip.
Remove the oil filter element and O-ring from the oil filter cap.
Text in Illustration *1
Oil Filter Element
*2
O-Ring
- NOTICE:
- Be sure to remove the cap O-ring by hand, without using any tools, to prevent damage to the cap O-ring groove.
| 39. REMOVE INTAKE MANIFOLD |
Disconnect the ventilation hose from the ventilation pipe of the cylinder head cover LH and RH.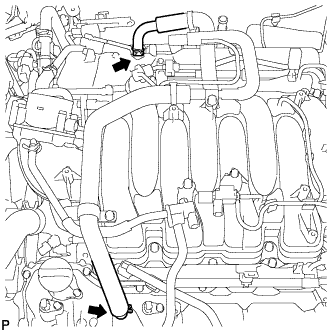
Disconnect the 2 water by-pass hoses.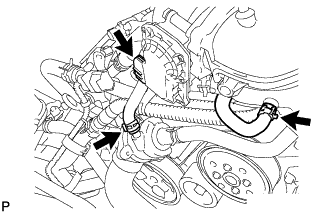
Disconnect the throttle body connector.
Disconnect the No. 1 ventilation hose.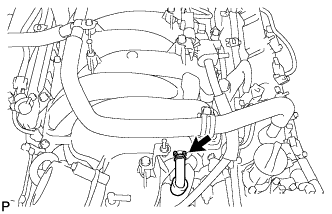
Disconnect the purge VSV connector.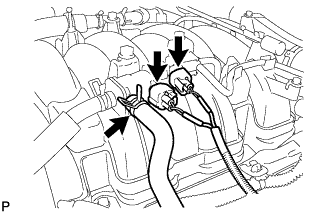
Disconnect the purge line hose from the purge VSV.
Disconnect the vacuum switching valve connector (for ACIS).
Remove the No. 1 engine cover sub-assembly.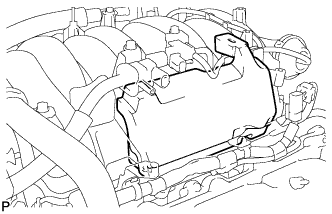
Remove the No. 3 engine cover.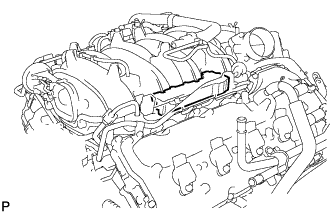
Disconnect the 3 wire clamps from the 3 wire brackets.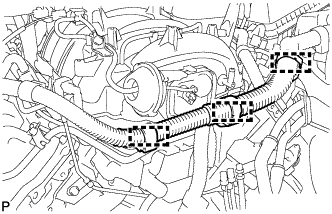
Remove the bolt and wire bracket from the intake manifold.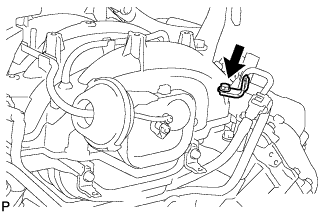
Remove the 2 nuts, 8 bolts, intake manifold and 2 gaskets.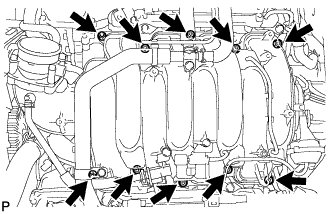
| 40. DISCONNECT VANE PUMP ASSEMBLY |
Remove the 2 bolts and disconnect the vane pump.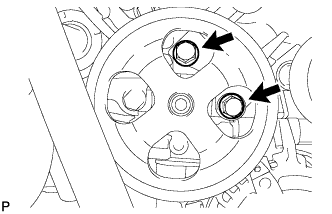
| 41. DISCONNECT OIL COOLER PIPE ASSEMBLY |
Remove the 2 bolts and disconnect the oil cooler pipe.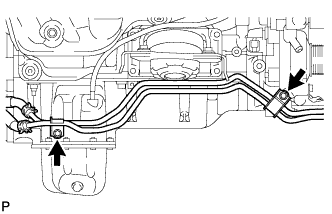
| 42. REMOVE GENERATOR ASSEMBLY |
Disconnect the generator connector.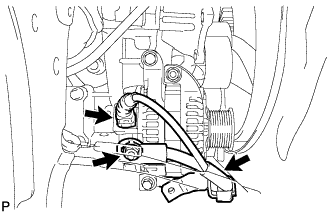
Remove the terminal cap and nut, and disconnect the generator wire.
Remove the bolt and wire harness bracket from the generator.
Remove the 3 bolts, nut and generator.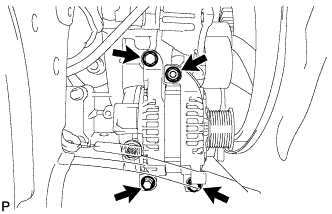
Remove the stud bolt.
| 43. REMOVE NO. 1 WATER BY-PASS HOSE |
Remove the No. 1 water by-pass hose by disconnecting the hose from the water inlet housing and front water by-pass joint.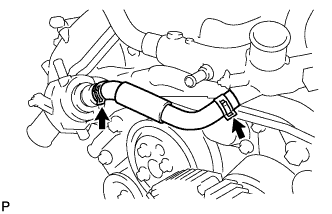
| 44. REMOVE WATER BY-PASS PIPE SUB-ASSEMBLY |
Disconnect the 2 hoses.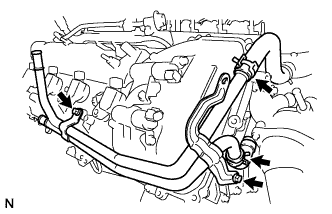
Remove the 2 bolts and water by-pass pipe.
| 45. REMOVE FRONT WATER BY-PASS JOINT |
Disconnect the No. 2 water by-pass hose from the water by-pass joint.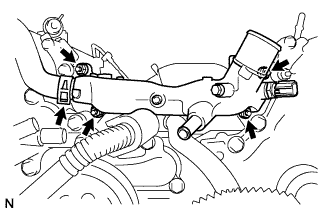
Remove the 4 nuts, water by-pass joint and 2 gaskets.
| 46. REMOVE NO. 2 ENGINE COVER |
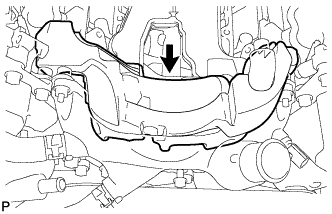 |
| 47. REMOVE NO. 1 ENGINE COVER |
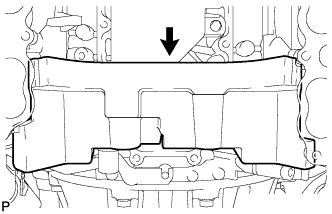 |
| 48. REMOVE WATER INLET HOUSING |
Remove the 3 bolts, water inlet housing and gasket.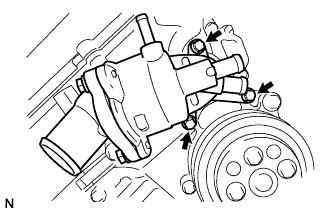
| 49. REMOVE WATER PUMP PULLEY |
Using SST, hold the water pump pulley.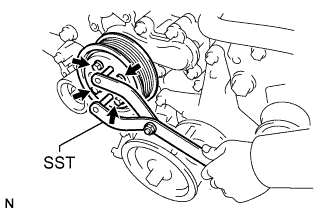
- SST
- 09960-10010
(09962-01000, 09963-01000)
Remove the 4 bolts and water pump pulley.
| 50. REMOVE NO. 1 IDLER PULLEY SUB-ASSEMBLY |
Remove the bolt and idler pulley.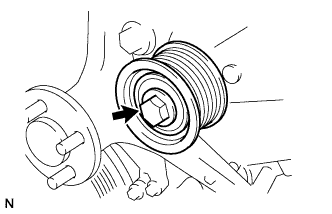
| 51. REMOVE FLUID COUPLING BRACKET |
Remove the 4 bolts and fluid coupling bracket.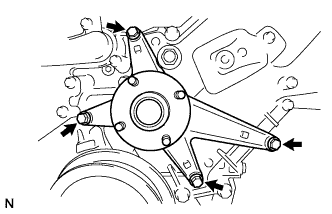
| 52. REMOVE V-RIBBED BELT TENSIONER ASSEMBLY |
Remove the standard bolt, 6 mm hexagon wrench bolt and belt tensioner.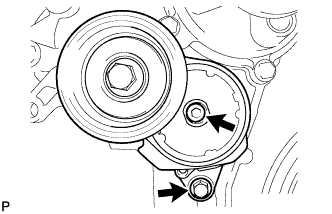
| 53. REMOVE IGNITION COIL ASSEMBLY |
Remove the 8 bolts and 8 ignition coils.
| 54. REMOVE CYLINDER HEAD COVER SUB-ASSEMBLY LH |
Remove the 14 bolts, seal washer, cylinder head cover and gasket.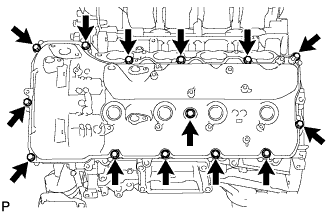
- HINT:
- Make sure the removed parts are returned to the same places they were removed from.
Remove the 5 gaskets from the camshaft bearing caps (No. 2, No. 3).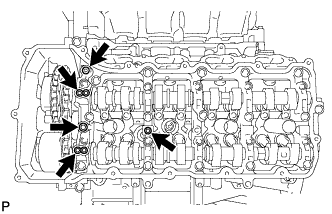
| 55. REMOVE CYLINDER HEAD COVER SUB-ASSEMBLY RH |
Remove the bolt and noise filter.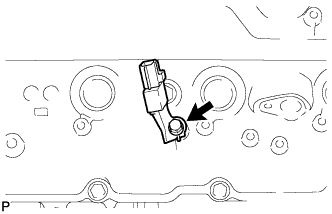
Remove the 14 bolts, seal washer, cylinder head cover and gasket.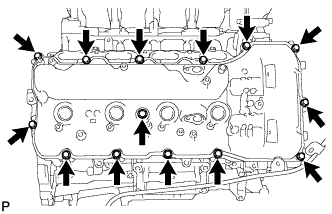
- HINT:
- Make sure the removed parts are returned to the same places they were removed from.
Remove the 5 gaskets from the camshaft bearing caps (No. 1, No. 3).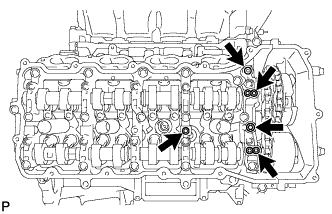
| 56. REMOVE SPARK PLUG TUBE GASKET |
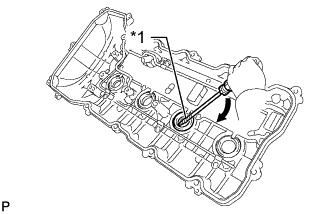 |
Bend the 4 ventilation baffle plate claws on the cylinder head cover to an angle of 90° or more.
Using a screwdriver, pry out the gaskets.
Text in Illustration *1
Tape

Pry
- NOTICE:
- Be careful not to damage the cylinder head cover.
- Be careful not to damage the gasket when removing it, as the removed gasket needs to be used when installing a new one.
- Be careful not to damage the cylinder head cover.
- HINT:
- Tape the screwdriver tip before use.
| 57. REMOVE CRANKSHAFT PULLEY |
Using SST, loosen the crankshaft pulley set bolt until 2 or 3 threads are engaged.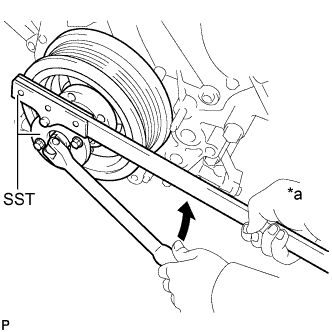
- SST
- 09213-70011
09330-00021
Text in Illustration *a
Hold
Turn
Using the pulley set bolt and SST, remove the crankshaft pulley.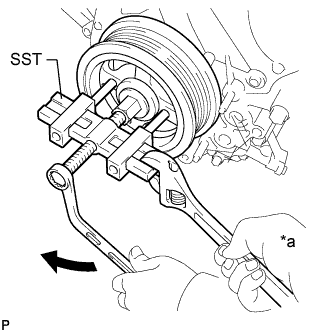
- SST
- 09950-50013
(09951-05010, 09952-05010, 09953-05010, 09954-05011)
Text in Illustration *a
Hold
Turn
| 58. DISCONNECT WIRE HARNESS CLAMP BRACKET |
Remove the bolt and disconnect the bracket.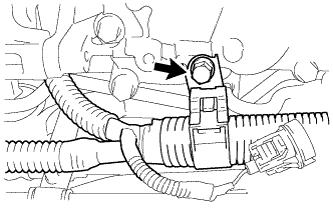
| 59. REMOVE TIMING CHAIN COVER SUB-ASSEMBLY |
Remove the 28 bolts and nut shown in the illustration.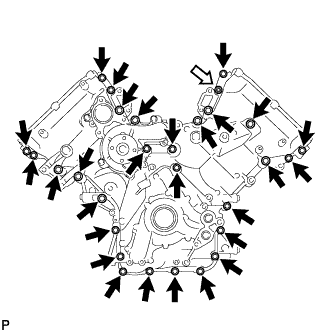
Text in Illustration
Bolt

Nut
Remove the timing chain cover by prying between the timing chain cover and cylinder head or cylinder block with a screwdriver as shown in the illustration.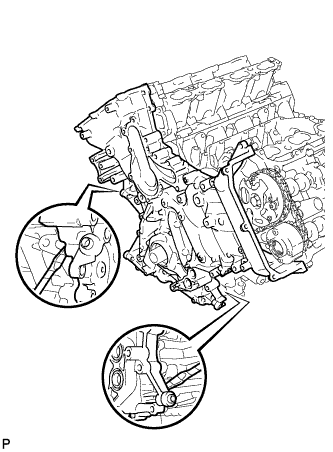
- NOTICE:
- Be careful not to damage the contact surfaces of the cylinder head, cylinder block and chain cover.
- HINT:
- Tape the screwdriver tip before use.
Remove the oil pump gasket from the cylinder block.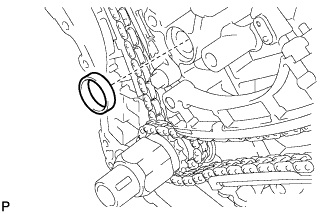
Remove the O-ring from the oil pan.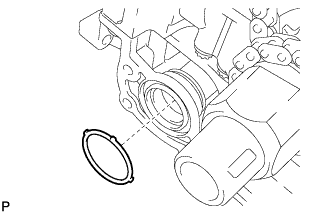
| 60. REMOVE WATER INLET PIPE |
Remove the water inlet pipe.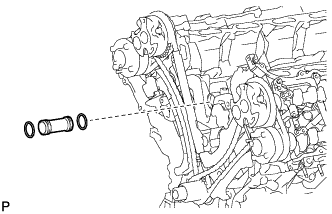
Remove the 2 O-rings from the water inlet pipe.
| 61. SET NO. 1 CYLINDER TO TDC/COMPRESSION |
Temporarily install the crankshaft pulley bolt.
Rotate the crankshaft clockwise so that the timing marks on the crankshaft timing sprocket and camshaft timing gears are as shown in the illustration.
- HINT:
- If the timing marks do not align, rotate the crankshaft clockwise again and align the timing marks.
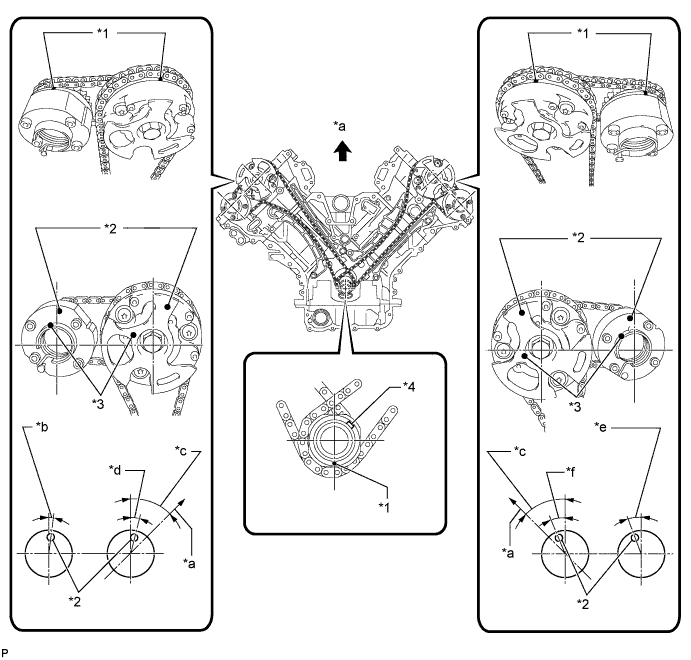
Text in Illustration *1
Timing Mark
*2
Timing Mark Position
*3
Knock Pin Position
*4
Key
*a
Toward Ceiling
*b
Approximately 2°
*c
Approximately 45°
*d
Approximately 16°
*e
Approximately 18°
*f
Approximately 32°
| 62. REMOVE NO. 1 CHAIN TENSIONER ASSEMBLY LH |
Move the stopper plate clockwise to release the lock, and push the plunger deep into the tensioner.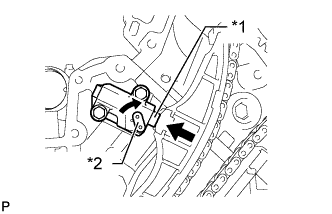
Text in Illustration *1
Plunger
*2
Stopper Plate
Move the stopper plate counterclockwise to set the lock, and insert a hexagon wrench into the stopper plate hole.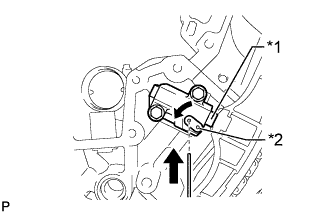
Text in Illustration *1
Plunger
*2
Stopper Plate
Remove the 2 bolts, chain tensioner and gasket.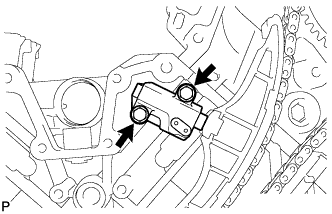
| 63. REMOVE NO. 1 CHAIN TENSIONER SLIPPER LH |
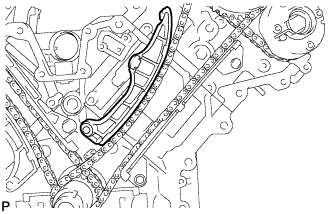 |
| 64. REMOVE NO. 1 CHAIN VIBRATION DAMPER LH |
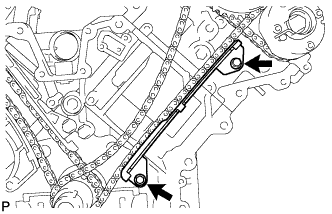 |
Remove the 2 bolts and chain vibration damper.
| 65. REMOVE NO. 1 CHAIN SUB-ASSEMBLY LH |
While pushing down the No. 3 chain tensioner, insert a pin of 1.0 mm (0.0394 in.) into the hole to fix it in place.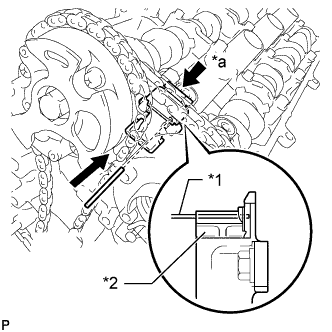
Text in Illustration *1
Pin
*2
Plunger
*a
Push
Hold the hexagonal portion of the camshaft with a wrench and loosen the bolt.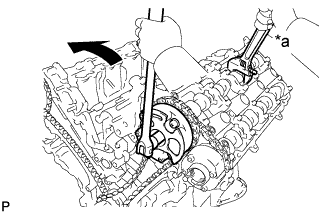
Text in Illustration *a
Hold
Turn
- NOTICE:
- Be careful not to damage the cylinder head with the wrench.
- Do not disassemble the camshaft timing gear.
- Be careful not to damage the cylinder head with the wrench.
Hold the hexagonal portion of the camshaft with a wrench and loosen the bolt.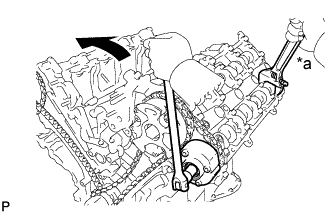
Text in Illustration *a
Hold
Turn
- NOTICE:
- Be careful not to damage the cylinder head with the wrench.
Remove the 2 bolts. Then with the No. 1 and No. 2 chains still connected to the gears, remove the camshaft timing gear, camshaft timing exhaust gear and crankshaft timing sprocket LH.
Remove the No. 1 and No. 2 chains from the gears.
| 66. REMOVE NO. 3 CHAIN TENSIONER ASSEMBLY |
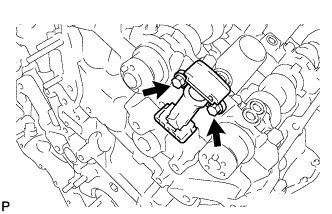 |
Remove the 2 bolts and chain tensioner.
| 67. REMOVE NO. 1 CHAIN TENSIONER ASSEMBLY RH |
Move the stopper plate clockwise to release the lock, and push the plunger deep into the tensioner.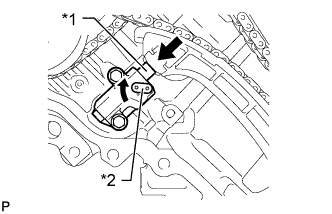
Text in Illustration *1
Plunger
*2
Stopper Plate
Move the stopper plate counterclockwise to set the lock, and insert a hexagon wrench into the stopper plate hole.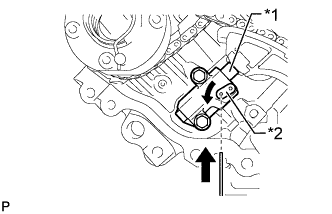
Text in Illustration *1
Plunger
*2
Stopper Plate
Remove the 2 bolts and chain tensioner.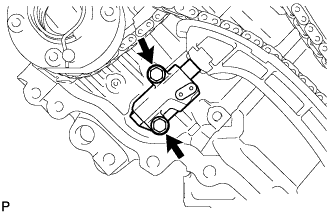
| 68. REMOVE NO. 1 CHAIN TENSIONER SLIPPER RH |
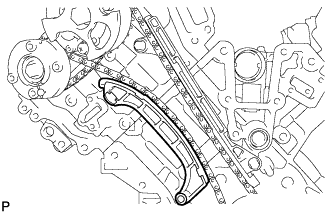 |
| 69. REMOVE NO. 1 CHAIN VIBRATION DAMPER RH |
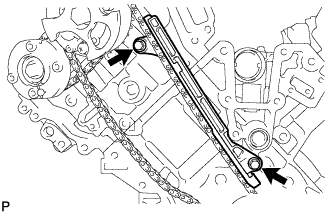 |
Remove the 2 bolts and vibration damper.
| 70. REMOVE NO. 1 CHAIN SUB-ASSEMBLY RH |
While raising up the No. 2 chain tensioner, insert a pin of 1.0 mm (0.0394 in.) into the hole to fix it in place.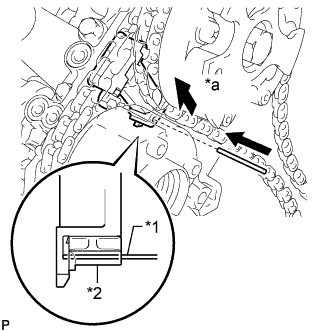
Text in Illustration *1
Pin
*2
Plunger
*a
Push
Hold the hexagonal portion of the camshaft with a wrench and loosen the bolt.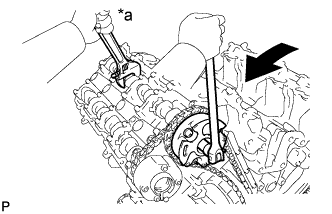
Text in Illustration *a
Hold
Turn
- NOTICE:
- Be careful not to damage the cylinder head with the wrench.
- Do not disassemble the camshaft timing gear.
- Be careful not to damage the cylinder head with the wrench.
Hold the hexagonal portion of the camshaft with a wrench and loosen the bolt.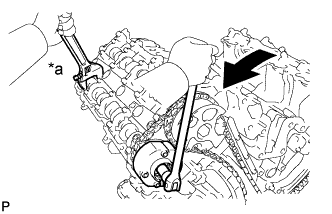
Text in Illustration *a
Hold
Turn
- NOTICE:
- Be careful not to damage the cylinder head with the wrench.
Remove the 2 bolts. Then with the No. 1 and No. 2 chains still connected to the gears, remove the camshaft timing gear, camshaft timing exhaust gear and crankshaft timing sprocket RH.
Remove the No. 1 and No. 2 chains from the gears.
| 71. REMOVE NO. 2 CHAIN TENSIONER ASSEMBLY |
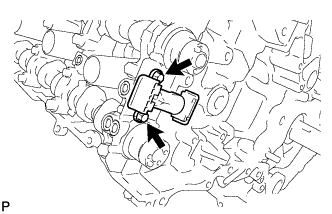 |
Remove the 2 bolts and chain tensioner.
| 72. REMOVE CRANKSHAFT TIMING GEAR KEY |
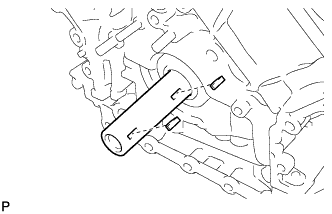 |
Using a screwdriver, remove the 2 timing gear keys from the crankshaft.
| 73. REMOVE CAMSHAFT BEARING CAP LH |
Make sure that the knock pin of the camshaft is positioned as shown in the illustration.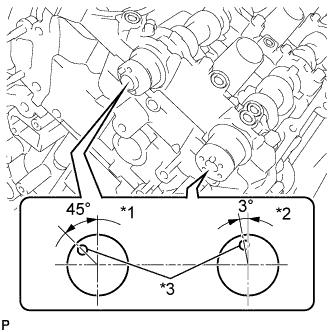
Text in Illustration *1
IN
*2
EX
*3
Knock Pin
Uniformly loosen and remove the 10 bearing cap bolts in the sequence shown in the illustration.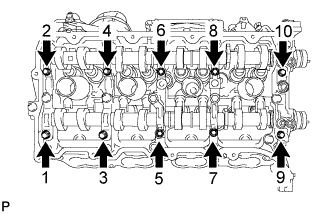
Uniformly loosen and remove the 18 bearing cap bolts in the sequence shown in the illustration.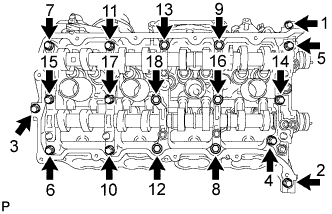
- NOTICE:
- Uniformly loosen the bolts while keeping the camshaft level.
Remove the 6 bearing caps.
- HINT:
- Arrange the removed parts in the correct order.
Remove the No. 3 and No. 4 camshafts.
| 74. REMOVE CAMSHAFT HOUSING SUB-ASSEMBLY LH |
Remove the camshaft housing by prying between the cylinder head and camshaft housing with a screwdriver.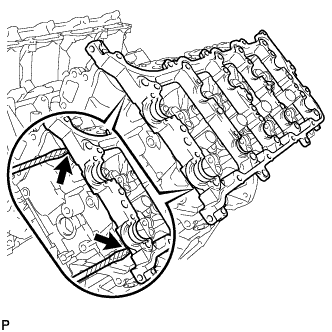
- NOTICE:
- Be careful not to damage the contact surfaces of the cylinder head and camshaft housing.
- HINT:
- Tape the screwdriver tip before use.
| 75. REMOVE CAMSHAFT BEARING CAP RH |
Make sure that the knock pin of the camshaft is positioned as shown in the illustration.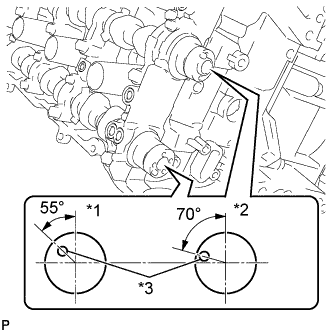
Text in Illustration *1
EX
*2
IN
*3
Knock Pin
Uniformly loosen and remove the 10 bearing cap bolts in the sequence shown in the illustration.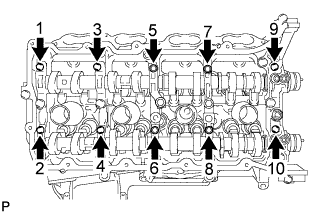
Uniformly loosen and remove the 18 bearing cap bolts in the sequence shown in the illustration.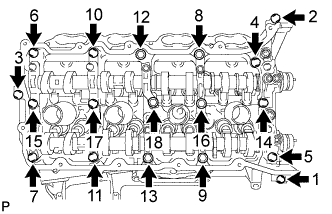
- NOTICE:
- Uniformly loosen the bolts while keeping the camshaft level.
Remove the 6 bearing caps.
- HINT:
- Arrange the removed parts in the correct order.
Remove the No. 1 and No. 2 camshafts.
| 76. REMOVE CAMSHAFT HOUSING SUB-ASSEMBLY RH |
Remove the camshaft housing by prying between the cylinder head and camshaft housing with a screwdriver.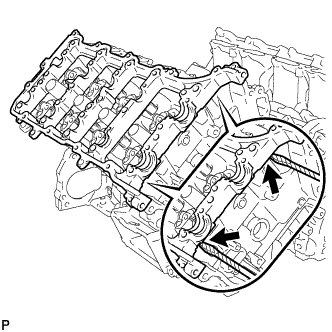
- NOTICE:
- Be careful not to damage the contact surfaces of the cylinder head and camshaft housing.
- HINT:
- Tape the screwdriver tip before use.