REMOVAL
Removal / installation · Vehicles built from Sep 2011
| 1. REMOVE REAR NO. 2 SEAT ASSEMBLY LH (except Face to Face Seat Type) |

Remove the rear No. 2 seat assembly LH (Click here).
| 2. REMOVE REAR NO. 2 SEAT ASSEMBLY RH (except Face to Face Seat Type) |
Remove the rear No. 2 seat assembly RH (Click here).
| 3. REMOVE REAR NO. 2 SEAT ASSEMBLY LH (for Face to Face Seat Type) |
Remove the rear No. 2 seat assembly LH (Click here).
| 4. REMOVE REAR NO. 2 SEAT ASSEMBLY RH (for Face to Face Seat Type) |
Remove the rear No. 2 seat assembly RH (Click here).
| 5. REMOVE FRONT QUARTER TRIM PANEL ASSEMBLY LH |
Remove the front quarter trim panel assembly LH (Click here).
| 6. REMOVE FRONT QUARTER TRIM PANEL ASSEMBLY RH |
Remove the front quarter trim panel assembly RH (Click here).
| 7. REMOVE NO. 3 SEAT CUSHION COVER |
Detach the 4 clips and 16 claws, and then remove the 4 seat cushion covers.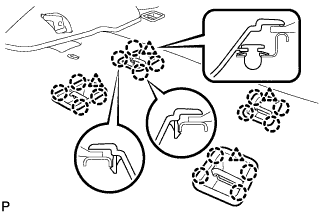

| 8. REMOVE INDOOR ELECTRICAL KEY OSCILLATOR |
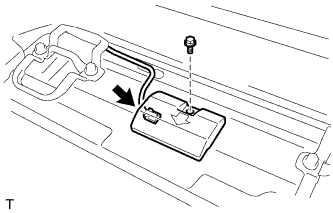 |
Fold back the rear floor carpet assembly.
Disconnect the connector.
Remove the bolt and electrical key oscillator.