INSTALLATION
Removal / installation · Vehicles built from Jan 2012
| 1. INSTALL NO. 1 EMISSION CONTROL VALVE SET |

Install the No. 1 emission control valve set with the 3 nuts.
- Torque:
- 21 N*m{ 214 kgf*cm , 15 ft.*lbf }
Align the paint mark with the rib and connect the No. 1 air hose.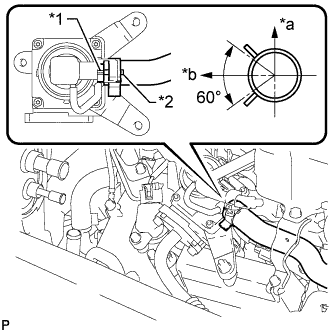

Text in Illustration *1
Rib
*2
Paint Mark
*a
RH Side
*b
Top
- HINT:
- Make sure the direction of the hose clamp is as shown in the illustration.
Connect the No. 1 emission control valve set connector.
| 2. INSTALL AIR TUBE |
Install 2 new gaskets.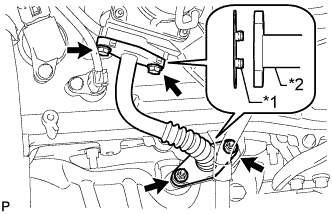
Text in Illustration *1
Claw
*2
Air Tube
- NOTICE:
- Make sure the gasket's claws are not caught between the No. 1 emission control valve set and air tube.
Install the air tube with the 2 bolts and 2 nuts.
- Torque:
- 10 N*m{ 102 kgf*cm , 7 in.*lbf }
| 3. INSTALL AIR CLEANER CAP AND HOSE |
Install the air cleaner cap and hose.
Install the air cleaner cap and hose with the bolt and fasten the 4 hook clamps.
- Torque:
- 5.0 N*m{ 51 kgf*cm , 44 in.*lbf }
Tighten the clamp.
- Torque:
- 2.5 N*m{ 25 kgf*cm , 22 in.*lbf }
Attach the clamp and connect the ventilation hose, vacuum hose and mass air flow meter connector.
| 4. INSTALL V-BANK COVER |
Attach the 2 V-bank cover hooks to the bracket. Then align the 2 V-bank cover grommets with the 2 pins and press down on the V-bank cover to attach the pins.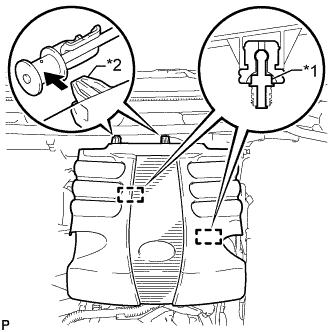
Text in Illustration *1
Pin
*2
Hook