REASSEMBLY
Removal / installation · Vehicles built from Jan 2012
| 1. INSTALL STUD BOLT |

  |
- NOTICE:
- If a stud bolt is deformed or its threads are damaged, replace it.
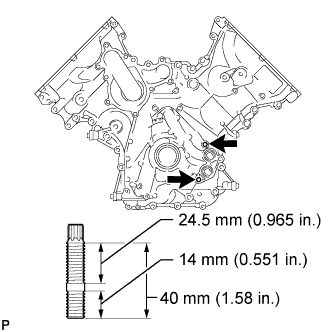
Install the timing chain cover stud bolts.
Using an E10 "TORX" socket wrench, install the 2 stud bolts as shown in the illustration.
- Torque:
- 20 N*m{ 199 kgf*cm , 14 ft.*lbf }
Install the No. 1 oil pan stud bolts.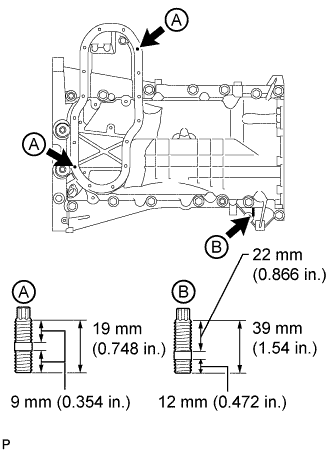
Using E6 and E7 "TORX" socket wrenches, install the 3 stud bolts as shown in the illustration.
- Torque:
- for stud bolt A:
- 5.0 N*m{ 51 kgf*cm , 44 in.*lbf }
- for stud bolt B:
- 9.0 N*m{ 92 kgf*cm , 80 in.*lbf }
| 2. INSTALL RING PIN |
 |
- NOTICE:
- It is not necessary to remove a ring pin unless it is being replaced.
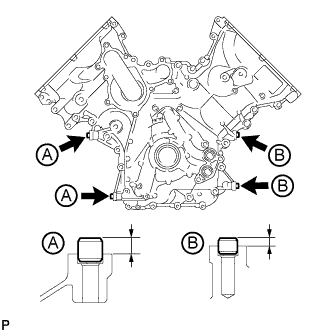
Using a plastic-faced hammer, tap in new ring pins to the timing chain cover.
- Standard Protrusion:
Item
Ring Pin Diameter
Specified Condition
Ring pin A
13 mm (0.512 in.)
7.5 to 8.5 mm (0.295 to 0.335 in.)
Ring pin B
11 mm (0.433 in.)
3.6 to 4.6 mm (0.142 to 0.181 in.)
| 3. INSTALL OIL DRAIN PIPE SUB-ASSEMBLY |
Apply a light coat of engine oil to a new O-ring.
Install the O-ring to the oil drain pipe.
Install the oil drain pipe with the bolt.
- Torque:
- 10 N*m{ 102 kgf*cm , 7 ft.*lbf }
| 4. INSTALL REAR CRANKSHAFT OIL SEAL |
Apply MP grease to the lip of a new rear crankshaft oil seal.
- NOTICE:
- Do not allow foreign matter to contact the lip of the oil seal.
- Do not allow MP grease to contact the dust seal.
- Do not allow foreign matter to contact the lip of the oil seal.
Using SST, tap in a rear crankshaft oil seal until its surface is flush with the rear engine oil seal retainer edge.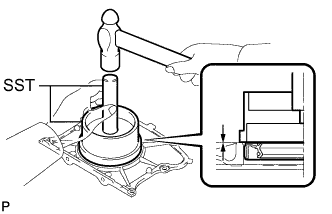
- SST
- 09223-15030
09950-70010 (09951-07100)
- Standard depth:
- 0 to 1.0 mm (0 to 0.0394 in.)
- NOTICE:
- Keep the lip free from foreign matter.
- Do not tap the rear crankshaft oil seal at an angle.
- Keep the lip free from foreign matter.
| 5. INSTALL REAR ENGINE OIL SEAL RETAINER |
Apply seal packing in a continuous line as shown in the illustration.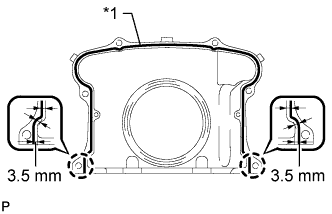
- Seal packing:
- Toyota Genuine Seal Packing Black, Three Bond 1207B or equivalent
- Seal diameter:
- 2.0 to 3.0 mm (0.0787 to 0.118 in.)
- Application position from inside edge of retainer:
- 3.5 mm (0.138 in.)
Text in Illustration *1
Seal Packing
- NOTICE:
- Remove any oil from the contact surface.
- Install the rear engine oil seal retainer within 3 minutes and tighten the bolts and nuts within 15 minutes after applying seal packing.
- Remove any oil from the contact surface.
Install the rear engine oil seal retainer with the 6 bolts.
- Torque:
- 10 N*m{ 102 kgf*cm , 7 ft.*lbf }
- NOTICE:
- Do not start the engine for at least 2 hours after installing the rear engine oil seal retainer.
- When installing the rear engine oil seal retainer, make sure the lip of the rear crankshaft oil seal is not damaged.
- When installing the rear engine oil seal retainer, make sure the lip of the rear crankshaft oil seal is not folded incorrectly.
- Do not start the engine for at least 2 hours after installing the rear engine oil seal retainer.
| 6. INSTALL OIL STRAINER SUB-ASSEMBLY |
Apply a light coat of engine oil to a new O-ring.
Install the O-ring to the oil strainer.
Install the oil strainer with the 2 bolts.
- Torque:
- 12 N*m{ 122 kgf*cm , 9 ft.*lbf }
- NOTICE:
- Make sure the O-ring is not twisted or damaged.
| 7. INSTALL NO. 1 OIL PAN BAFFLE PLATE |
Install the No. 1 oil pan baffle plate with the 7 bolts.
- Torque:
- 12 N*m{ 122 kgf*cm , 9 ft.*lbf }
| 8. INSTALL NO. 1 OIL PAN SUB-ASSEMBLY |
Apply seal packing in a continuous line as shown in the illustration.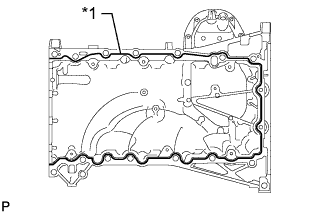
- Seal packing:
- Toyota Genuine Seal Packing Black, Three Bond 1207B or equivalent
- Standard seal diameter:
- 3.0 to 4.0 mm (0.118 to 0.157 in.)
Text in Illustration *1
Seal Packing
- NOTICE:
- Remove any oil from the contact surface.
- Install the No. 1 oil pan within 3 minutes and tighten the bolts and nuts within 15 minutes after applying seal packing.
- Remove any oil from the contact surface.
Install the No. 1 oil pan with the 14 bolts and 2 nuts.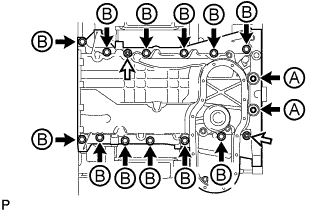
- Torque:
- for bolt A:
- 10 N*m{ 102 kgf*cm , 7 ft.*lbf }
- for bolt B and nut:
- 35 N*m{ 357 kgf*cm , 26 ft.*lbf }
Text in Illustration 
Bolt

Nut
- NOTICE:
- Do not start the engine for at least 2 hours after installing the oil pan.
| 9. INSTALL NO. 2 OIL PAN SUB-ASSEMBLY |
Apply seal packing in a continuous line as shown in the illustration.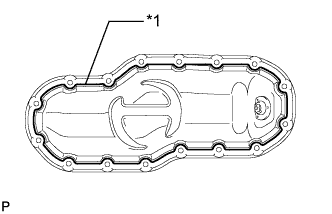
- Seal packing:
- Toyota Genuine Seal Packing Black, Three Bond 1207B or equivalent
- Standard seal diameter:
- 3.0 to 4.0 mm (0.118 to 0.156 in.)
Text in Illustration *1
Seal Packing
- NOTICE:
- Remove any oil from the contact surface.
- Install the No. 2 oil pan within 3 minutes and tighten the bolts and nuts within 15 minutes after applying seal packing.
- Remove any oil from the contact surface.
Install the No. 2 oil pan with the 14 bolts and 2 nuts.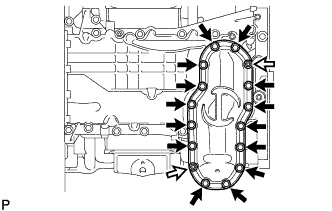
- Torque:
- 10 N*m{ 102 kgf*cm , 7 ft.*lbf }
Text in Illustration
Bolt
Nut
- NOTICE:
- Do not start the engine for at least 2 hours after installing the oil pan.
| 10. INSTALL NO. 1 HEAT EXCHANGER COVER |
Apply seal packing in a continuous line as shown in the illustration.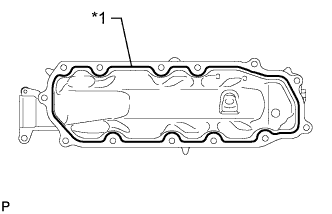
- Seal packing:
- Toyota Genuine Seal Packing 1282B, Three Bond 1282B or equivalent
- Standard seal diameter:
- 3.0 to 4.0 mm (0.118 to 0.157 in.)
Text in Illustration *1
Seal Packing
- NOTICE:
- Remove any oil from the contact surface.
- Install the No. 1 heat exchanger cover within 3 minutes and tighten the bolts and nuts within 15 minutes after applying seal packing.
- Remove any oil from the contact surface.
Install the No. 1 heat exchanger cover with the 12 bolts and 2 nuts.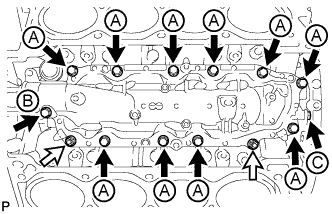
- Torque:
- for bolt C:
- 10 N*m{ 102 kgf*cm , 7 ft.*lbf }
- for bolt A, bolt B and nut:
- 21 N*m{ 214 kgf*cm , 15 ft.*lbf }
- Standard Bolt:
Item
Length
Thread Diameter
Bolt A
20 mm (0.787 in.)
8 mm (0.315 in.)
Bolt B
70 mm (2.76 in.)
8 mm (0.315 in.)
Bolt C
16 mm (0.630 in.)
6 mm (0.236 in.)
Text in Illustration
Bolt
Nut
- NOTICE:
- Do not start the engine for at least 2 hours after installing the heat exchanger cover.
| 11. INSTALL VENTILATION PIPE GASKET |
Using SST, evenly tap in a new ventilation pipe gasket until its surface is flush with the lip of the ventilation pipe.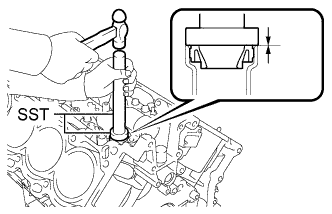
- SST
- 09950-60010
(09951-00360)
09950-70010 (09951-07100)
- NOTICE:
- Do not tap the ventilation pipe gasket at an angle.
- Do not tap the ventilation pipe gasket excessively.
- Do not tap the ventilation pipe gasket at an angle.
| 12. INSTALL OIL RETURN PIPE GASKET |
Install a new oil return pipe gasket.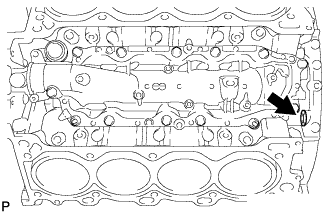
| 13. INSTALL CYLINDER BLOCK WATER JACKET SPACER |
Install the 2 cylinder block water jacket spacers as shown in the illustration.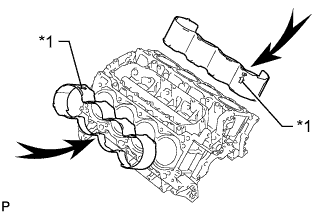
Text in Illustration *1
UP Mark
- NOTICE:
- Make sure that the cutouts indicated by the arrows in the illustration face away from the engine.
- Make sure that the "up" marks are oriented as shown in the illustration.
- Make sure that the cutouts indicated by the arrows in the illustration face away from the engine.
| 14. INSTALL CYLINDER HEAD GASKET |
Place a new cylinder head gasket on the cylinder block surface with the front face of the Lot No. stamp upward.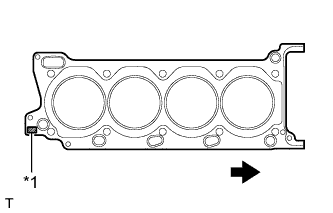
Text in Illustration *1
Lot No.
Engine Front
- NOTICE:
- Make sure that the gasket is installed facing the proper direction.
- Make sure that no oil is on the front end (indicated by the arrows) of the cylinder head gasket.
- Make sure that the gasket is installed facing the proper direction.
| 15. INSTALL CYLINDER HEAD SUB-ASSEMBLY |
Place the cylinder head on the cylinder block.
- NOTICE:
- Place the cylinder head gently in order not to damage the gasket with the bottom part of the head.
- Make sure that no oil is on the mounting surface of the cylinder head.
- Place the cylinder head gently in order not to damage the gasket with the bottom part of the head.
Install the cylinder head bolts.
- HINT:
- The cylinder head bolts are tightened in 3 progressive steps.
Apply a light coat of engine oil to the threads and under the heads of the cylinder head bolts.
Step 1: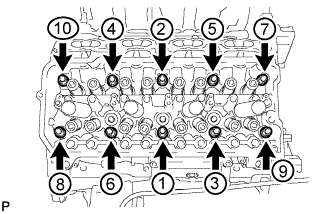
Using a 10 mm bi-hexagon wrench, install and uniformly tighten the 10 cylinder head bolts with the plate washers in several steps in the sequence shown in the illustration.- Torque:
- 36 N*m{ 367 kgf*cm , 27 ft.*lbf }
Mark the front side of each cylinder head bolt head with paint.
Step 2:
Tighten the cylinder head bolts 90°.Step 3:
Tighten the cylinder head bolts an additional 90°.Check that the paint marks are now at a 180° angle to the front.
Install and uniformly tighten the 2 bolts in the sequence shown in the illustration.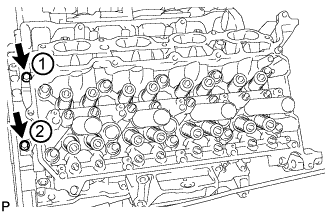
- Torque:
- 21 N*m{ 214 kgf*cm , 15 ft.*lbf }
- NOTICE:
- Thoroughly wipe clean any seal packing.
| 16. INSTALL NO. 2 CYLINDER HEAD GASKET |
Place a new cylinder head gasket on the cylinder block surface with the front face of the Lot No. stamp upward.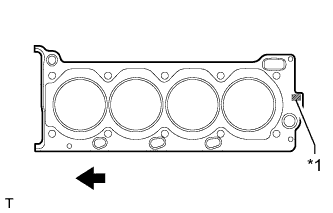
Text in Illustration *1
Lot No.
Engine Front
- NOTICE:
- Make sure that the gasket is installed facing the proper direction.
- Make sure that no oil is on the front end (indicated by the arrows) of the No. 2 cylinder head gasket.
- Make sure that the gasket is installed facing the proper direction.
| 17. INSTALL CYLINDER HEAD SUB-ASSEMBLY LH |
Place the cylinder head on the cylinder block.
- NOTICE:
- Make sure that no oil is on the mounting surface of the cylinder head.
- Place the cylinder head gently in order not to damage the gasket with the bottom part of the head.
- Make sure that no oil is on the mounting surface of the cylinder head.
Install the cylinder head bolts.
- HINT:
- The cylinder head bolts are tightened in 3 progressive steps.
Apply a light coat of engine oil to the threads and under the heads of the cylinder head bolts.
Step 1: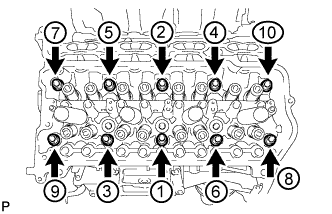
Using a 10 mm bi-hexagon wrench, install and uniformly tighten the 10 cylinder head bolts with the plate washers in several steps in the sequence shown in the illustration.- Torque:
- 36 N*m{ 367 kgf*cm , 27 ft.*lbf }
Mark the front side of each cylinder head bolt head with paint.
Step 2:
Tighten the cylinder head bolts 90°.Step 3:
Tighten the cylinder head bolts an additional 90°.Check that the paint marks are now at a 180° angle to the front.
Install and uniformly tighten the 2 bolts in the sequence shown in the illustration.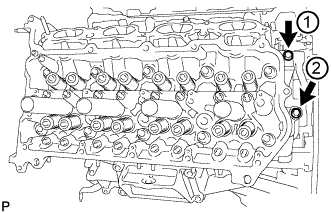
- Torque:
- 21 N*m{ 214 kgf*cm , 15 ft.*lbf }
- NOTICE:
- Thoroughly wipe clean any seal packing.
| 18. INSTALL VALVE STEM CAP |
Apply a light coat of engine oil to the valve stem caps.
Install the 32 valve stem caps to the cylinder head.
| 19. INSTALL VALVE LASH ADJUSTER ASSEMBLY |
Inspect the valve lash adjusters (Click here).
Install the 32 valve lash adjusters to the cylinder head.
- NOTICE:
- Install each valve lash adjuster to the same place it was removed from.
| 20. INSTALL NO. 1 VALVE ROCKER ARM SUB-ASSEMBLY |
Apply engine oil to the valve lash adjuster tips and valve stem cap ends.
Install the 32 No. 1 valve rocker arms as shown in the illustration.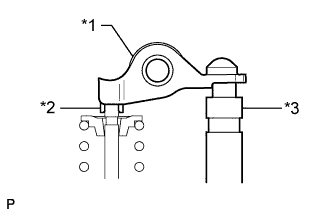
Text in Illustration *1
No. 1 Valve Rocker Arm
*2
Valve Stem Cap
*3
Valve Lash Adjuster
| 21. INSTALL CAMSHAFT BEARING CAP RH |
Apply a light coat of engine oil to the camshaft journals, camshaft housing and camshaft bearing caps.
Install the No. 1 and No. 2 camshafts to the camshaft housing.
Confirm the marks and numbers on the camshaft bearing caps and place them in their proper positions and directions.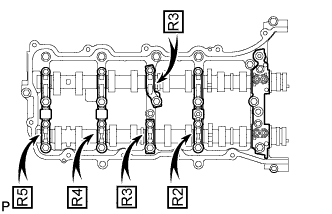
Temporarily install the 10 bolts in the order shown in the illustration.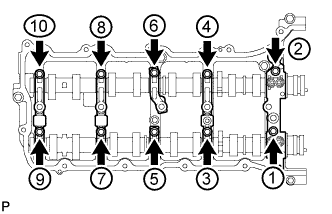
| 22. INSTALL CAMSHAFT HOUSING SUB-ASSEMBLY RH |
Check the valve rocker arms as shown in the illustration.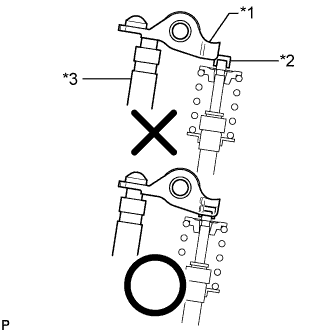
Text in Illustration *1
Valve Rocker Arm
*2
Valve Stem Cap
*3
Valve Lash Adjuster
Apply seal packing in a continuous line as shown in the illustration.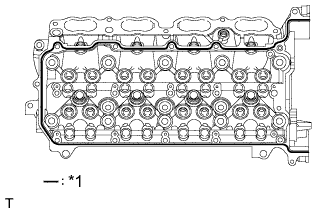
- Seal packing:
- Toyota Genuine Seal Packing Black, Three Bond 1207B or equivalent
- Standard seal diameter:
- 3.5 to 4.0 mm (0.138 to 0.157 in.)
Text in Illustration *1
Seal Packing
- NOTICE:
- Remove any oil from the contact surface.
- Install the camshaft housing within 3 minutes and tighten the bolts within 15 minutes after applying seal packing.
- Remove any oil from the contact surface.
Install the camshaft housing, and then install the 18 bolts in the order shown in the illustration.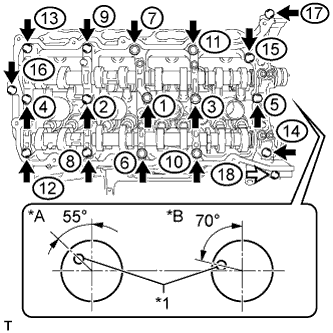
- Torque:
- for bolt A:
- 10 N*m{ 102 kgf*cm , 7 ft.*lbf }
- except bolt A:
- 30 N*m{ 306 kgf*cm , 22 ft.*lbf }
Text in Illustration *A
for Exhaust Side
*B
for Intake Side
*1
Knock Pin
Bolt
Bolt A
- NOTICE:
- Do not start the engine for at least 2 hours after the installation.
- Make sure that the knock pins of the camshafts are positioned as shown in the illustration before installing the camshaft housing.
- Do not start the engine for at least 2 hours after the installation.
Tighten the 10 bolts in the order shown in the illustration.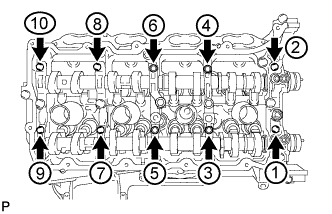
- Torque:
- 16 N*m{ 163 kgf*cm , 12 ft.*lbf }
- NOTICE:
- Thoroughly wipe clean any seal packing.
| 23. INSTALL CAMSHAFT BEARING CAP LH |
Apply a light coat of engine oil to the camshaft journals, camshaft housing and camshaft bearing caps.
Install the No. 3 and No. 4 camshafts to the camshaft housing.
Confirm the marks and numbers on the camshaft bearing caps and place them in their proper positions and directions.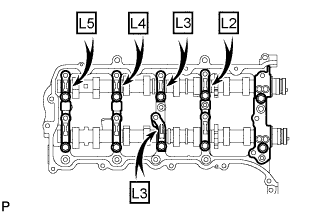
Temporarily install the 10 bolts in the order shown in the illustration.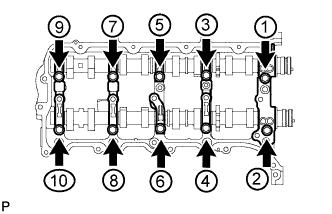
| 24. INSTALL CAMSHAFT HOUSING SUB-ASSEMBLY LH |
Check the valve rocker arms as shown in the illustration.
Text in Illustration *1
Valve Rocker Arm
*2
Valve Stem Cap
*3
Valve Lash Adjuster
Apply seal packing in a continuous line as shown in the illustration.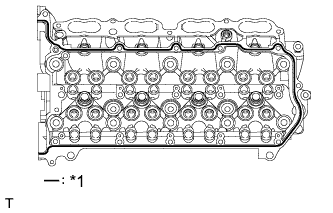
- Seal packing:
- Toyota Genuine Seal Packing Black, Three Bond 1207B or equivalent
- Standard seal diameter:
- 3.5 to 4.0 mm (0.138 to 0.157 in.)
Text in Illustration *1
Seal Packing
- NOTICE:
- Remove any oil from the contact surface.
- Install the camshaft housing within 3 minutes and tighten the bolts within 15 minutes after applying seal packing.
- Remove any oil from the contact surface.
Install the camshaft housing, and then install the 18 bolts in the order shown in the illustration.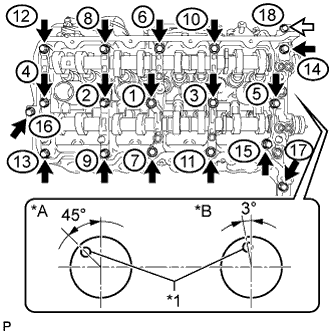
- Torque:
- for bolt A:
- 10 N*m{ 102 kgf*cm , 7 ft.*lbf }
- except bolt A:
- 30 N*m{ 306 kgf*cm , 22 ft.*lbf }
Text in Illustration *A
for Intake Side
*B
for Exhaust Side
*1
Knock Pin
Bolt
Bolt A
- NOTICE:
- Do not start the engine for at least 2 hours after the installation.
- Make sure that the knock pins of the camshafts are positioned as shown in the illustration before installing the camshaft housing.
- Do not start the engine for at least 2 hours after the installation.
Tighten the 10 bolts in the order shown in the illustration.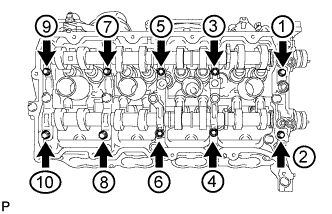
- Torque:
- 16 N*m{ 163 kgf*cm , 12 ft.*lbf }
- NOTICE:
- Thoroughly wipe clean any seal packing.
| 25. INSTALL CRANKSHAFT TIMING GEAR KEY |
Install the crankshaft timing gear key.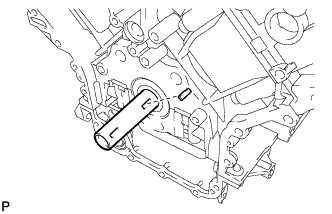
- HINT:
- The other crankshaft timing gear key will be installed in a later step.
| 26. INSTALL NO. 2 CHAIN TENSIONER ASSEMBLY |
Install the No. 2 chain tensioner with the 2 bolts.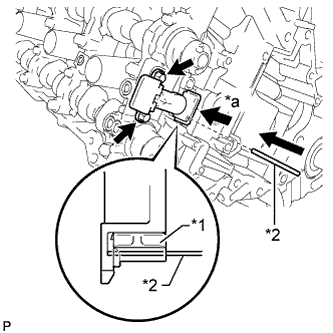
- Torque:
- 10 N*m{ 102 kgf*cm , 7 ft.*lbf }
Text in Illustration *1
Plunger
*2
Pin
*a
Push
While raising up the No. 2 chain tensioner, insert a pin with a diameter of 1.0 mm (0.0394 in.) into the hole to fix the tensioner in place.
| 27. INSTALL NO. 1 CHAIN SUB-ASSEMBLY RH |
Align the No. 1 chain's mark plates (orange) with the camshaft timing gear's timing mark and attach the chain to the gear as shown in the illustration.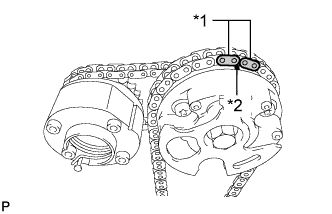
Text in Illustration *1
Mark Plate (Orange)
*2
Timing Mark
Align the No. 1 chain's mark plate (orange) with the crankshaft timing gear's timing mark and attach the chain to the gear as shown in the illustration.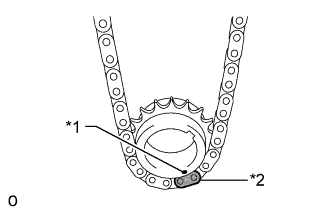
Text in Illustration *1
Timing Mark
*2
Mark Plate (Orange)
Align the No. 2 chain's mark plates (yellow) with the timing marks (1-dot marks) of the camshaft timing gear and camshaft timing exhaust gear, and attach the No. 2 chain to the gears as shown in the illustration.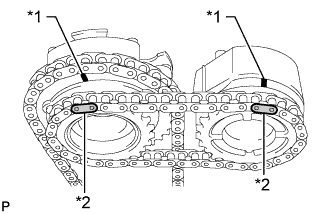
Text in Illustration *1
Timing Mark
*2
Mark Plate (Yellow)
- HINT:
- The crankshaft timing gear and camshaft exhaust gear are installed with the No. 1 and No. 2 chains connected to the gears.
Install the crankshaft timing sprocket RH to the crankshaft.
Align the knock pin of the No. 1 camshaft with the pin hole of the camshaft timing gear and install the camshaft timing gear.
Using the hexagonal portion of the No. 2 camshaft, align the knock pin of the No. 2 camshaft with the pin hole of the camshaft timing exhaust gear and install the camshaft timing exhaust gear.
Remove the pin from the No. 2 chain tensioner.
| 28. INSTALL NO. 1 CHAIN VIBRATION DAMPER RH |
Install the No. 1 chain vibration damper RH with the 2 bolts.
- Torque:
- 21 N*m{ 214 kgf*cm , 15 ft.*lbf }
| 29. INSTALL CHAIN TENSIONER SLIPPER RH |
- HINT:
- If the No. 1 chain tensioner slipper cannot be installed due to the tension of the chain, use the hexagonal portion of the camshaft to loosen the chain, and then install the chain tensioner slipper RH.
| 30. INSTALL NO. 1 CHAIN TENSIONER ASSEMBLY RH |
Move the stopper plate upward to release the lock and push the plunger deep into the No. 1 chain tensioner.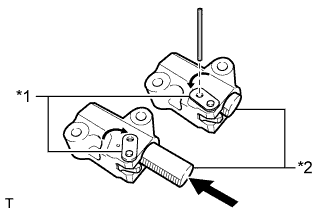
Text in Illustration *1
Stopper Plate
*2
Plunger
Move the stopper plate downward to set the lock and insert a hexagon wrench into the hole of the stopper plate.
Install the No. 1 chain tensioner with the 2 bolts.
- Torque:
- 10 N*m{ 102 kgf*cm , 7 ft.*lbf }
Remove the hexagon wrench from the No. 1 chain tensioner.
| 31. INSTALL NO. 3 CHAIN TENSIONER ASSEMBLY |
Install the No. 3 chain tensioner with the 2 bolts.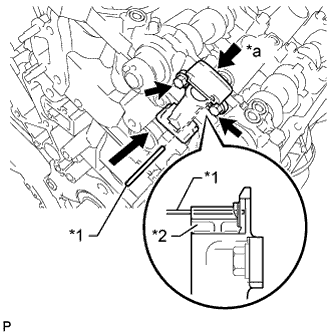
- Torque:
- 10 N*m{ 102 kgf*cm , 7 ft.*lbf }
Text in Illustration *1
Pin
*2
Plunger
*a
Push
While pushing down the No. 3 chain tensioner, insert a pin with a diameter of 1.0 mm (0.0394 in.) into the hole to fix the tensioner in place.
| 32. INSTALL NO. 1 CHAIN SUB-ASSEMBLY LH |
Align the No. 1 chain's mark plates (orange) with the camshaft timing gear's timing mark and attach the chain to the gear as shown in the illustration.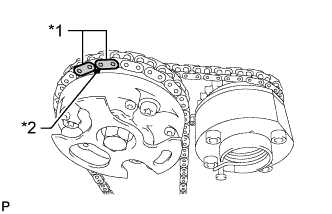
Text in Illustration *1
Mark Plate (Orange)
*2
Timing Mark
Align the No. 1 chain's mark plate (orange) with the crankshaft timing gear's timing mark and attach the chain to the gear as shown in the illustration.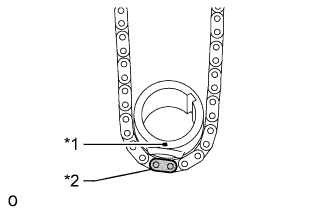
Text in Illustration *1
Timing Mark
*2
Mark Plate (Orange)
Align the No. 2 chain's mark plates (yellow) with the timing marks (1-dot marks) of the camshaft timing gear and camshaft timing exhaust gear, and attach the No. 2 chain to the gears as shown in the illustration.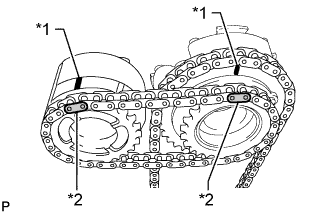
Text in Illustration *1
Timing Mark
*2
Mark Plate (Yellow)
- HINT:
- The crankshaft timing gear and camshaft exhaust gear are installed with the No. 1 and No. 2 chains connected to the gears.
Install the crankshaft timing sprocket LH to the crankshaft.
Align the knock pin of the No. 3 camshaft with the pin hole of the camshaft timing gear and install the camshaft timing gear.
Using the hexagonal portion of the No. 4 camshaft, align the knock pin of the No. 4 camshaft with the pin hole of the camshaft timing exhaust gear and install the camshaft timing exhaust gear.
- NOTICE:
- Because the gears' timing mark positions may shift due to looseness of the No. 1 chain, use the hexagonal portion of the camshaft to hold the No. 3 camshaft in place until the No. 1 chain tensioner is installed.
Remove the pin from the No. 3 chain tensioner.
| 33. INSTALL NO. 1 CHAIN VIBRATION DAMPER LH |
Install the No. 1 chain vibration damper with the 2 bolts.
- Torque:
- 21 N*m{ 214 kgf*cm , 15 ft.*lbf }
Remove the hexagon wrench from the No. 1 chain tensioner.
| 34. INSTALL CHAIN TENSIONER SLIPPER LH |
- HINT:
- If the chain tensioner slipper cannot be installed due to the tension of the chain, use the hexagonal portion of the camshaft to loosen the chain and install the chain tensioner slipper LH.
| 35. INSTALL NO. 1 CHAIN TENSIONER ASSEMBLY LH |
Move the stopper plate upward to release the lock and push the plunger deep into the No. 1 chain tensioner.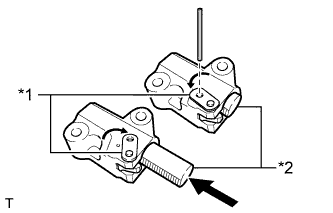
Text in Illustration *1
Stopper Plate
*2
Plunger
Move the stopper plate downward to set the lock and insert a hexagon wrench into the hole of the stopper plate.
Install a new gasket and the No. 1 chain tensioner with the 2 bolts.
- Torque:
- 10 N*m{ 102 kgf*cm , 7 ft.*lbf }
| 36. TIGHTEN CAMSHAFT TIMING GEAR ASSEMBLY |
for Bank 1:
Using a wrench to hold the hexagonal portion of the No. 3 camshaft, install the camshaft timing gear bolt.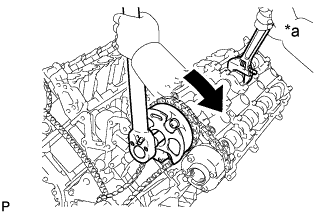
- Torque:
- 100 N*m{ 1020 kgf*cm , 74 ft.*lbf }
Text in Illustration *a
Hold
Turn
Using a wrench to hold the hexagonal portion of the No. 4 camshaft, install the camshaft timing exhaust gear bolt.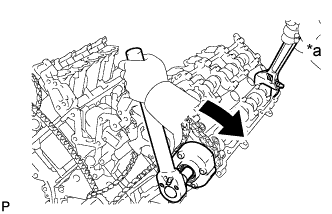
- Torque:
- 100 N*m{ 1020 kgf*cm , 74 ft.*lbf }
Text in Illustration *a
Hold
Turn
for Bank 2:
Using a wrench to hold the hexagonal portion of the No. 1 camshaft, install the camshaft timing gear bolt.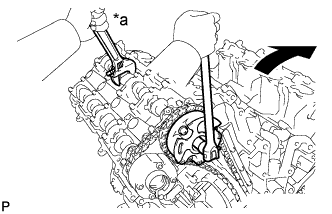
- Torque:
- 100 N*m{ 1020 kgf*cm , 74 ft.*lbf }
Text in Illustration *a
Hold
Turn
Using a wrench to hold the hexagonal portion of the No. 2 camshaft, install the camshaft timing exhaust gear bolt.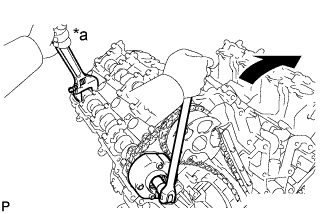
- Torque:
- 100 N*m{ 1020 kgf*cm , 74 ft.*lbf }
Text in Illustration *a
Hold
Turn
| 37. CHECK NO. 1 CYLINDER TO TDC/COMPRESSION |
Temporarily install the pulley set bolt.
Rotate the crankshaft clockwise and check that the timing marks on the crankshaft timing gear and camshaft timing gears are as shown in the illustration.
Remove the crankshaft pulley set bolt.
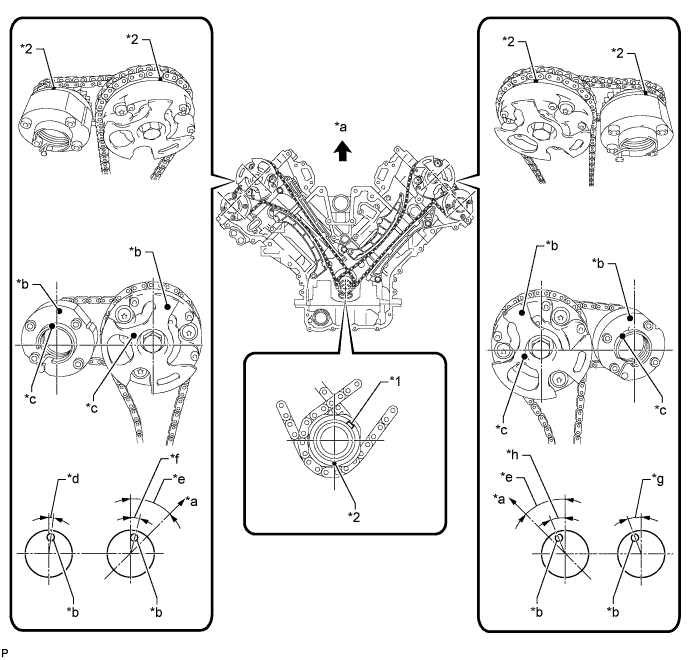
Text in Illustration *1
Crankshaft Timing Gear Key
*2
Timing Mark
*a
Toward Ceiling
*b
Timing Mark Position
*c
Knock Pin Position
*d
Approximately 2°
*e
Approximately 45°
*f
Approximately 16°
*g
Approximately 18°
*h
Approximately 32°
| 38. INSTALL WATER INLET PIPE |
Apply soapy water to 2 new O-rings and install them to the water inlet pipe.
Install the water inlet pipe to the No. 1 heat exchanger cover.
| 39. INSTALL TIMING CHAIN COVER SUB-ASSEMBLY |
Apply a light coat of engine oil to a new gasket.
Install the gasket to the cylinder block.
Apply a light coat of engine oil to a new O-ring.
Install the O-ring to the oil pan.
Apply seal packing in a continuous line to the timing chain cover as shown in the following illustration.
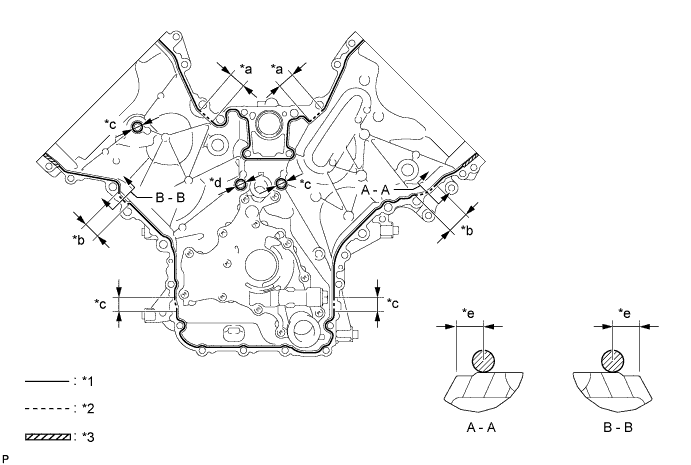
Text in Illustration *1
Continuous Line Area
*2
Dashed Line Area
*3
Diagonal Line Area
-
-
*a
20.0 mm (0.787 in.)
*b
26.0 mm (1.02 in.)
*c
16.0 mm (0.630 in.)
*d
18.0 mm (0.709 in.)
*e
7.0 mm (0.276 in.)
-
-
- Seal packing:
- Toyota Genuine Seal Packing Black, Three Bond 1207B or equivalent
-
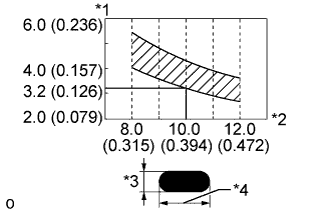
- Application Specification:
Area
Seal Packing Diameter
Application Position from Inside Edge of Cover
Continuous line area
3.0 to 4.0 mm (0.118 to 0.157 in.)
2.5 mm (0.0984 in.)
Dashed line area
6.4 mm (0.252 in.) or more, or within OK area shown in illustration
7.0 mm (0.276 in.)
Diagonal line area
3.0 to 4.0 mm (0.118 to 0.157 in.)
5.5 mm (0.217 in.)
Text in Illustration *1
Seal Packing Thickness mm (in.)
*2
Seal Packing Width mm (in.)
*3
Thickness
*4
Width

OK Area
- NOTICE:
- When the contact surfaces are wet, wipe them with an oil-free cloth before applying seal packing.
- Install the chain cover within 3 minutes and tighten the bolts within 10 minutes after applying seal packing.
- When the contact surfaces are wet, wipe them with an oil-free cloth before applying seal packing.
Align the oil pump drive rotor spline and crankshaft as shown in the illustration and install the chain cover.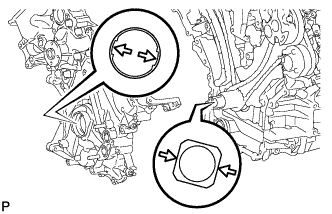
Temporarily install the 26 bolts and nut.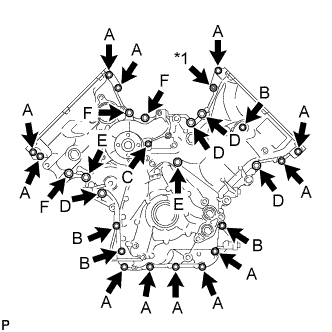
- Standard Bolt:
Item
Length
Thread Diameter
Bolt A
25 mm (0.984 in.)
8 mm (0.315 in.)
Bolt B
55 mm (2.17 in.)
8 mm (0.315 in.)
Bolt C
70 mm (2.76 in.)
8 mm (0.315 in.)
Bolt D
35 mm (1.38 in.)
10 mm (0.394 in.)
Bolt E
55 mm (2.17 in.)
10 mm (0.394 in.)
Bolt F
80 mm (3.15 in.)
10 mm (0.394 in.)
Text in Illustration *1
Nut
- NOTICE:
- Make sure that there is no oil on the bolt threads.
Tighten the 3 bolts in several steps in the sequence shown in the illustration.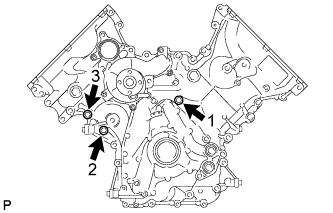
- Torque:
- 47 N*m{ 479 kgf*cm , 35 ft.*lbf }
Temporarily install the fan bracket with the 5 bolts.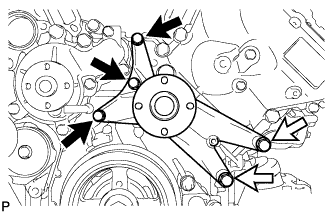
- Standard Bolt:
Item
Length
Thread Diameter
Bolt A
70 mm (2.76 in.)
8 mm (0.315 in.)
Bolt B
80 mm (3.15 in.)
10 mm (0.394 in.)
Text in Illustration
Bolt A
Bolt B
Temporarily install the belt tensioner with the bolt and 6 mm hexagon bolt.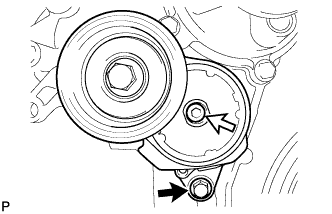
Text in Illustration
Bolt
6 mm Hexagon Bolt
Tighten the 8 bolts labeled 4 to 11 in several steps in the sequence shown in the illustration.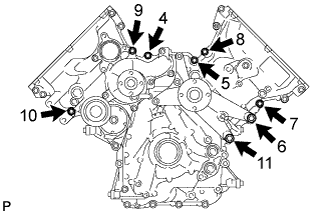
- Torque:
- 47 N*m{ 479 kgf*cm , 35 ft.*lbf }
Tighten the 22 bolts and nut labeled 12 to 34 in several steps in the sequence shown in the illustration.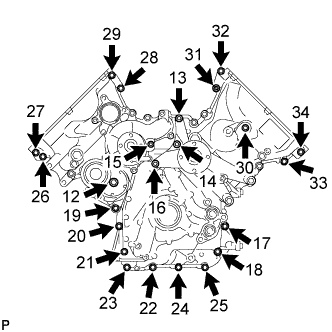
- Torque:
- 23 N*m{ 235 kgf*cm , 17 ft.*lbf }
- NOTICE:
- Do not start the engine for at least 2 hours after the installation.
-
After the installation, if the seal packing has seeped out at the areas labeled A shown in the illustration, wipe it off.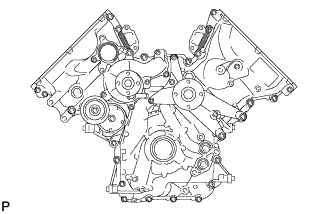
- Do not start the engine for at least 2 hours after the installation.
Text in Illustration 
Labeled A
Check the torque of each bolt and nut again.
| 40. INSTALL ENGINE WATER PUMP ASSEMBLY |
Install a new gasket and the engine water pump with the 8 bolts shown in the illustration.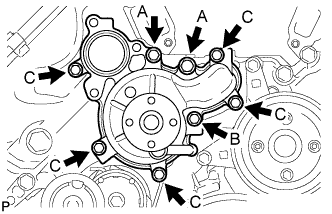
- Torque:
- for bolt A:
- 47 N*m{ 479 kgf*cm , 35 ft.*lbf }
- for bolt B:
- 23 N*m{ 235 kgf*cm , 17 ft.*lbf }
- for bolt C:
- 20 N*m{ 204 kgf*cm , 15 ft.*lbf }
- Standard Bolt:
Item
Length
Thread Diameter
Bolt A
80 mm (3.15 in.)
10 mm (0.394 in.)
Bolt B
70 mm (2.76 in.)
8 mm (0.315 in.)
Bolt C
25 mm (0.984 in.)
8 mm (0.315 in.)
| 41. INSTALL FRONT CRANKSHAFT OIL SEAL |
Apply MP grease to the lip of a new front crankshaft oil seal.
- NOTICE:
- Do not allow foreign matter to contact the lip of the oil seal.
- Do not allow MP grease to contact the dust seal.
- Do not allow foreign matter to contact the lip of the oil seal.
Using SST and a hammer, tap in the front crankshaft oil seal to a depth between 0 and 1.0 mm (0 to 0.0394 in.) from the timing chain cover edge.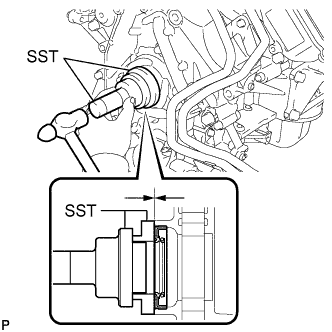
- SST
- 09223-22010
09506-35010
- NOTICE:
- Keep the lip free from foreign matter.
- Do not tap the front crankshaft oil seal at an angle.
- Keep the lip free from foreign matter.
| 42. INSTALL CRANKSHAFT TIMING GEAR KEY |
Install the crankshaft timing gear key to the crankshaft.
| 43. INSTALL ENGINE OIL LEVEL SENSOR |
Install a new gasket to the engine oil level sensor.
Install the engine oil level sensor with the 4 bolts.
- Torque:
- 7.0 N*m{ 71 kgf*cm , 62 in.*lbf }
Connect the connector.
| 44. INSTALL SPARK PLUG TUBE GASKET |
Using a cutter knife, cut off the seal part of the removed spark plug tube gasket.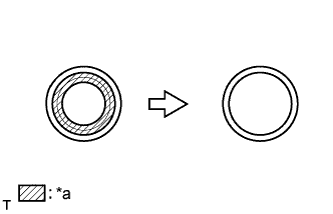
Text in Illustration *a
Area to cut off
Using the removed spark plug tube gasket and a hammer, tap in a new spark plug tube gasket until it stops.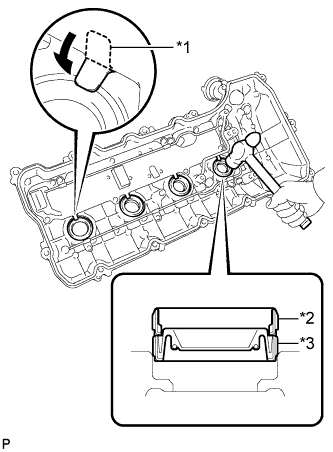
Text in Illustration *1
Ventilation Baffle Plate Claw
*2
Removed Spark Plug Tube Gasket
*3
New Spark Plug Tube Gasket
- HINT:
- If the removed spark plug tube gasket does not fit on the new one, correct the removed one with pliers.
Apply a light coat of MP grease to the spark plug tube gasket lip.
Return the 4 ventilation baffle plate claws to their original positions.
| 45. INSTALL OIL CONTROL VALVE FILTER |
for Bank 1:
Install the oil control valve filter to the cylinder head cover.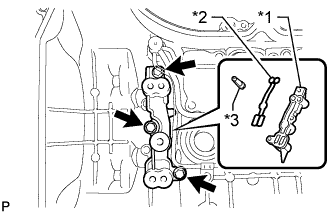
Text in Illustration *1
Cylinder Head Cover Spacer
*2
New Gasket
*3
Oil Control Valve Filter
Install a new gasket and the cylinder head cover spacer with the 3 bolts.
- Torque:
- 10 N*m{ 102 kgf*cm , 7 ft.*lbf }
for Bank 2:
Install the oil control valve filter to the cylinder head cover.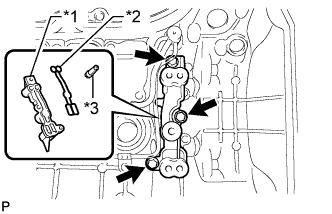
Text in Illustration *1
Cylinder Head Cover Spacer
*2
New Gasket
*3
Oil Control Valve Filter
Install a new gasket and the cylinder head cover spacer with the 3 bolts.
- Torque:
- 10 N*m{ 102 kgf*cm , 7 ft.*lbf }
| 46. INSTALL CYLINDER HEAD COVER SUB-ASSEMBLY RH |
Install 5 new gaskets to the camshaft bearing caps. (No. 1, No. 3).
Install a new cylinder head cover gasket RH to the cylinder head cover sub-assembly RH.
- NOTICE:
- Remove any oil from the contact surface.
Apply seal packing as shown in the illustration.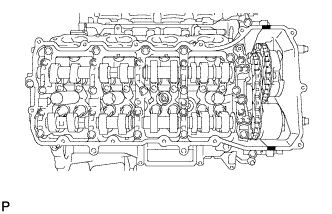
- Seal packing:
- Toyota Genuine Seal Packing Black, Three Bond 1207B or equivalent
Text in Illustration 
Seal Packing
- NOTICE:
- Remove any oil from the contact surface.
- Install the cylinder head cover within 3 minutes and tighten the bolts within 15 minutes after applying seal packing.
- Remove any oil from the contact surface.
Install a new seal washer to the bolt.
Temporarily install the cylinder head cover sub-assembly RH with the 14 bolts. Tighten the bolts uniformly in several steps.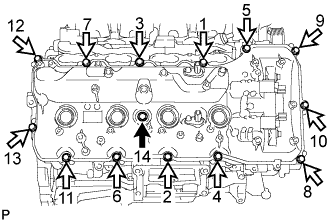
- Torque:
- for bolt A:
- 21 N*m{ 214 kgf*cm , 15 ft.*lbf }
- for bolt B:
- 12 N*m{ 122 kgf*cm , 9 ft.*lbf }
- Standard Bolt:
Item
Length
Thread Diameter
Bolt A
70 mm (2.76 in.)
8 mm (0.315 in.)
Bolt B
25 mm (0.984 in.)
6 mm (0.236 in.)
Text in Illustration
Bolt A
Bolt B
- NOTICE:
- Do not start the engine for at least 2 hours after the installation.
| 47. INSTALL CYLINDER HEAD COVER SUB-ASSEMBLY LH |
Install 5 new gaskets to the camshaft bearing caps (No. 2, No. 3).
Install a new cylinder head cover gasket LH to the cylinder head cover sub-assembly LH.
- NOTICE:
- Remove any oil from the contact surface.
Apply seal packing as shown in the illustration.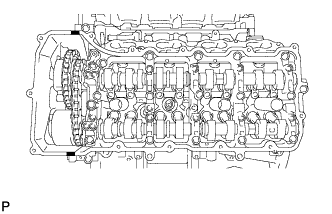
- Seal packing:
- Toyota Genuine Seal Packing Black, Three Bond 1207B or equivalent
Text in Illustration
Seal Packing
- NOTICE:
- Remove any oil from the contact surface.
- Install the cylinder head cover within 3 minutes and tighten the bolts within 15 minutes after applying seal packing.
- Remove any oil from the contact surface.
Install a new seal washer to the bolt.
Temporarily install the cylinder head cover sub-assembly LH with the 14 bolts. Tighten the bolts uniformly in several steps.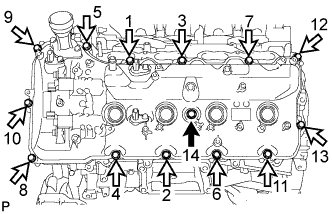
- Torque:
- for bolt A:
- 21 N*m{ 214 kgf*cm , 15 ft.*lbf }
- for bolt B:
- 12 N*m{ 122 kgf*cm , 9 ft.*lbf }
- Standard Bolt:
Item
Length
Thread Diameter
Bolt A
70 mm (2.76 in.)
8 mm (0.315 in.)
Bolt B
25 mm (0.984 in.)
6 mm (0.236 in.)
Text in Illustration
Bolt A
Bolt B
- NOTICE:
- Do not start the engine for at least 2 hours after the installation.
| 48. INSTALL FRONT WATER BY-PASS JOINT |
Install 2 new gaskets and the water by-pass joint with the 4 nuts.
- Torque:
- 21 N*m{ 214 kgf*cm , 15 ft.*lbf }
| 49. INSTALL WATER INLET HOUSING |
Install a new gasket to the engine water pump.
Install the water inlet housing with the 3 bolts.
- Torque:
- 21 N*m{ 214 kgf*cm , 15 ft.*lbf }
| 50. INSTALL CYLINDER BLOCK WATER DRAIN COCK SUB-ASSEMBLY |
Apply adhesive to 2 or 3 threads of the cylinder block water drain cocks.
- Adhesive:
- Toyota Genuine Adhesive 1344, Three Bond 1344 or equivalent
Install the cylinder block water drain cocks.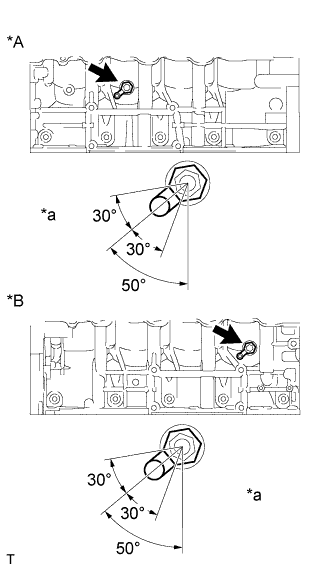
- Torque:
- 30 N*m{ 306 kgf*cm , 22 ft.*lbf }
Text in Illustration *A
for Bank 1
*B
for Bank 2
*a
Front
Tighten the cylinder block water drain cocks up to an additional 360° so that the cylinder block water drain cock pipes are within the range shown in the illustration.
- NOTICE:
- Do not rotate the cylinder block water drain cocks more than 1 revolution (360°) after tightening the cylinder block water drain cocks to the specified torque.
- Do not loosen the cylinder block water drain cocks to adjust them. If an adjustment is necessary, remove the cylinder block water drain cocks and reinstall them.
- Do not rotate the cylinder block water drain cocks more than 1 revolution (360°) after tightening the cylinder block water drain cocks to the specified torque.
Install the water drain cock plugs to the water drain cocks.
- Torque:
- 13 N*m{ 130 kgf*cm , 9 ft.*lbf }
| 51. INSTALL CAMSHAFT TIMING OIL CONTROL VALVE ASSEMBLY |
for Bank 1:
Apply a light coat of engine oil to 2 new O-rings.
Install the 2 O-rings to the 2 camshaft timing oil control valves.
Install the 2 camshaft timing oil control valves with the 2 bolts.
- Torque:
- 10 N*m{ 102 kgf*cm , 7 ft.*lbf }
for Bank 2:
Apply a light coat of engine oil to 2 new O-rings.
Install the 2 O-rings to the 2 camshaft timing oil control valves.
Install the 2 camshaft timing oil control valves with the 2 bolts.
- Torque:
- 10 N*m{ 102 kgf*cm , 7 ft.*lbf }
| 52. INSTALL CRANKSHAFT POSITION SENSOR |
Install the crankshaft position sensor with the bolt.
- Torque:
- 10 N*m{ 102 kgf*cm , 7 ft.*lbf }
Connect the crankshaft position sensor connector.
| 53. INSTALL CRANKSHAFT POSITION SENSOR PROTECTOR |
Install the crankshaft position sensor protector with the 2 bolts.
- Torque:
- 10 N*m{ 102 kgf*cm , 7 ft.*lbf }
| 54. INSTALL CAMSHAFT POSITION SENSOR |
Install the camshaft position sensor with the bolt.
- Torque:
- 10 N*m{ 102 kgf*cm , 7 ft.*lbf }
Connect the camshaft position sensor connector.
| 55. INSTALL VVT SENSOR |
Install the 4 VVT sensors with the 4 bolts.
- Torque:
- 10 N*m{ 102 kgf*cm , 7 ft.*lbf }
Connect the 4 VVT sensor connectors.
| 56. INSTALL KNOCK SENSOR |
Install the 4 knock sensors with the 4 bolts so that the knock sensors are angled as shown in the illustration.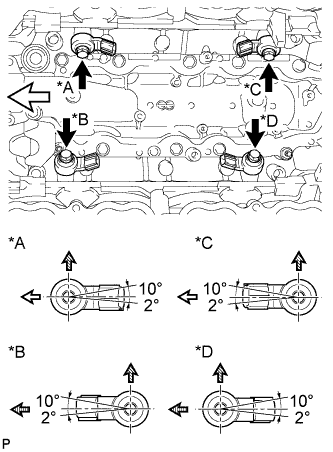
- Torque:
- 20 N*m{ 204 kgf*cm , 15 ft.*lbf }
Text in Illustration *A
for Bank 2 Sensor 1
*B
for Bank 1 Sensor 1
*C
for Bank 2 Sensor 2
*D
for Bank 1 Sensor 2
Front

Upper Side

Rear
Connect the 4 knock sensor connectors.
| 57. INSTALL SPARK PLUG |
Using a 16 mm plug wrench, install the 8 spark plugs.
- Torque:
- 21 N*m{ 214 kgf*cm , 15 ft.*lbf }
| 58. INSTALL OIL FILLER CAP HOUSING |
Align the protrusion of a new gasket with the cutout of the oil filler cap housing and install the gasket to the oil filler cap housing.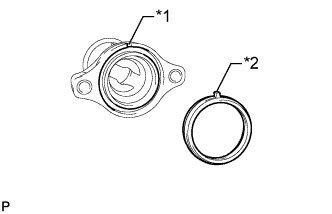
Text in Illustration *1
Cutout
*2
Protrusion
Install the oil filler cap housing with the 2 bolts.
- Torque:
- 10 N*m{ 102 kgf*cm , 7 ft.*lbf }
| 59. INSTALL OIL FILLER CAP SUB-ASSEMBLY |
Install the gasket to the oil filler cap.
Install the oil filler cap.
| 60. INSTALL CRANKSHAFT PULLEY |
Align the key groove of the pulley with the pulley set key, and slide on the pulley to install it.
Using SST, install the pulley set bolt.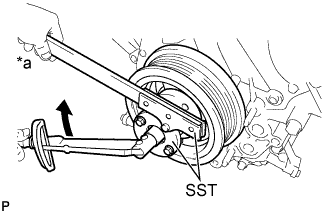
- SST
- 09213-70011
09330-00021
- Torque:
- 300 N*m{ 3059 kgf*cm , 221 ft.*lbf }
Text in Illustration *a
Hold
Turn
| 61. INSTALL OIL FILTER BRACKET SUB-ASSEMBLY |
Apply a light coat of engine oil to 2 new O-rings.
Install the 2 O-rings to the timing chain cover.
Install the oil filter bracket with the 2 nuts and 2 bolts.
- Torque:
- 35 N*m{ 357 kgf*cm , 26 ft.*lbf }
| 62. INSTALL OIL PRESSURE SENDER GAUGE ASSEMBLY |
Apply adhesive to 2 or 3 threads of the oil pressure sender gauge.
- Adhesive:
- Toyota Genuine Adhesive 1344, Three Bond 1344 or equivalent
- NOTICE:
-
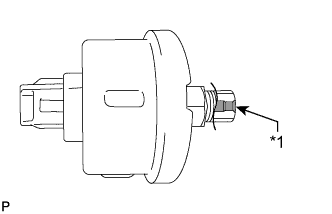
- Do not apply adhesive to the oil inlet port of the oil pressure sender gauge.
Text in Illustration *1
Oil Inlet Port
Install the oil pressure sender gauge.
- Torque:
- 15 N*m{ 153 kgf*cm , 11 ft.*lbf }
- NOTICE:
- Do not start the engine within 1 hour after installation.
Connect the oil pressure sender gauge connector.
| 63. INSTALL OIL FILTER ELEMENT |
Clean the inside of the oil filter cap, threads and O-ring groove.
Apply a light coat of engine oil to a new O-ring for the cap, and then install the O-ring to the groove of the oil filter cap.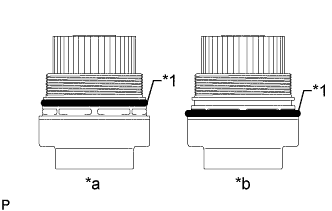
Text in Illustration *1
O-Ring
*a
CORRECT
*b
INCORRECT
- NOTICE:
- Be sure to install the O-ring in the proper location, otherwise oil may leak.
- Do not twist the O-ring.
- Be sure to install the O-ring in the proper location, otherwise oil may leak.
Set a new oil filter element to the oil filter cap.
Remove any dirt or foreign matter from the installation surface of the engine.
Apply a small amount of engine oil to the O-ring again and temporarily install the oil filter cap.
- NOTICE:
- Do not remove the oil filter bracket clip.
- Do not pinch the O-ring for the cap.
- Do not remove the oil filter bracket clip.
Using SST, tighten the oil filter cap.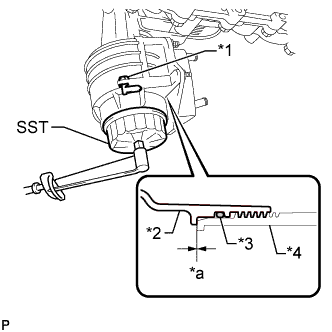
- SST
- 09228-06501
- Torque:
- 25 N*m{ 255 kgf*cm , 18 ft.*lbf }
Text in Illustration *1
Oil Filter Bracket Clip
*2
Oil Filter Cap
*3
O-Ring
*4
Oil Filter Bracket
*a
No Gap
- NOTICE:
- When tightening the oil filter cap, do not remove the oil filter bracket clip.
- After tightening the oil filter cap, make sure that there is no gap and that the O-ring is not protruding.
- When tightening the oil filter cap, do not remove the oil filter bracket clip.
Apply a small amount of engine oil to a new drain plug O-ring, and install it to the oil filter cap.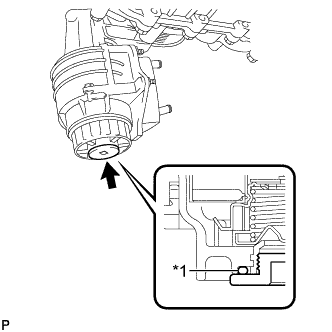
Text in Illustration *1
O-Ring
- NOTICE:
- Before installing the O-ring, remove any dirt or foreign matter from the installation surface of the oil filter cap.
Install the oil filter drain plug.
- Torque:
- 13 N*m{ 127 kgf*cm , 9 ft.*lbf }
- NOTICE:
- Be careful that the O-ring does not get caught between any surrounding parts.