INSTALLATION
Removal / installation · Vehicles built from Jan 2012
| 1. INSTALL NOISE FILTER |

for Bank 2:
Install the noise filter to the cylinder head cover with the bolt.- Torque:
- 10 N*m{ 102 kgf*cm , 7 ft.*lbf }
for Bank 1:
Install the noise filter to the cylinder head cover with the bolt.- Torque:
- 10 N*m{ 102 kgf*cm , 7 ft.*lbf }
| 2. INSTALL IGNITION COIL ASSEMBLY |
Install the 8 ignition coils with the 8 bolts.
- Torque:
- 10 N*m{ 102 kgf*cm , 7 ft.*lbf }
| 3. INSTALL NO. 11 WATER BY-PASS HOSE |
Install the No. 11 water by-pass hose.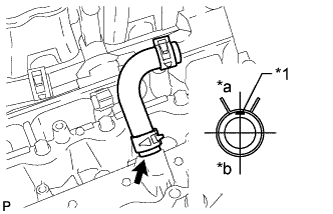

Text in Illustration *1
Paint Mark
*a
Rear
*b
Front
- HINT:
- When connecting the hose, make sure the paint marks and clips are as shown in the illustration.
- The direction of the hose clamp is indicated in the illustration.
- When connecting the hose, make sure the paint marks and clips are as shown in the illustration.
| 4. INSTALL ENGINE WIRE |
Attach the 3 wire harness clamps to install the engine wire.
Connect the 4 knock sensor connectors.
Install the bolt.
- Torque:
- 8.0 N*m{ 82 kgf*cm , 71 in.*lbf }
| 5. INSTALL NO. 1 ENGINE COVER |
| 6. INSTALL NO. 2 ENGINE COVER |
| 7. INSTALL SEPARATOR CASE |
Install the separator case with the 4 bolts.
- Torque:
- 10 N*m{ 102 kgf*cm , 7 ft.*lbf }
| 8. INSTALL NO. 1 IDLER PULLEY SUB-ASSEMBLY |
Install the No. 1 idler pulley with the bolt.
- Torque:
- 43 N*m{ 438 kgf*cm , 32 ft.*lbf }
| 9. INSTALL WATER PUMP PULLEY |
Temporarily install the water pump pulley with the 4 bolts.
Using SST, hold the water pump pulley and tighten the 4 bolts.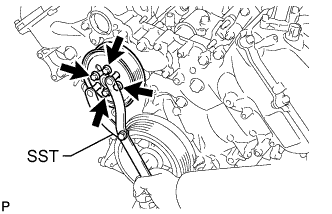
- SST
- 09960-10010
(09962-01000, 09963-01000)
- Torque:
- 21 N*m{ 214 kgf*cm , 15 ft.*lbf }
| 10. INSTALL NO. 1 WATER BY-PASS HOSE |
| 11. INSTALL NO. 2 WATER BY-PASS PIPE SUB-ASSEMBLY |
Connect the 4 hoses.
Install the water by-pass pipe with the 2 bolts.
- Torque:
- 10 N*m{ 102 kgf*cm , 7 ft.*lbf }
| 12. INSTALL NO. 3 ENGINE COVER |
Install the No. 3 engine cover.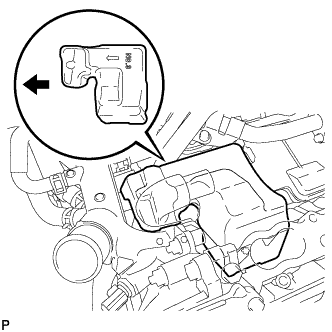
Text in Illustration 
Engine Front
- HINT:
- Position the No. 3 engine cover so that the arrow mark faces the front of the engine and install it.
| 13. INSTALL NO. 4 ENGINE COVER |
Install the No. 4 engine cover.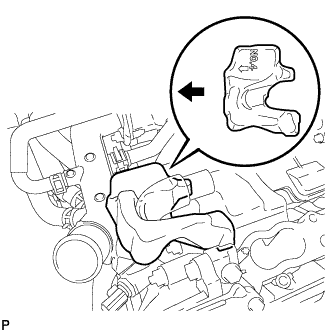
Text in Illustration
Engine Front
- HINT:
- Position the No. 4 engine cover so that the arrow mark faces the front of the engine and install it.
| 14. INSTALL NO. 2 FUEL DELIVERY PIPE SUB-ASSEMBLY |
Install the 2 delivery pipe spacers and 4 insulators to the cylinder head LH.
Install the delivery pipe together with the injectors to the cylinder head LH.
Install the 2 bolts.
- Torque:
- 21 N*m{ 214 kgf*cm , 15 ft.*lbf }
- NOTICE:
-
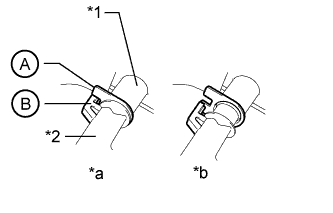
- Make sure that the part of the injector labeled B is between the parts of the delivery pipe labeled A.
Text in Illustration *1
Fuel Delivery Pipe
*2
Fuel Injector
*a
CORRECT
*b
INCORRECT
Connect the No. 7 wire harness connector.
| 15. INSTALL FUEL DELIVERY PIPE SUB-ASSEMBLY |
Install the 2 delivery pipe spacers and 4 insulators to the cylinder head RH.
Install the delivery pipe together with the injectors to the cylinder head RH.
Install the 2 bolts.
- Torque:
- 21 N*m{ 214 kgf*cm , 15 ft.*lbf }
- NOTICE:
-
- Make sure that the part of the injector labeled B is between the parts of the delivery pipe labeled A.
Text in Illustration *1
Fuel Delivery Pipe
*2
Fuel Injector
*a
CORRECT
*b
INCORRECT
Connect the No. 6 wire harness connector.
| 16. INSTALL FRONT NO. 1 ENGINE MOUNTING BRACKET LH |
Install the front No. 1 engine mounting bracket LH with the 4 bolts.
- Torque:
- 35 N*m{ 357 kgf*cm , 26 ft.*lbf }
| 17. INSTALL FRONT NO. 1 ENGINE MOUNTING BRACKET RH |
Install the front No. 1 engine mounting bracket RH with the 4 bolts.
- Torque:
- 35 N*m{ 357 kgf*cm , 26 ft.*lbf }
| 18. INSTALL NO. 1 EGR PIPE BRACKET |
Install the No. 1 EGR pipe bracket with the 3 bolts.
- Torque:
- 21 N*m{ 214 kgf*cm , 15 ft.*lbf }
| 19. INSTALL NO. 1 WATER OUTLET PIPE |
Install the No. 1 water outlet pipe with the 2 bolts.
- Torque:
- 10 N*m{ 102 kgf*cm , 7 ft.*lbf }
| 20. CONNECT NO. 11 WATER BY-PASS HOSE |
Connect the No. 11 water by-pass hose.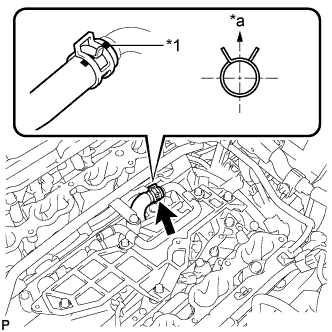
Text in Illustration *1
Paint Mark
*a
Upper Side
- HINT:
- The direction of the hose clamp is indicated in the illustration.
| 21. INSTALL NO. 8 WATER BY-PASS HOSE |
Install the No. 8 water by-pass hose.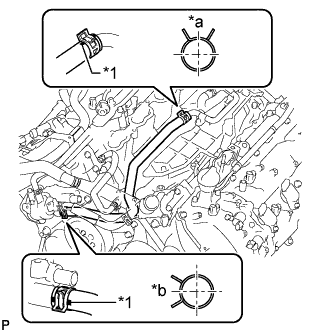
Text in Illustration *1
Paint Mark
*a
Upper Side
*b
Front
- HINT:
- When connecting the hose, make sure the paint marks and clips are as shown in the illustration.
- The direction of each hose clamp is indicated in the illustration.
- When connecting the hose, make sure the paint marks and clips are as shown in the illustration.
| 22. INSTALL NO. 2 WATER BY-PASS PIPE |
Install the No. 2 water by-pass pipe with the 2 bolts and connect the hose.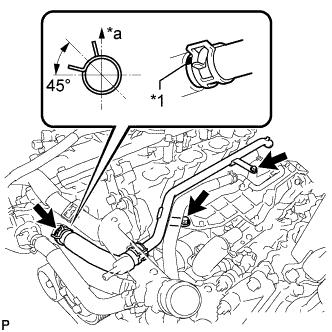
- Torque:
- 10 N*m{ 102 kgf*cm , 7 ft.*lbf }
Text in Illustration *1
Paint Mark
*a
Upper Side
- HINT:
- When connecting the hose, make sure the paint marks and clips are as shown in the illustration.
- The direction of each hose clamp is indicated in the illustration.
- When connecting the hose, make sure the paint marks and clips are as shown in the illustration.
| 23. INSTALL NO. 3 AIR TUBE (w/ Secondary Air Injection System) |
Install the No. 3 air tube with the bolt.
- Torque:
- 10 N*m{ 102 kgf*cm , 7 ft.*lbf }
| 24. INSTALL NO. 4 AIR TUBE (w/ Secondary Air Injection System) |
Install the No. 4 air tube with the bolt.
- Torque:
- 10 N*m{ 102 kgf*cm , 7 ft.*lbf }
| 25. INSTALL AIR SWITCHING VALVE ASSEMBLY (for Bank 2) |
- for Bank 1 (Click here)
- for Bank 2 (Click here)
| 26. INSTALL FUEL TUBE SUB-ASSEMBLY |
Install the fuel tube (Click here).
Install the 2 bolts.
- Torque:
- 10 N*m{ 102 kgf*cm , 7 ft.*lbf }
| 27. INSTALL FUEL HOSE |
Install the fuel hose (Click here).
Install the fuel pipe clamp.
Connect the 2 clamps.
| 28. INSTALL ENGINE WIRE |