INSTALLATION
Removal / installation · Vehicles built Sep 2011 – Dec 2011
Versions by build date: Sep 2011 – Dec 2011 from Jan 2012
| 1. INSTALL EXHAUST MANIFOLD SUB-ASSEMBLY RH |

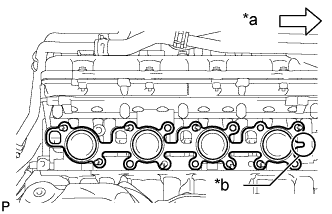  |
Install a new gasket to the cylinder head.
- HINT:
- Install the exhaust manifold gasket with the gasket tab facing toward the front of the engine.
Text in Illustration *a
Front
*b
Tab
Install the exhaust manifold with 8 new nuts.
- Torque:
- 30 N*m{ 306 kgf*cm , 22 ft.*lbf }
| 2. INSTALL NO. 1 EXHAUST MANIFOLD HEAT INSULATOR |
Install the heat insulator with the 3 bolts.
- Torque:
- 10 N*m{ 102 kgf*cm , 7 ft.*lbf }
| 3. INSTALL NO. 1 MANIFOLD STAY |
Install the manifold stay with the 3 bolts.
- Torque:
- 40 N*m{ 408 kgf*cm , 30 ft.*lbf }
| 4. INSTALL EXHAUST MANIFOLD SUB-ASSEMBLY LH |
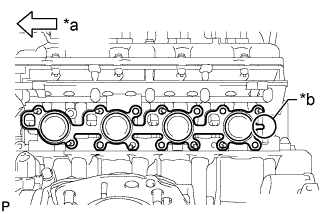 |
Install a new gasket to the cylinder head.
- HINT:
- Install the exhaust manifold gasket with the gasket tab facing toward the rear of the engine.
Text in Illustration *a
Front
*b
Tab
Install the exhaust manifold with 8 new nuts.
- Torque:
- 30 N*m{ 306 kgf*cm , 22 ft.*lbf }
| 5. INSTALL NO. 2 EXHAUST MANIFOLD HEAT INSULATOR |
Install the heat insulator with the 3 bolts.
- Torque:
- 10 N*m{ 102 kgf*cm , 7 ft.*lbf }
| 6. INSTALL NO. 2 MANIFOLD STAY |
Install the manifold stay with the 3 bolts.
- Torque:
- 40 N*m{ 408 kgf*cm , 30 ft.*lbf }
| 7. INSTALL PROPELLER SHAFT HEAT INSULATOR |
Install the heat insulator with the 2 bolts.
- Torque:
- 16 N*m{ 160 kgf*cm , 12 ft.*lbf }
| 8. INSTALL FRONT EXHAUST PIPE ASSEMBLY |
Install a new gasket and the front exhaust pipe to the exhaust manifold RH with 2 new nuts.
- Torque:
- 54 N*m{ 551 kgf*cm , 40 ft.*lbf }
Install the wire harness clamp bracket of the oxygen sensor to the transmission with the bolt.
- Torque:
- 29 N*m{ 296 kgf*cm , 21 ft.*lbf }
Connect the heated oxygen sensor connector.
| 9. INSTALL FRONT NO. 2 EXHAUST PIPE ASSEMBLY |
Install a new gasket and the front No. 2 exhaust pipe to the exhaust manifold LH with 2 new nuts.
- Torque:
- 54 N*m{ 551 kgf*cm , 40 ft.*lbf }
Install the wire harness clamp bracket of the oxygen sensor to the transmission with the bolt.
- Torque:
- 29 N*m{ 296 kgf*cm , 21 ft.*lbf }
Connect the heated oxygen sensor connector.
| 10. INSTALL CENTER EXHAUST PIPE ASSEMBLY |
Install 2 new gaskets to the front exhaust pipe and front No. 2 exhaust pipe.
Install the center exhaust pipe to the 3 exhaust pipe supports, and then install the 4 bolts.
- Torque:
- 48 N*m{ 489 kgf*cm , 35 ft.*lbf }
| 11. INSTALL TAILPIPE ASSEMBLY |
Install the tailpipe to the 2 exhaust pipe supports.
Install a new gasket to the center exhaust pipe.
Connect the tailpipe to the center exhaust pipe.
Attach a new clamp to the tailpipe and center exhaust pipe. Then install the bolt to the clamp.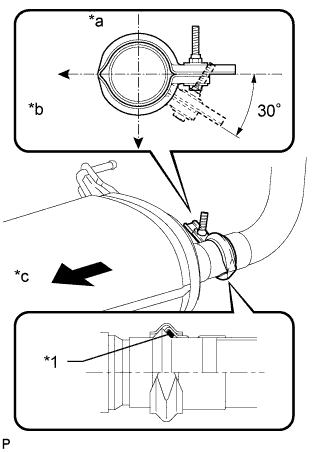
- Torque:
- 32 N*m{ 326 kgf*cm , 24 ft.*lbf }
Text in Illustration *1
Gasket
*a
Top
*b
LH Side
*c
Front
- HINT:
- Install the clamp within the angle range shown in the illustration.
| 12. INSTALL ENGINE OIL LEVEL DIPSTICK GUIDE |
Apply a light coat of engine oil to a new O-ring.
Install the O-ring to the guide.
Install the dipstick guide with the bolt.
- Torque:
- 10 N*m{ 102 kgf*cm , 7 ft.*lbf }
Install the dipstick.
Connect the wire harness clamp.
| 13. INSPECT FOR EXHAUST GAS LEAK |
| 14. INSTALL FRONT FENDER APRON SEAL LH |
Install the fender apron seal with the 3 clips.
| 15. INSTALL FRONT FENDER APRON SEAL REAR LH |
Install the fender apron seal with the 4 clips.
| 16. INSTALL FRONT FENDER APRON SEAL FRONT RH |
Install the fender apron seal with the 3 clips.
| 17. INSTALL FRONT FENDER APRON SEAL REAR RH |
Install the fender apron seal with the 4 clips.
| 18. INSTALL NO. 1 ENGINE UNDER COVER SUB-ASSEMBLY |
Install the No. 1 engine under cover with the 10 bolts.
- Torque:
- 29 N*m{ 296 kgf*cm , 21 ft.*lbf }
| 19. INSTALL FRONT FENDER SPLASH SHIELD SUB-ASSEMBLY LH |
 |
Push in the clip indicated by the arrow in the illustration to install the fender splash shield.
Install the 3 bolts and screw.
| 20. INSTALL FRONT FENDER SPLASH SHIELD SUB-ASSEMBLY RH |
- HINT:
- Use the same procedures described for the LH side.
| 21. INSTALL NO. 2 ENGINE UNDER COVER |
Install the No. 2 engine under cover with the 2 bolts.
- Torque:
- 29 N*m{ 296 kgf*cm , 21 ft.*lbf }