REMOVAL
Removal / installation · Vehicles built Sep 2011 – Dec 2011
Versions by build date: Sep 2011 – Dec 2011 from Jan 2012
| 1. REMOVE RADIATOR ASSEMBLY |

Remove the radiator (Click here).
| 2. REMOVE CRANKSHAFT PULLEY SUB-ASSEMBLY |
- NOTICE:
-
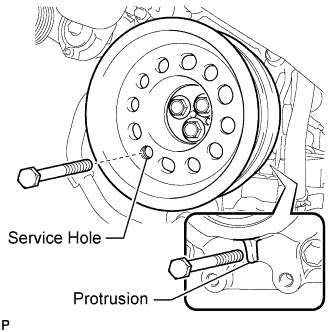

- This procedure is intended for removal/installation of the crankshaft pulley only. Do not use this procedure for removal/installation of the flywheel or the drive plate and ring gear.
Install the 2 bolts to the bolt holes of the crankshaft rear side.
Using a bar, turn the crankshaft until the crankshaft pulley service hole is a little to the left of bottom dead center.
Install a 14 mm x 1.5 pitch service bolt with a length of 70 mm or more to the crankshaft pulley service hole, and hold the crankshaft using the timing chain cover protrusion.
Remove the 3 bolts and crankshaft pulley.
- NOTICE:
- If the crankshaft pulley cannot be removed, temporarily install a bolt to the crankshaft so that the pulley does not fall, and lightly tap the outer edge of the mass damper with a plastic-faced hammer to remove the pulley. Do not tap the pulley V-ribbed belt ribs, as the crankshaft may be damaged.
| 3. REMOVE FRONT CRANKSHAFT OIL SEAL |
Using a knife, cut off the lip of the oil seal.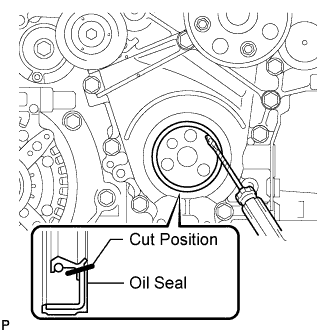
Using a screwdriver, pry out the oil seal.
- NOTICE:
- Be careful not to damage the crankshaft.
- HINT:
- Tape the screwdriver tip before use.