REASSEMBLY
Removal / installation · Vehicles built from Jan 2012
Versions by build date: Sep 2011 – Dec 2011 from Jan 2012
| 1. INSTALL REAR NO. 2 BUMPER SIDE BRACKET (w/ Tire Carrier) |

Attach the 3 claws and 2 clips to install the rear No. 2 bumper side bracket and rear No. 3 bumper side bracket.
Install the 2 screws.
| 2. INSTALL REAR NO. 2 STEP COVER |
Attach the 10 claws to install the rear No. 2 step cover.
| 3. INSTALL REFLEX REFLECTOR ASSEMBLY LH (w/o Rear Fog Light) |
Attach the claw to install the reflex reflector assembly LH.
Install the 2 nuts.
| 4. INSTALL REFLEX REFLECTOR ASSEMBLY RH (w/o Rear Fog Light) |
- HINT:
- Use the same procedure described for the LH side.
| 5. INSTALL REAR FOG LIGHT ASSEMBLY LH (w/ Rear Fog Light) |
Attach the claw.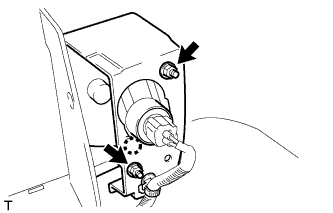

Connector the connectors.
Install the fog light with the 2 nuts.
| 6. INSTALL REAR FOG LIGHT ASSEMBLY RH (w/ Rear Fog Light) |
- HINT:
- Use the same procedure described for the LH side.
| 7. INSTALL REAR BUMPER ENERGY ABSORBER |
Attach the 8 claws to install the rear bumper energy absorber.
| 8. INSTALL NO. 1 ULTRASONIC SENSOR RETAINER (w/ TOYOTA Parking Assist-sensor System) |
- HINT:
- Use the same procedure to install the No. 1 ultrasonic sensor retainer on the other side.
Align the keyhole and protrusion as shown in the illustration.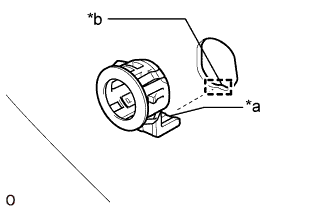
Text in Illustration *a
Protrusion
*b
Keyhole
- NOTICE:
- Do not damage the bumper with the protrusion when installing the No. 1 ultrasonic sensor retainer.
- Securely install the No. 1 ultrasonic sensor retainer so that there are no gaps between the retainer and surface of the rear bumper.
- Do not damage the bumper with the protrusion when installing the No. 1 ultrasonic sensor retainer.
- HINT:
- The illustration shows the No. 1 ultrasonic sensor retainer for the RH corner. The vertical orientation of the No. 1 ultrasonic sensor retainers for the LH corner is opposite that of the image shown in the illustration.
Attach the 2 claws to install the No. 1 ultrasonic sensor retainer.
| 9. INSTALL NO. 2 ULTRASONIC SENSOR RETAINER (w/ TOYOTA Parking Assist-sensor System) |
- HINT:
- Use the same procedure to install the No. 2 ultrasonic sensor retainer on the other side.
Align the keyhole and protrusion as shown in the illustration.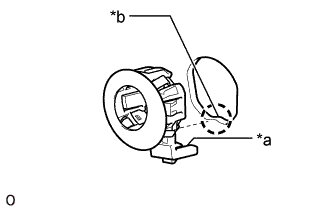
Text in Illustration *a
Protrusion
*b
Keyhole
- NOTICE:
- Do not damage the bumper with the protrusion when installing the No. 2 ultrasonic sensor retainer.
- Securely install the No. 2 ultrasonic sensor retainer so that there are no gaps between the retainer and surface of the rear bumper.
- Do not damage the bumper with the protrusion when installing the No. 2 ultrasonic sensor retainer.
Attach the 2 claws to install the No. 2 ultrasonic sensor retainer.
| 10. INSTALL NO. 1 ULTRASONIC SENSOR (w/ TOYOTA Parking Assist-sensor System) |
- HINT:
- Use the same procedure for all No. 1 ultrasonic sensors.
Attach the 2 claws to install the No. 1 ultrasonic sensor.
- NOTICE:
- Push the ultrasonic sensor retainer from the outside of the bumper when there is a gap between the retainer and the bumper surface. In this case, do not push on the ultrasonic sensor.
| 11. INSTALL NO. 2 FRAME WIRE |
w/ TOYOTA Parking Assist-sensor System, w/o Rear Fog Light:
Attach the 12 clamps to install the No. 2 frame wire.
Connect the 4 connectors.
w/ TOYOTA Parking Assist-sensor System, w/ Rear Fog Light:
Attach the 14 clamps to install the No. 2 frame wire.
Connect the 6 connectors.
w/o TOYOTA Parking Assist-sensor System, w/ Rear Fog Light:
Attach the 13 clamps to install the No. 2 frame wire.
Connect the 2 connectors.