INSTALLATION
Removal / installation · Vehicles built Sep 2011 – Dec 2011
Versions by build date: Sep 2011 – Dec 2011 from Jan 2012
- HINT:
- When installing the emblem and name plate, heat the vehicle body, emblem and name plate using a heat light.
- Standard Heating Temperature:
Item
Temperature
Vehicle Body
40 to 60°C (104 to 140°F)
Emblem
20 to 30°C (68 to 86°F)
Name Plate
20 to 30°C (68 to 86°F)
- NOTICE:
- Do not heat the vehicle body, emblem and name plate excessively.
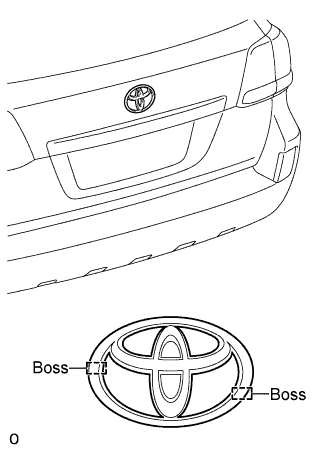
| 1. INSTALL SYMBOL EMBLEM |

  |
Clean the vehicle body surface.
Using a heat light, heat the vehicle body surface.
Remove the double-sided tape from the vehicle body.
Wipe off any tape adhesive residue with cleaner.
Install a new emblem.
Using a heat light, heat the vehicle body and a new emblem.
Remove the peeling paper from the face of the emblem.
- HINT:
- After removing the peeling paper, keep the exposed adhesive free from foreign matter.
Align the boss positions and install the emblem.
- HINT:
- Press the emblem firmly to install it.
| 2. INSTALL REAR NO. 3 BODY NAME PLATE |
Clean the vehicle body surface.
Using a heat light, heat the vehicle body surface.
Remove the double-sided tape from the vehicle body.
Wipe off any tape adhesive residue with cleaner.
Install a new rear body name plate.
Using a heat light, heat the vehicle body and a new rear body name plate.
Remove the peeling paper from the face of the rear body name plate.
- HINT:
- After removing the peeling paper, keep the exposed adhesive free from foreign matter.
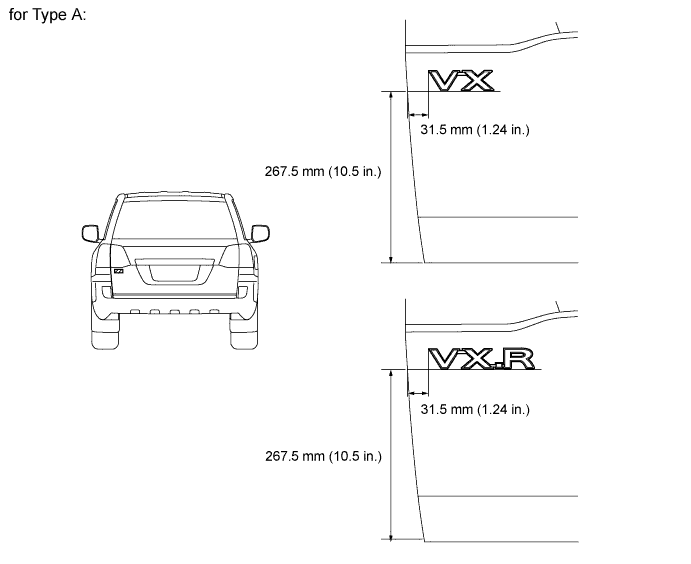
for Type A:
Install the rear body name plate in the position shown in the illustration.- HINT:
- Press the rear body name plate firmly to install it.
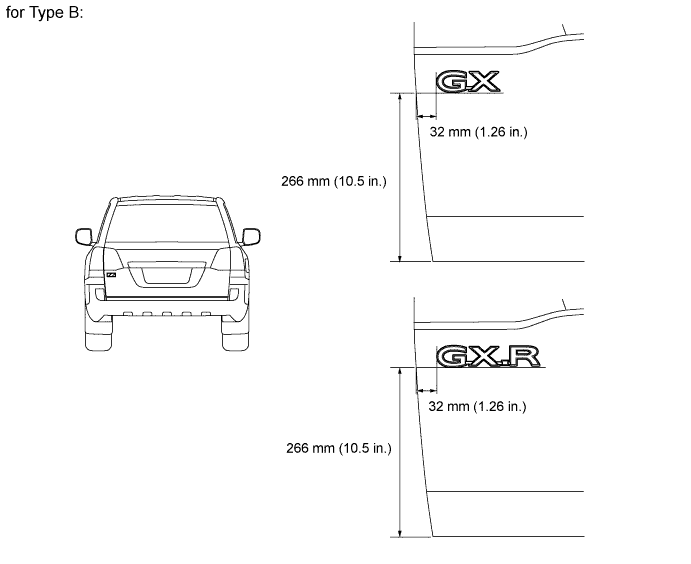
for Type B:
Install the rear body name plate in the position shown in the illustration.- HINT:
- Press the rear body name plate firmly to install it.
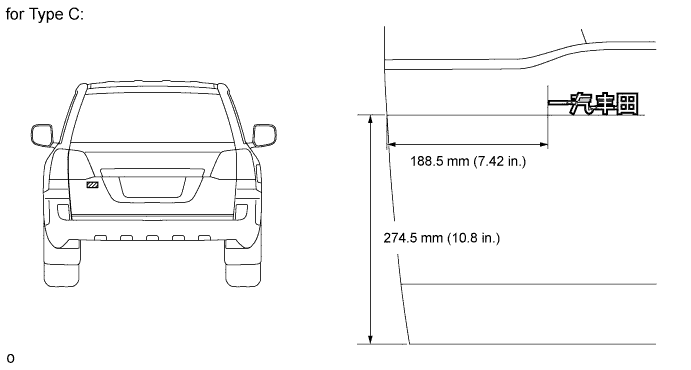
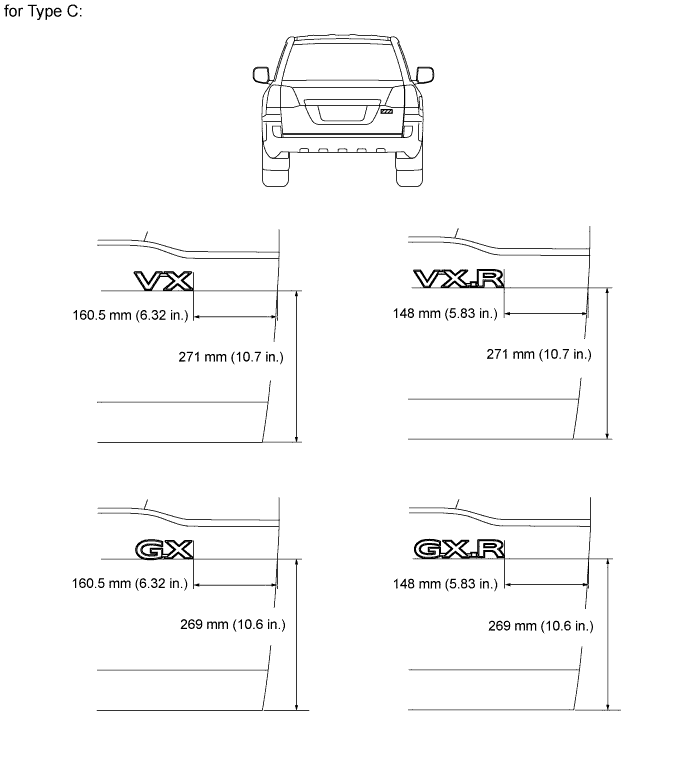
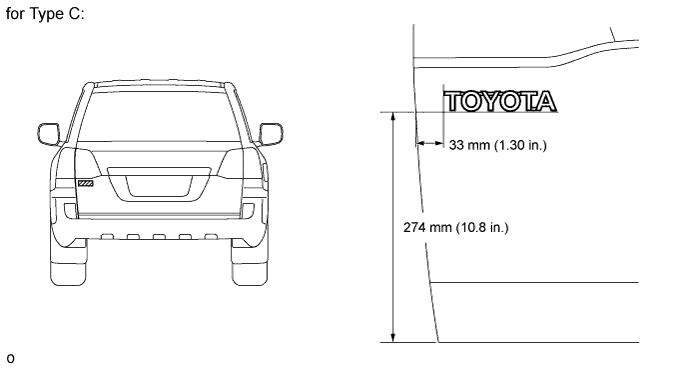
for Type C:
Install the rear body name plate in the position shown in the illustration.- HINT:
- Press the rear body name plate firmly to install it.
| 3. INSTALL NO. 5 BACK DOOR NAME PLATE |
Clean the vehicle body surface.
Using a heat light, heat the vehicle body surface.
Remove the double-sided tape from the vehicle body.
Wipe off any tape adhesive residue with cleaner.
Install a new back door name plate.
Using a heat light, heat the vehicle body and a new back door name plate.
Remove the peeling paper from the face of the back door name plate.
- HINT:
- After removing the peeling paper, keep the exposed adhesive free from foreign matter.
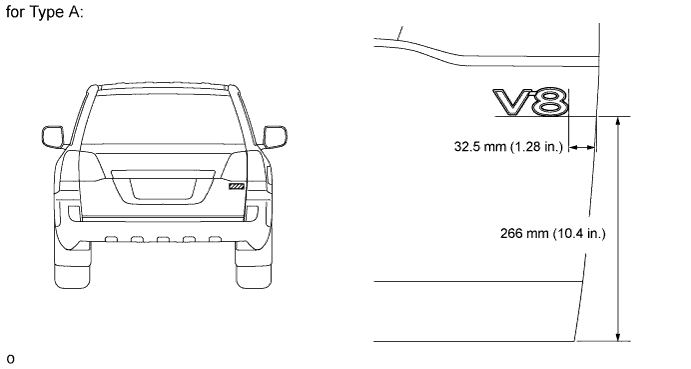
for Type A:
Install the back door name plate in the position shown in the illustration.- HINT:
- Press the rear body name plate firmly to install it.
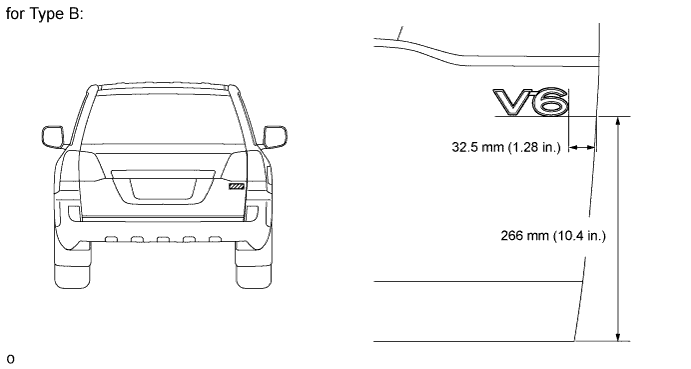
for Type B:
Install the back door name plate in the position shown in the illustration.- HINT:
- Press the rear body name plate firmly to install it.
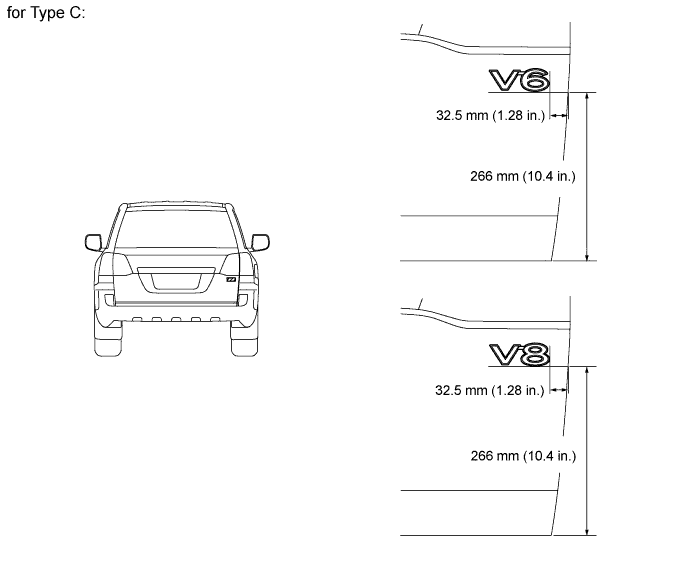
for Type C:
Install the back door name plate in the position shown in the illustration.- HINT:
- Press the rear body name plate firmly to install it.
| 4. INSTALL BACK DOOR NAME PLATE |
Clean the vehicle body surface.
Using a heat light, heat the vehicle body surface.
Remove the double-sided tape from the vehicle body.
Wipe off any tape adhesive residue with cleaner.
Install a new rear body name plate.
Using a heat light, heat the vehicle body and a new rear body name plate.
Remove the peeling paper from the face of the rear body name plate.
- HINT:
- After removing the peeling paper, keep the exposed adhesive free from foreign matter.
Install the rear body name plate in the position shown in the illustration.
- HINT:
- Press the rear body name plate firmly to install it.
| 5. INSTALL NO. 6 LUGGAGE COMPARTMENT DOOR NAME PLATE |
Clean the vehicle body surface.
Using a heat light, heat the vehicle body surface.
Remove the double-sided tape from the vehicle body.
Wipe off any tape adhesive residue with cleaner.
Install a new rear body name plate.
Using a heat light, heat the vehicle body and a new rear body name plate.
Remove the peeling paper from the face of the rear body name plate.
- HINT:
- After removing the peeling paper, keep the exposed adhesive free from foreign matter.
Install the rear body name plate in the position shown in the illustration.
- HINT:
- Press the rear body name plate firmly to install it.