REASSEMBLY
Removal / installation · Vehicles built from Sep 2011
- CAUTION:
- Wear protective gloves. Sharp areas on the parts may injure your hands.
- HINT:
- Use the same procedure for RHD and LHD vehicles.
- The procedure listed below is for LHD vehicles.
- Use the same procedure for RHD and LHD vehicles.
| 1. INSTALL FRONT SEAT OUTER TRACK ASSEMBLY RH |

Using a T40 "TORX" socket wrench, install the front seat outer track assembly RH together with the front seat reinforcement with the 5 "TORX" bolts.
- Torque:
- 25 N*m{ 255 kgf*cm , 18 ft.*lbf }
| 2. INSTALL FRONT SEAT INNER TRACK ASSEMBLY RH |
Using a T40 "TORX" socket wrench, install the front seat inner track assembly RH with the 5 "TORX" bolts.
- Torque:
- 25 N*m{ 255 kgf*cm , 18 ft.*lbf }
Attach the 2 springs to install the seat track adjusting handle as shown in the illustration.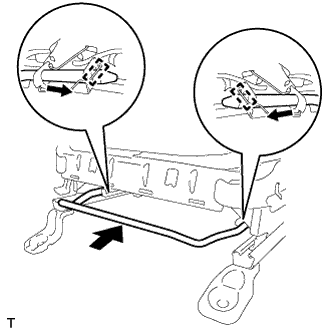

| 3. INSTALL FRONT SEAT LOWER CUSHION SHIELD RH |
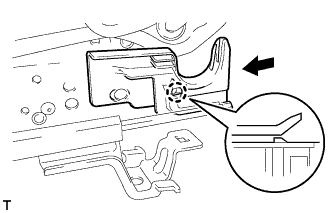 |
Attach the claw to install the front seat lower cushion shield RH.
| 4. INSTALL RECLINING ADJUSTER OUTSIDE COVER LH |
Install the reclining adjuster outside cover LH with the screw.
| 5. INSTALL RECLINING ADJUSTER OUTSIDE COVER RH |
- HINT:
- Use the same procedure described for the LH side.
| 6. INSTALL RECLINING ADJUSTER INSIDE COVER LH |
Attach the guide.
Install the reclining adjuster inside cover LH with the screw.
| 7. INSTALL RECLINING ADJUSTER INSIDE COVER RH |
- HINT:
- Use the same procedure described for the LH side.
| 8. INSTALL FRONT SEATBACK PROTECTOR |
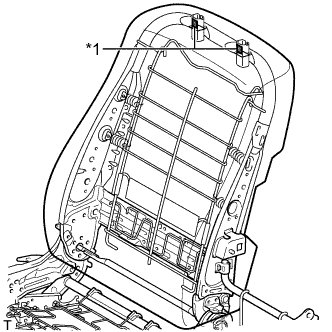 |
Apply double-sided tape as shown in the illustration.
Text in Illustration *1
Double-sided Tape
Install the front seatback protector.
| 9. INSTALL SEPARATE TYPE FRONT SEATBACK COVER |
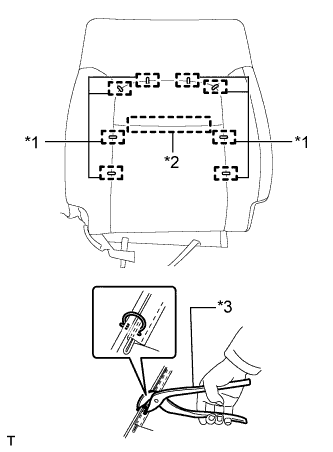 |
Attach the fastening tape to temporarily install the separate type front seatback cover to the separate type front seatback pad.
Text in Illustration *1
Hog Ring
*2
Fastening Tape
*3
Hog Ring Pliers
Using hog ring pliers, install new hog rings.
- NOTICE:
- Be careful not to damage the cover.
- When installing the hog rings, avoid wrinkling the cover.
- Be careful not to damage the cover.
| 10. INSTALL SEATBACK COVER WITH PAD |
Set the seatback cover with pad in place.
Attach the 4 claws to install the 2 front seat headrest supports.
Attach the fastening tape.
Attach the 2 hooks.
Using hog ring pliers, install new hog rings.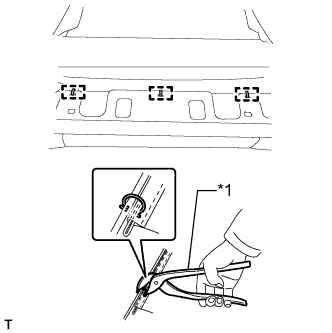
Text in Illustration *1
Hog Ring Pliers
- NOTICE:
- Be careful not to damage the cover.
- When installing the hog rings, avoid wrinkling the cover.
- Be careful not to damage the cover.
Using hog ring pliers, install new hog rings.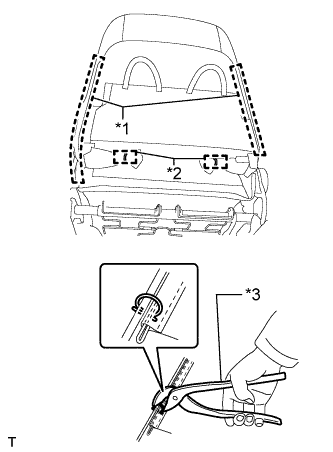
Text in Illustration *1
Fastener
*2
Hog Ring
*3
Hog Ring Pliers
- NOTICE:
- Be careful not to damage the cover.
- When installing the hog rings, avoid wrinkling the cover.
- Be careful not to damage the cover.
Close the 2 fasteners to install the seatback cover with pad.
| 11. INSTALL FRONT SEAT INNER CUSHION SHIELD RH |
Attach the claw and clip to install the front seat inner cushion shield RH.
Install the screw.
| 12. INSTALL CENTER SEAT HINGE COVER |
Install the center seat hinge cover with the screw.
| 13. INSTALL SEPARATE TYPE FRONT SEAT CUSHION COVER |
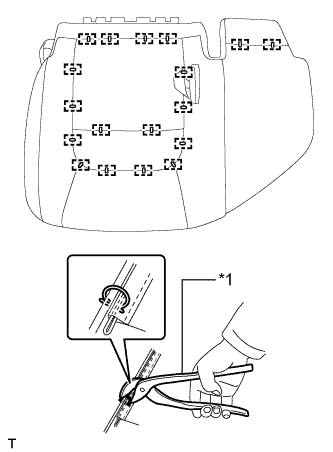 |
Using hog ring pliers, install the separate type front seat cushion cover to the separate type front seat cushion pad with new hog rings.
Text in Illustration *1
Hog Ring Pliers
- NOTICE:
- Be careful not to damage the cover.
- When installing the hog rings, avoid wrinkling the cover.
- Be careful not to damage the cover.
| 14. INSTALL SEAT CUSHION COVER WITH PAD |
Set the seat cushion cover with pad in place.
Using hog ring pliers, install new hog rings.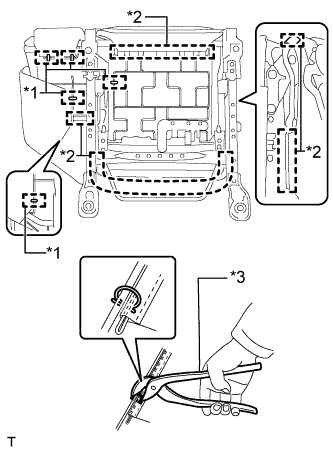
Text in Illustration *1
Hog Ring
*2
Hook
*3
Hog Ring Pliers
- NOTICE:
- Be careful not to damage the cover.
- When installing the hog rings, avoid wrinkling the cover.
- Be careful not to damage the cover.
Attach the hooks to install the seat cushion cover with pad.
| 15. INSTALL FRONT SEAT CUSHION EDGE PROTECTOR |
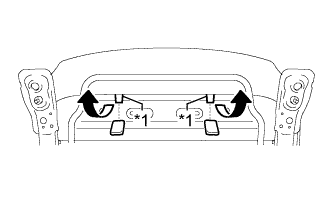 |
Install the 2 front seat cushion edge protectors.
Return the 2 cushion edge tabs to their original positions.
Text in Illustration *1
Cushion Edge Tab
- NOTICE:
- Be careful not to break the cushion edge tabs.
| 16. INSTALL FRONT SEATBACK SIDE COVER SUB-ASSEMBLY RH |
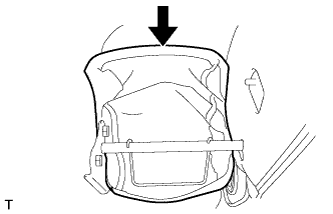 |
Set the front seatback side cover sub-assembly RH in place.
- NOTICE:
- Be careful not to damage the cover.
Install the front seatback inside pad RH.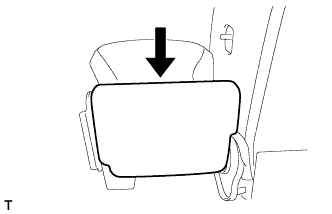
Attach the fastening tape to install the front seatback side cover sub-assembly RH.
- NOTICE:
- Be careful not to damage the cover.
- When attaching the fastening tape, avoid wrinkling the cover.
- Be careful not to damage the cover.
| 17. INSTALL FRONT SEAT ARMREST HOLE BOARD COVER |
Install the front seat armrest hole board cover to the seat armrest assembly RH.
| 18. INSTALL SEAT ARMREST ASSEMBLY RH |
Install the seat armrest assembly RH with the bolt.
- Torque:
- 37 N*m{ 377 kgf*cm , 27 ft.*lbf }
| 19. INSTALL INNER SEAT BRACKET ASSEMBLY RH |
Install the inner seat bracket assembly RH with the 4 bolts.
- Torque:
- 37 N*m{ 377 kgf*cm , 27 ft.*lbf }
| 20. INSTALL FRONT SEAT LOWER CUSHION SHIELD RH |
Attach the hook to install the front seat lower cushion shield RH.
Install the screw.
| 21. INSTALL FRONT SEAT HINGE COVER RH |
Attach the 2 hooks to install the front seat hinge cover RH.
Install the 2 screws.
| 22. INSTALL FRONT SEAT HINGE KNOB |
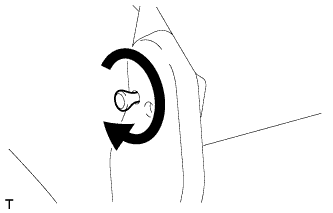 |
Twist the front seat hinge knob in the direction indicated by the arrow to install it.
| 23. INSTALL FRONT SEAT CUSHION SHIELD RH |
Attach the 2 guides and claw to install the front seat cushion shield RH.
Install the 2 screws.
Attach the 2 rubber bands.
| 24. INSTALL RECLINING ADJUSTER RELEASE HANDLE RH |
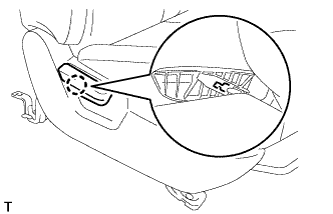 |
Attach the claw to install the reclining adjuster release handle RH.
| 25. INSTALL FRONT SEAT INNER BELT ASSEMBLY RH |
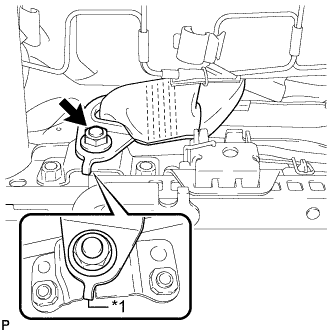 |
Install the front seat inner belt assembly RH with the nut.
- Torque:
- 42 N*m{ 428 kgf*cm , 31 ft.*lbf }
- NOTICE:
- Do not allow the anchor part of the front seat inner belt assembly to overlap the protruding part of the front seat.
Text in Illustration *1
Protruding Part
| 26. INSTALL SEAT ADJUSTER COVER CAP RH |
Install the 2 seat adjuster cover caps.