Removal / installation · Vehicles built Sep 2011 – Dec 2011
Versions by build date: Sep 2011 – Dec 2011from Jan 2012
1.
DISCONNECT CABLE FROM NEGATIVE BATTERY TERMINAL
CAUTION:
Wait at least 90 seconds after disconnecting the cable from the negative (-) battery terminal to disable the SRS system.
NOTICE:
When disconnecting the cable, some systems need to be initialized after the cable is reconnected (Click here).
2.
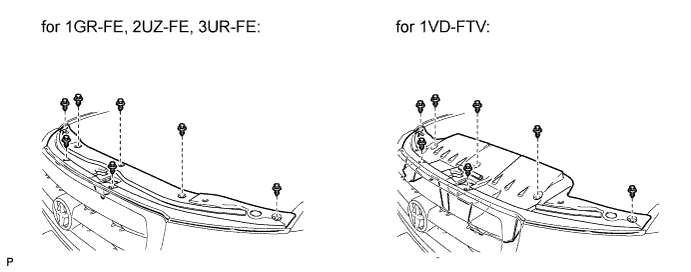
REMOVE UPPER RADIATOR SUPPORT SEAL
Remove the 7 clips and radiator support seal.
3.
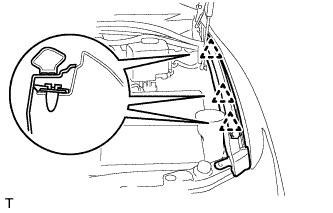
REMOVE FRONT FENDER MAIN SEAL LH
Using a clip remover, detach the 3 clips and remove the fender main seal.
4.
REMOVE FRONT FENDER MAIN SEAL RH
Using a clip remover, detach the 3 clips and remove the fender main seal.
5.
REMOVE FRONT WIPER ARM LH
Remove the nut, wiper arm and blade.
6.
REMOVE FRONT WIPER ARM RH
Remove the nut, wiper arm and blade.
7.
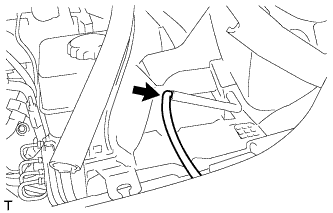
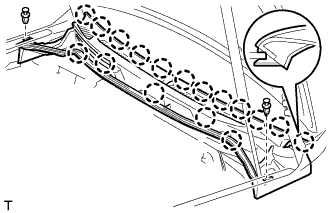
REMOVE COWL TOP VENTILATOR LOUVER SUB-ASSEMBLY
Remove the washer hose.
Remove the 2 clips.
Detach the 17 claws and remove the cowl top ventilator louver sub-assembly.
8.
REMOVE WINDSHIELD OUTSIDE MOULDING LH
Remove the windshield outside moulding.
Put protective tape around the moulding.
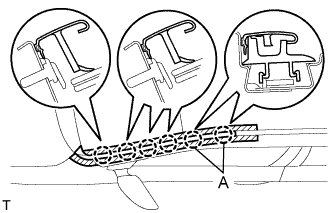
Using a moulding remover, detach the 6 clips and remove the moulding.
NOTICE:
When removing the windshield outside moulding, be careful not to damage the roof drip side finish moulding clip labeled A in the illustration.
If a roof drip side finish moulding clip is damaged or becomes detached from the vehicle, replace it with a new one.
9.
REMOVE WINDSHIELD OUTSIDE MOULDING RH
HINT:
Use the same procedures described for the LH side.
10.
REMOVE NO. 4 WINDSHIELD MOULDING PAD
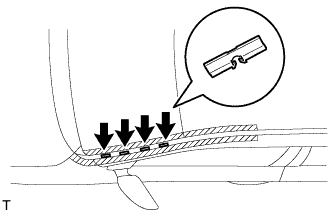
Remove the 4 No. 4 windshield moulding pads.
HINT:
Use the same procedure to remove the 4 pads on the other side.
11.
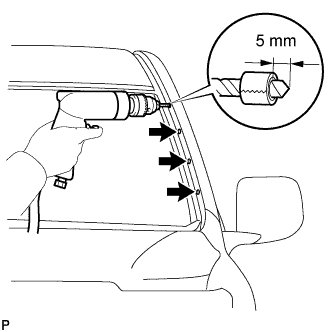
REMOVE NO. 3 WINDSHIELD OUTSIDE MOULDING CLIP
HINT:
Perform the following procedures if replacing any No. 3 windshield outside moulding clip(s).
Put a 4 mm (0.157 in.) drill bit into a drill.
Wind tape around the drill bit approximately 5 mm (0.197 in.) from the tip of the drill.
HINT:
Tape the 4 mm (0.157 in.) drill bit to prevent the drill bit from going too deep.
Lightly press the drill against the No. 3 windshield outside moulding clip(s), drill off the flanges of the No. 3 windshield outside moulding clip(s), and remove the No. 3 windshield outside moulding clip(s).
NOTICE:
Pressing the drill too firmly will cause the No. 3 windshield outside moulding clip to turn and result in the No. 3 windshield outside moulding clip not being drilled through.
Do not pry the No. 3 windshield outside moulding clips with the drill, because this may cause damage to the installation holes of the No. 3 windshield outside moulding clips or the drill bit.
NOTICE:
Be careful of the drilled No. 3 windshield outside moulding clips as they may become hot.
Using a vacuum cleaner, remove the No. 3 windshield outside moulding clip fragments and shavings from the drilled areas.
HINT:
Use the same procedure to remove the clip(s) on the other side.
12.
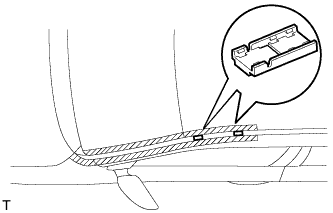
REMOVE ROOF DRIP SIDE FINISH MOULDING CLIP
HINT:
Perform the following procedures if replacing any roof drip side finish moulding clip.
Remove the roof drip side finish moulding clips.
HINT:
Use the same procedure to remove the clip on the other side.
13.
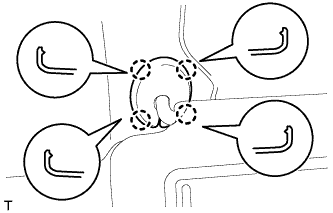
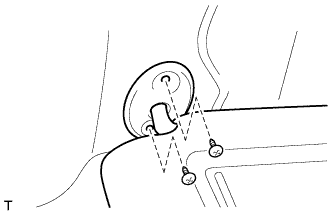
REMOVE FRONT ASSIST GRIP SUB-ASSEMBLY
HINT:
Use the same procedure to remove the front assist grip on the other side.
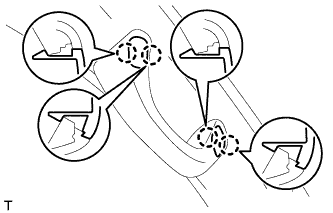
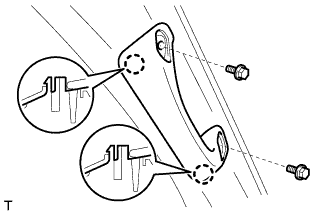
Detach the 4 claws and remove the 2 assist grip plugs.
Remove the 2 bolts.
Detach the 2 claws and remove the front assist grip.
14.
REMOVE FRONT PILLAR GARNISH LH
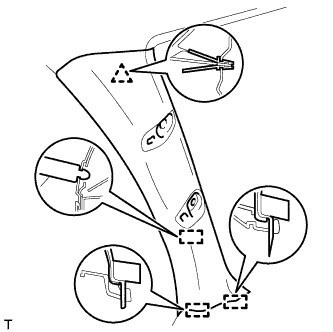
Detach the clip 3 guides, and remove the front pillar garnish.
for 9, 14 Speakers: Disconnect the speaker connector and then remove the front pillar garnish.
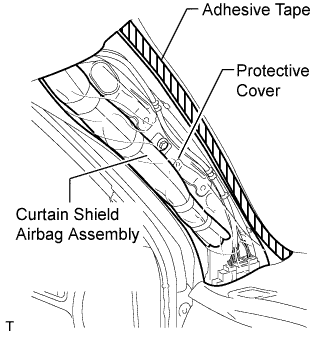
Protect the curtain shield airbag.
Thoroughly cover the airbag with a cloth or nylon sheet and fix the ends of the cover with adhesive tape, as shown in the illustration.
NOTICE:
Cover the curtain shield airbag with a protective cover as soon as the front pillar garnish is removed.
15.
REMOVE FRONT PILLAR GARNISH RH
HINT:
Use the same procedures described for the LH side.
16.
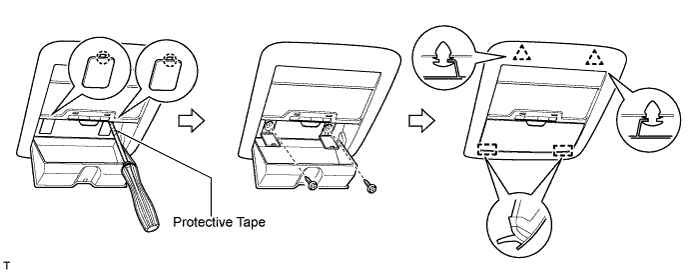
REMOVE MAP LIGHT ASSEMBLY
Using a screwdriver, detach the 2 claws and open the 2 covers.
HINT:
Tape the screwdriver tip before use.
Remove the 2 screws.
Detach the 2 clips and 2 guides.
Disconnect the connector and then remove the map light.
17.
REMOVE VISOR BRACKET COVER
HINT:
Use the same procedure to remove the visor bracket cover on the other side.
Detach the 4 claws and remove the visor bracket cover.
18.
REMOVE VISOR ASSEMBLY LH
Remove the 2 screws and visor.
19.
REMOVE VISOR ASSEMBLY RH
HINT:
Use the same procedures described for the LH side.
20.
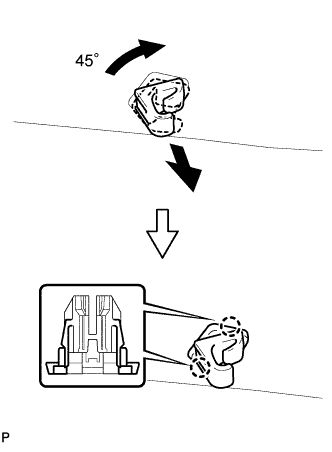
REMOVE VISOR HOLDER
HINT:
Use the same procedure to remove the visor holder on the other side.
Turn the visor holder approximately 45° and pull it out as shown in the illustration.
Detach the 2 claws and remove the visor holder.
21.
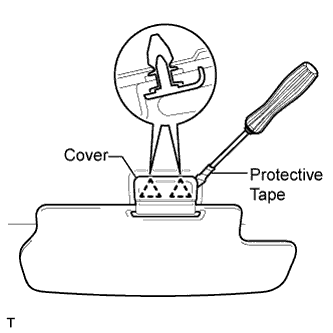
REMOVE CENTER VISOR ASSEMBLY LH (w/ Sub Visor)
Using a screwdriver, pry off the cover to detach the 2 clips and remove the center visor.
HINT:
Tape the screwdriver tip before use.
22.
REMOVE CENTER VISOR ASSEMBLY RH (w/ Sub Visor)
HINT:
Use the same procedures described for the LH side.
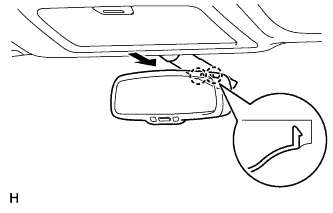
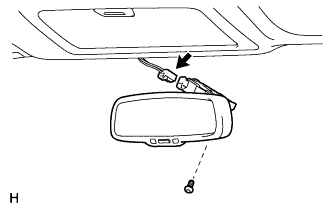
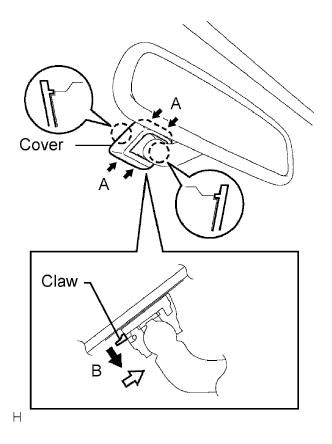
Push the cover in the direction indicated by the arrows labeled A and remove it.
While holding down the claw in the direction of the black arrow labeled B, slide the mirror in the direction of the white arrow and remove it.
26.
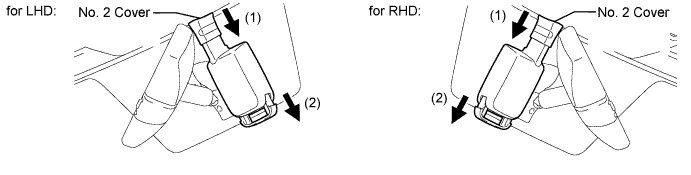
REMOVE RAIN SENSOR COVER (w/ Rain Sensor)
Slide the No. 2 cover in the direction of the arrow labeled (1).
Pull the stopper in the direction of the arrow labeled (2) to remove the No. 2 cover.
27.
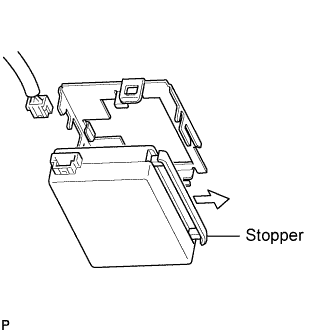
REMOVE RAIN SENSOR (w/ Rain Sensor)
Release the stopper by pulling it down, and separate the rain sensor.
Disconnect the connector and remove the rain sensor.
When replacing the rain sensor tape.
Remove the rain sensor tape.
28.
REMOVE ROOF HEADLINING
w/ Sliding Roof:
Partially remove the roof headlining.
HINT:
It is not necessary to completely remove the roof headlining. Slightly lower the front section of the roof headlining so that the windshield glass can be removed in a later step.
It is not necessary to completely remove the roof headlining. Slightly lower the front section of the roof headlining so that the windshield glass can be removed in a later step.