2011-2013 Land Cruiser · Service Manual Steering

REMOVAL

Removal / installation · Vehicles built from Jan 2012

Versions by build date: Sep 2011 – Dec 2011 from Jan 2012

CAUTION:
Some of these service operations affect the SRS airbag system. Read the precautionary notices concerning the SRS airbag system before servicing the steering column (Click here).


1. FRONT WHEELS FACING STRAIGHT AHEAD

2. DISCONNECT CABLE FROM NEGATIVE BATTERY TERMINAL

CAUTION:
Wait at least 90 seconds after disconnecting the cable from the negative (-) battery terminal to disable the SRS system.

NOTICE:
  1. After the engine switch is turned off, the navigation system requires approximately 90 seconds to record various types of memory and settings. As a result, after turning the engine switch off, wait 90 seconds or more before disconnecting the cable from the negative (-) battery terminal.
  2. When disconnecting the cable, some systems need to be initialized after the cable is reconnected (Click here).


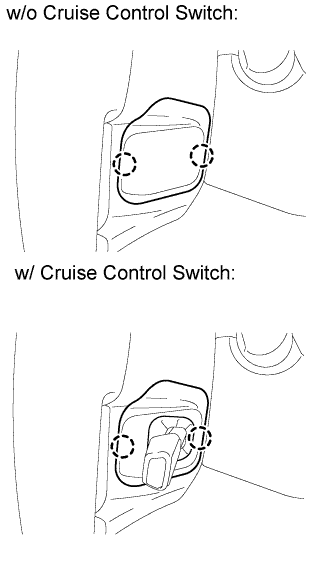
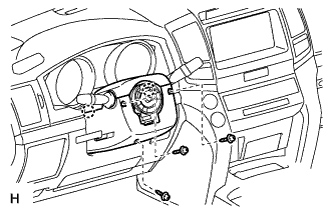
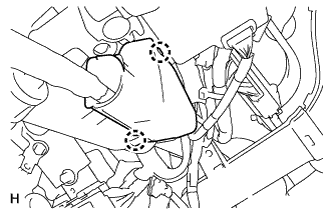
3. REMOVE LOWER NO. 3 STEERING WHEEL COVER

  1. B181563
    Detach the 2 claws and remove the steering wheel cover.


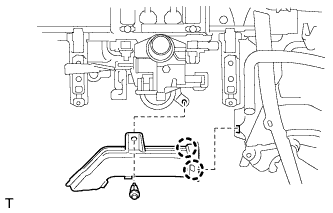
4. REMOVE LOWER NO. 2 STEERING WHEEL COVER

  1. B189186E01
    Detach the 2 claws and remove the steering wheel cover.


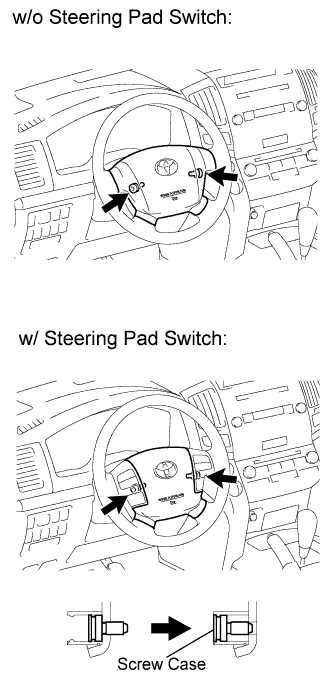
5. REMOVE STEERING PAD

  1. B187261E01
    Using a T30 "TORX" socket wrench, loosen the 2 screws until the groove along the screw circumference catches on the screw case.

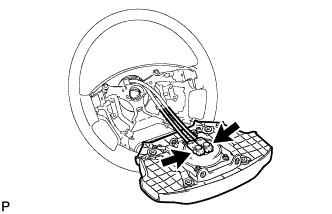
  1. B181568
    Pull out the steering pad from the steering wheel, as shown in the illustration. Then support the steering pad with one hand.

    NOTICE:
    When removing the steering pad, do not pull the airbag wire harness.

  1. Disconnect the horn connector.

  1. Disconnect the 2 connectors and remove the steering pad.

    NOTICE:
    When handling the airbag connector, take care not to damage the airbag wire harness.


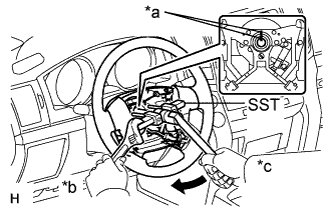
6. REMOVE STEERING WHEEL ASSEMBLY
  1. Remove the steering wheel set nut.

  1. C172673E03
    Put matchmarks on the steering wheel and main shaft.
    Text in Illustration 
    *a
    Matchmark
    *b
    Hold
    *c
    Turn

  1. Using SST, remove the steering wheel assembly.

    SST
    09950-50013   (09951-05010, 09952-05010, 09953-05020, 09954-05011)


7. REMOVE LOWER STEERING COLUMN COVER

  1. C179481
    Remove the 3 screws.

  1. Detach the 2 claws to remove the lower steering column cover.

    NOTICE:
    Do not damage the tilt and telescopic switch.


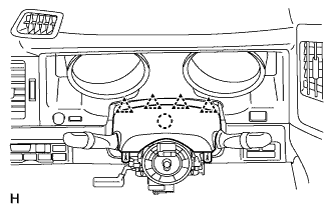
8. REMOVE UPPER STEERING COLUMN COVER

  1. C179482
    Detach the 4 clips.

  1. Detach the claw to remove the upper steering column cover.


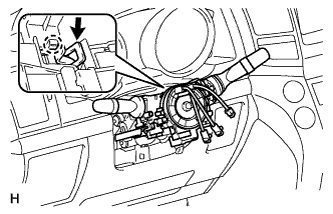
9. REMOVE COMBINATION SWITCH ASSEMBLY WITH SPIRAL CABLE SUB-ASSEMBLY
  1. Disconnect the connectors from the combination switch with spiral cable.

  1. C179484E01
    Using pliers, grip the claws of the clamp and remove the combination switch with spiral cable from the steering column.


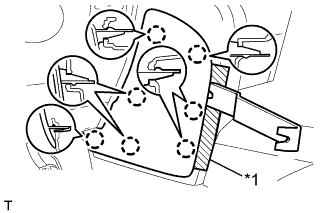
10. REMOVE NO. 2 INSTRUMENT PANEL FINISH PANEL CUSHION

B292994E01
  1. Put protective tape around the No. 2 instrument panel finish panel cushion.

    Text in Illustration 
    *1
    Protective Tape

  1. Using a moulding remover, detach the 7 claws and remove the No. 2 instrument panel finish panel cushion.


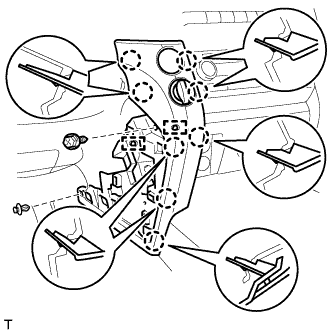
11. REMOVE LOWER INSTRUMENT PANEL PAD SUB-ASSEMBLY LH

B292995
  1. Remove the clip and screw.

  1. Detach the 8 claws.

  1. Disconnect the connectors, detach the 2 clamps and remove the lower instrument panel pad sub-assembly.


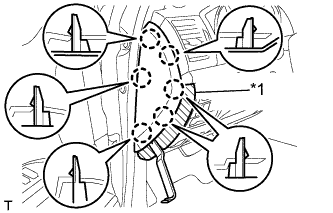
12. REMOVE INSTRUMENT SIDE PANEL LH

E154740E06
  1. Place protective tape as shown in the illustration.

    Text in Illustration 
    *1
    Protective Tape

  1. Using a moulding remover, detach the 6 claws and remove the instrument side panel.


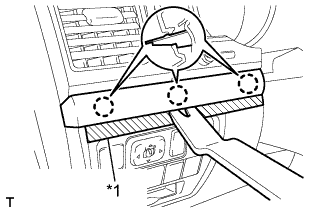
13. REMOVE NO. 1 INSTRUMENT CLUSTER FINISH PANEL GARNISH

E154744E04
  1. Place protective tape as shown in the illustration.

    Text in Illustration 
    *1
    Protective Tape

  1. Using a moulding remover, detach the 3 claws and remove the No. 1 instrument cluster finish panel garnish.


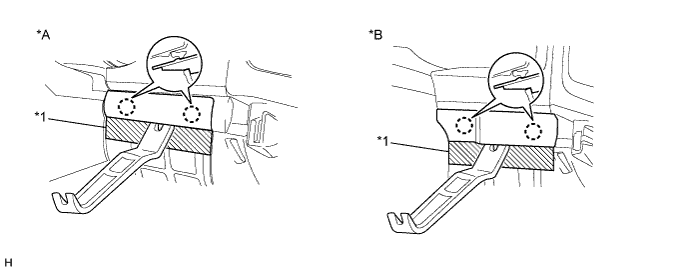
14. REMOVE NO. 2 INSTRUMENT CLUSTER FINISH PANEL GARNISH
  1. Place protective tape as shown in the illustration.

  1. Using a moulding remover, detach the 2 claws and remove the No. 2 instrument cluster finish panel garnish.

    B291251E01

    Text in Illustration 
    *A
    w/ Entry and Start System
    *B
    w/o Entry and Start System
    *1
    Protective Tape
    -
    -


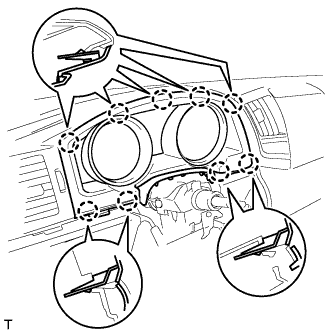
15. REMOVE INSTRUMENT CLUSTER FINISH PANEL SUB-ASSEMBLY (w/ Multi-information Display)

B180017
  1. Detach the 9 claws.

  1. Disconnect the connector and remove the instrument cluster finish panel.


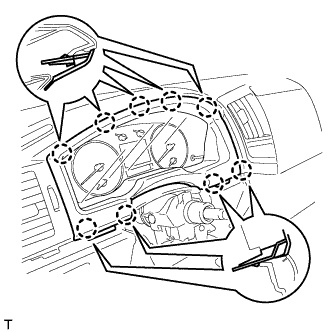
16. REMOVE INSTRUMENT CLUSTER FINISH PANEL SUB-ASSEMBLY (w/o Multi-information Display)

B180016
  1. Detach the 9 claws and remove the instrument cluster finish panel.


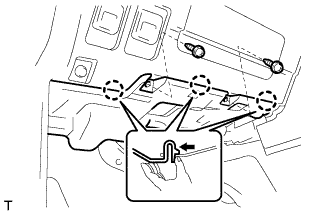
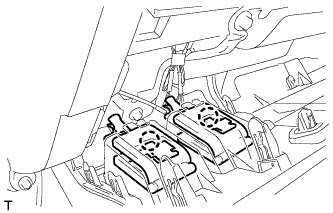
17. REMOVE NO. 1 INSTRUMENT PANEL UNDER COVER SUB-ASSEMBLY (w/ Floor Under Cover)

B180655
  1. Remove the 2 screws.

  1. Detach the 3 claws.

  1. Disconnect the connectors and remove the No. 1 instrument panel under cover.


18. REMOVE FRONT DOOR SCUFF PLATE LH

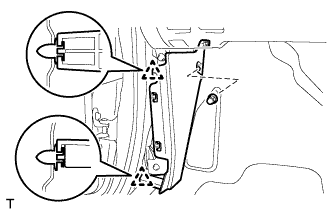
19. REMOVE COWL SIDE TRIM BOARD LH

B181911
  1. Remove the cap nut.

  1. Detach the 2 clips and remove the cowl side trim board.


20. REMOVE LOWER NO. 1 INSTRUMENT PANEL FINISH PANEL

B180295E02
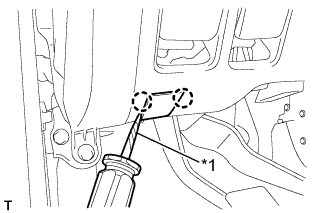
  1. Using a screwdriver, detach the 2 claws and open the hole cover.

    HINT:
    Tape the screwdriver tip before use.

    Text in Illustration 
    *1
    Protective Tape

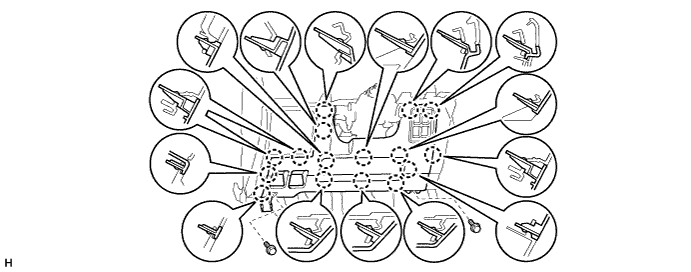
  1. w/ Driver Side Knee Airbag:

    1. Remove the 2 bolts.

    2. Detach the 16 claws.

      B291249

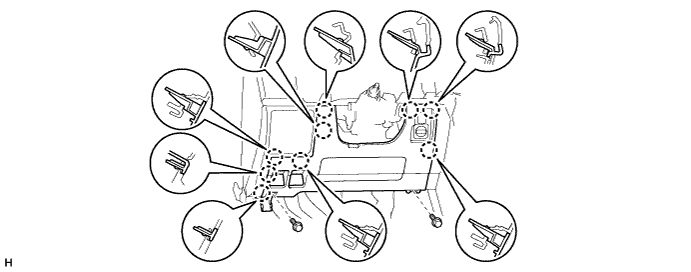
  1. w/o Driver Side Knee Airbag:

    1. Remove the 2 bolts.

    2. Detach the 9 claws.

      B291250

  1. B180296
    for Automatic Air Conditioning System:

    1. Detach the 2 claws and remove the room temperature sensor.

  1. B181942
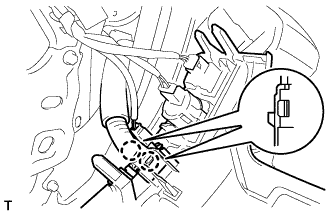
    Detach the 2 claws and disconnect the 2 control cables.

  1. Disconnect the connectors and remove the lower No. 1 instrument panel finish panel.


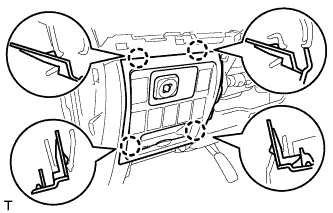
21. REMOVE NO. 1 SWITCH HOLE BASE

B180298
  1. Detach the 4 claws.

  1. Disconnect the connectors and remove the No. 1 switch hole cover.


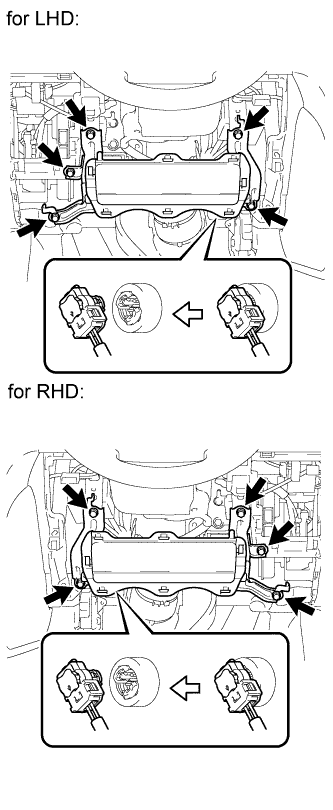
22. REMOVE DRIVER SIDE KNEE AIRBAG ASSEMBLY (w/ Driver Side Knee Airbag)

  1. B189602E01
    Remove the 5 bolts and driver side knee airbag.

  1. Disconnect the connector.

    NOTICE:
    When handling the airbag connector, take care not to damage the airbag wire harness.


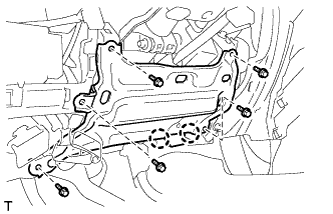
23. REMOVE LOWER INSTRUMENT PANEL SUB-ASSEMBLY (w/o Driver Side Knee Airbag)

B180299
  1. Detach the 2 claws and disconnect the DLC3.

  1. Remove the 5 bolts and lower instrument panel.


24. DISCONNECT WIRE HARNESS PROTECTOR AND WIRE HARNESS

  1. C172656
    Detach the 2 claws to disconnect the wire harness protector and wire harness.


25. REMOVE NO. 3 AIR DUCT SUB-ASSEMBLY

E156901
  1. Remove the clip.

  1. Detach the 2 claws and remove the duct.


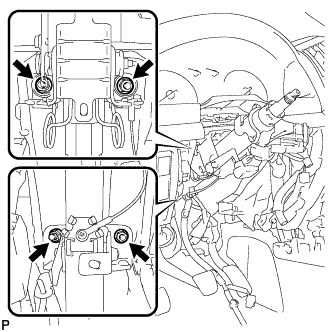
26. REMOVE STEERING COLUMN ASSEMBLY

  1. C172648E02
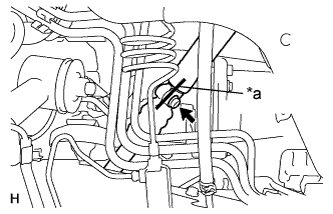
    Put matchmarks on the steering intermediate shaft and the steering column.
    Text in Illustration 
    *a
    Matchmark

  1. Remove the bolt.

  1. w/o Entry and Start System:

    1. C246797E01
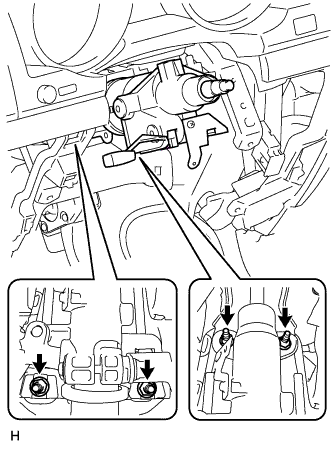
      Remove the 4 nuts and steering column.

  1. w/ Entry and Start System:

    1. C172654
      Remove the 4 nuts and steering column.


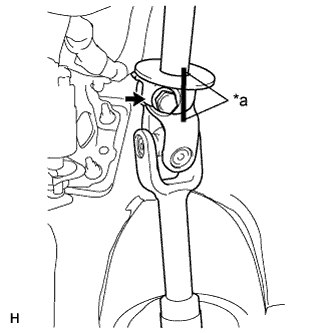
27. DISCONNECT STEERING INTERMEDIATE SHAFT ASSEMBLY

  1. C172649E02
    Put matchmarks on the steering intermediate shaft and the No. 2 steering intermediate shaft.
    Text in Illustration 
    *a
    Matchmark

  1. Remove the bolt, and then pull out the intermediate shaft toward the inside of the vehicle.


28. REMOVE STEERING COLUMN HOLE COVER SUB-ASSEMBLY

  1. C179097
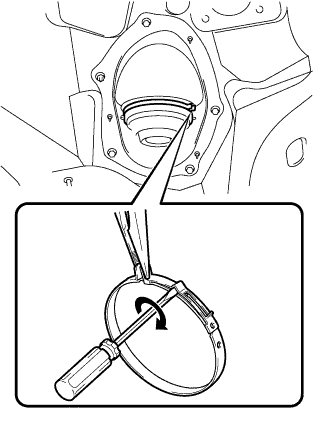
    Hold the clamp with needle nose pliers, then insert a screwdriver and turn it in the direction shown in the illustration to remove the clamp of the steering column hole cover.

  1. C179099
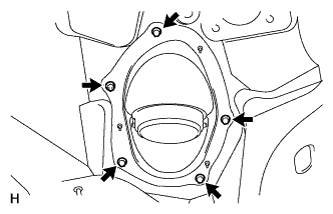
    Remove the 4 bolts and nut with the steering column hole cover from the vehicle.


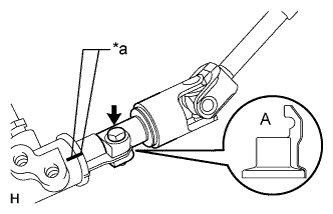
29. DISCONNECT NO. 2 STEERING INTERMEDIATE SHAFT

  1. C172652E02
    Loosen the bolt and remove the No. 2 intermediate shaft.
    Text in Illustration 
    *a
    Matchmark

    NOTICE:
    It is possible to install the intermediate shaft to the same position it was removed from without placing matchmarks due to the dust cover part labeled A. Therefore, do not remove the dust cover from the steering link.

    HINT:
    If the dust cover is removed/installed or replaced, place matchmarks on the dust cover and steering link.

← REMOVAL (Sep 2011 – Dec 2011)DISASSEMBLY (from Sep 2011) →