INSTALLATION
Removal / installation · Vehicles built from Jan 2012
Versions by build date: Sep 2011 – Dec 2011 from Jan 2012
| 1.
INSTALL FUEL SUCTION WITH PUMP AND GAUGE TUBE ASSEMBLY |
 |
Apply a light coat of gasoline or grease to a new gasket, and install it to the fuel tank.
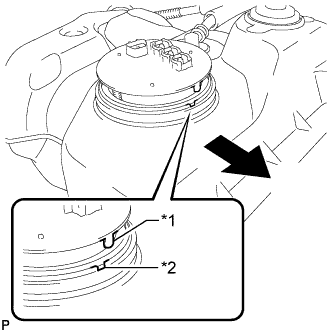
- Install the fuel suction with pump and gauge tube into the fuel tank.
Text in Illustration
*1
|
Protrusion
|
*2
|
Groove
|
 
|
Front
|
- NOTICE:
- Be careful not to bend the arm of the fuel sender gauge.
- HINT:
- Align the protrusion of the fuel suction with pump and gauge tube with the groove of the fuel tank.
Put the retainer on the fuel tank. While holding the fuel suction with pump and gauge tube, tighten the retainer one complete turn by hand.
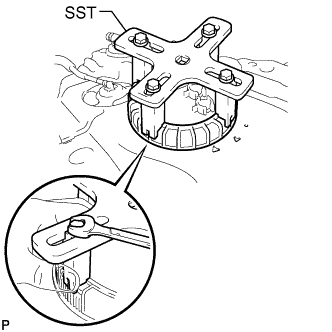
- Set SST on the retainer.
- SST
- 09808-14030
- HINT:
- Hold the fuel suction tube assembly upright by hand to ensure that the fuel suction tube gasket is not moved out of position.
- Securely attach the claws of SST to the protrusions of the retainer and fix SST in place.
- Install SST while pressing the claws of SST against the retainer (toward the center of SST).
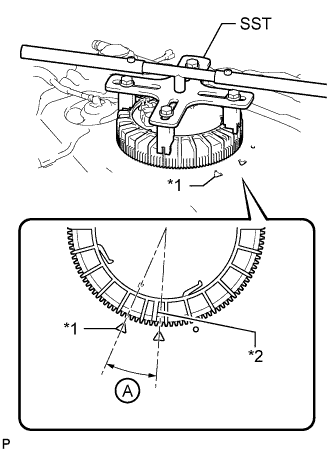
- Using SST, tighten the retainer until the mark on the retainer is within range A on the fuel tank as shown in the illustration.
- SST
- 09808-14030
Text in Illustration
*1
|
Fuel Tank Side Mark
|
*2
|
Retainer Side Mark
|
- HINT:
- Fit the tips of SST onto the ribs of the retainer.
| 2.
INSTALL FUEL TANK MAIN TUBE, FUEL TANK RETURN TUBE AND NO. 2 FUEL TANK MAIN TUBE SUB-ASSEMBLY
|
|
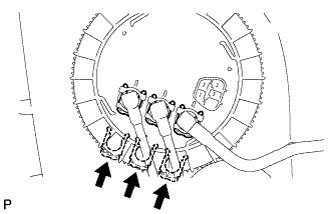
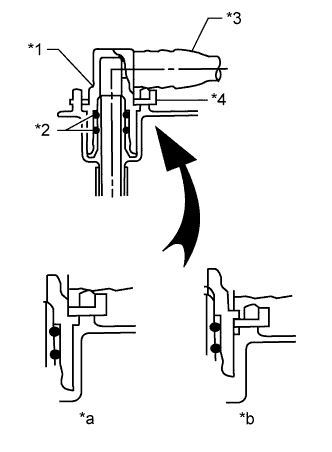
- Install the 3 fuel tank tubes with the 3 tube joint clips.
- NOTICE:
- Check that there are no scratches or foreign objects on the connecting parts.
- Check that the fuel tube joints are inserted securely.
- Check that the tube joint clips are on the collars of the fuel tube joints.
- After installing the tube joint clips, check that the fuel tube joints cannot be pulled off.
Text in Illustration
*1
|
Fuel Tube Joint
|
*2
|
O-Ring
|
*3
|
Fuel Tube
|
*4
|
Tube Joint Clip
|
*a
|
CORRECT
|
*b
|
INCORRECT
|
Install the 3 fuel tank tubes to the fuel tank.
| 3.
INSTALL FUEL TANK SUB-ASSEMBLY |
|
(Click here)