INSTALLATION
Removal / installation · Vehicles built from Jan 2012
Versions by build date: Sep 2011 – Dec 2011 from Jan 2012
| 1. INSTALL FUEL TANK TO FILLER PIPE HOSE |

Install the hose to the fuel sub tank as shown in the illustration.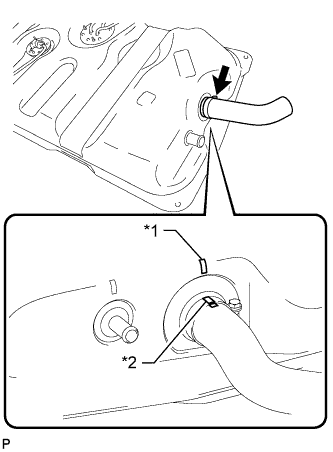

Text in Illustration *1
Tank Side Mark
*2
Hose Side Mark
- HINT:
- Align the fuel sub tank side mark with the hose side mark when installing the hose.
-
Tighten the hose clamp until the end of the hose clamp contacts the stopper as shown in the illustration.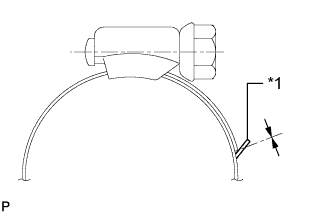
- Align the fuel sub tank side mark with the hose side mark when installing the hose.
Text in Illustration *1
Stopper
| 2. INSTALL NO. 3 FUEL HOSE |
Install the fuel hose to the fuel sub tank as shown in the illustration.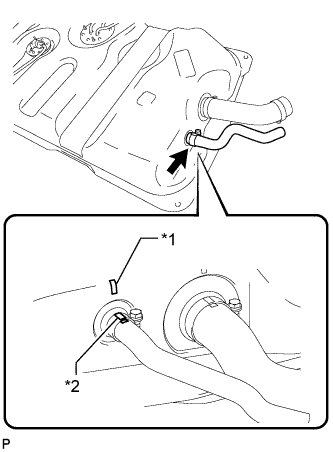
Text in Illustration *1
Tank Side Mark
*2
Hose Side Mark
- HINT:
- Align the fuel sub tank side mark with the hose side mark when installing the hose.
-
Tighten the hose clamp until the end of the hose clamp contacts the stopper as shown in the illustration.
- Align the fuel sub tank side mark with the hose side mark when installing the hose.
Text in Illustration *1
Stopper
| 3. INSTALL FUEL TANK BREATHER HOSE |
Install the breather hose to the fuel sub tank.
| 4. INSTALL FUEL AND EVAPORATION VENT TUBE SUB-ASSEMBLY |
Install a new gasket to the fuel and evaporation vent tube.
Install the fuel and evaporation vent tube with the 6 bolts.
- Torque:
- 3.5 N*m{ 36 kgf*cm , 31 in.*lbf }
| 5. INSTALL FUEL TANK EVAPORATION VENT TUBE SUB-ASSEMBLY |
Install the 2 fuel tank evaporation vent tubes.
| 6. INSTALL FUEL HOSE |
| 7. INSTALL FUEL SENDER GAUGE ASSEMBLY |
Install a new gasket to the sender gauge.
- NOTICE:
- Be careful not to bend the arm of the fuel sender gauge.
Install the sender gauge with the 5 screws.
- Torque:
- 1.5 N*m{ 15 kgf*cm , 13 in.*lbf }
| 8. INSTALL FLOOR NO. 3 WIRE |
Attach the wire harness clamp to the fuel sub tank.
Connect the sender gauge connector.
| 9. INSTALL FUEL SUB TANK SUB-ASSEMBLY |
Set the fuel sub tank on a transmission jack and raise the fuel sub tank.
Connect the 2 fuel tank bands with the 2 bolts.
- Torque:
- 40 N*m{ 408 kgf*cm , 30 ft.*lbf }
Connect the floor No. 3 wire connector.
Attach the 3 wire harness clamps.
| 10. CONNECT FUEL TANK TO FILLER PIPE HOSE |
Connect the hose to the filler pipe.
| 11. CONNECT NO. 3 FUEL HOSE |
Connect the fuel hose to the filler pipe.
| 12. CONNECT FUEL TANK BREATHER HOSE |
Connect the breather hose to the filler pipe.
| 13. CONNECT FUEL HOSE |
| 14. CONNECT FUEL TANK EVAPORATION VENT TUBE SUB-ASSEMBLY |
Connect the 2 fuel tubes.
| 15. INSTALL FUEL TANK CAP ASSEMBLY |
| 16. INSTALL NO. 1 SPARE WHEEL STOPPER |
Install the spare wheel stopper with the 2 bolts.
- Torque:
- 32 N*m{ 326 kgf*cm , 24 ft.*lbf }
| 17. INSTALL SPARE WHEEL CARRIER CROSSMEMBER AND SPARE WHEEL CARRIER BRACKET |
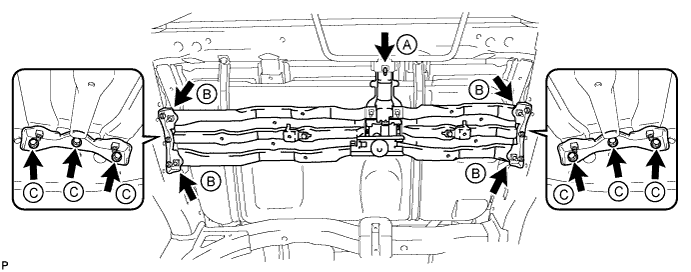
Install the spare wheel carrier crossmember and 2 brackets to the vehicle with the 6 bolts labeled C.
- Torque:
- for bolt C:
- 20 N*m{ 204 kgf*cm , 15 ft.*lbf }
Temporarily install the bolt labeled A, and then tighten the bolt labeled A and bolts labeled B.
- Torque:
- for bolt A:
- 29 N*m{ 296 kgf*cm , 21 ft.*lbf }
- for bolt B:
- 20 N*m{ 204 kgf*cm , 15 ft.*lbf }
| 18. INSTALL TAILPIPE ASSEMBLY |
Install the tailpipe to the 2 exhaust pipe supports.
Install a new gasket to the center exhaust pipe.
Connect the tailpipe to the center exhaust pipe.
Attach a new clamp to the tailpipe and center exhaust pipe. Then install the bolt to the clamp.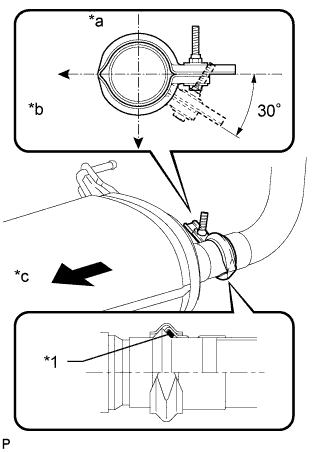
- Torque:
- 32 N*m{ 326 kgf*cm , 24 ft.*lbf }
Text in Illustration *1
Gasket
*a
Top
*b
LH Side
*c
Front
- HINT:
- Install the clamp within the angle range shown in the illustration.
| 19. CONNECT CABLE TO NEGATIVE BATTERY TERMINAL |
- NOTICE:
- When disconnecting the cable, some systems need to be initialized after the cable is reconnected (Click here).
| 20. INSPECT FOR FUEL LEAK |
Connect the intelligent tester to the DLC3.
Turn the engine switch on (IG) and intelligent tester main switch on.
- NOTICE:
- Do not start the engine.
Enter the following menus: Powertrain / Engine and ECT / Active Test / Control the Fuel Pump / Speed.
Check that there are no fuel leaks after doing maintenance anywhere on the fuel system.
| 21. INSPECT FOR EXHAUST GAS LEAK |
| 22. INSTALL SPARE TIRE |