REMOVAL
Removal / installation · Vehicles built from Jan 2012
Versions by build date: Sep 2011 – Dec 2011 from Jan 2012
| 1. RECOVER REFRIGERANT FROM REFRIGERATION SYSTEM |

Start the engine.
Turn the A/C switch on.
Operate the cooler compressor while the engine speed is approximately 1000 rpm for 5 to 6 minutes to circulate the refrigerant and collect the compressor oil remaining in each component into the cooler compressor.
Stop the engine.
Recover the refrigerant from the A/C system using a refrigerant recovery unit.
| 2. REMOVE FRONT SEAT ASSEMBLY LH (for Power Seat) |
Remove the front seat assembly LH (Click here).
| 3. REMOVE FRONT SEAT ASSEMBLY LH (for Manual Seat) |
Remove the front seat assembly LH (Click here).
| 4. REMOVE NO. 2 INSTRUMENT PANEL FINISH PANEL CUSHION |
Place protective tape as shown in the illustration.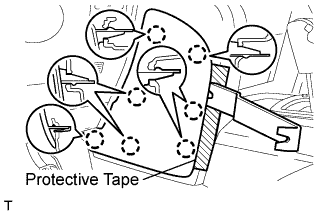

Using a moulding remover, detach the 7 claws and remove the panel cushion.
| 5. REMOVE LOWER INSTRUMENT PANEL PAD SUB-ASSEMBLY LH |
Remove the clip.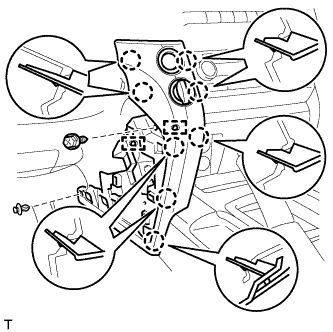
Remove the screw.
Detach the 8 claws.
Remove the panel pad and disconnect the connectors and 2 clamps.
| 6. REMOVE NO. 1 INSTRUMENT PANEL FINISH CUSHION |
Place protective tape as shown in the illustration.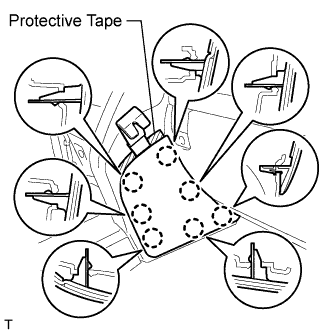
Using a moulding remover, detach the 7 claws and remove the panel cushion.
| 7. REMOVE LOWER INSTRUMENT PANEL PAD SUB-ASSEMBLY RH |
Remove the clip.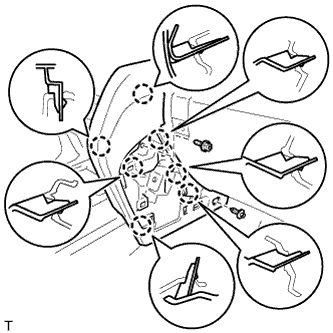
Remove the screw.
Detach the 7 claws and remove the panel.
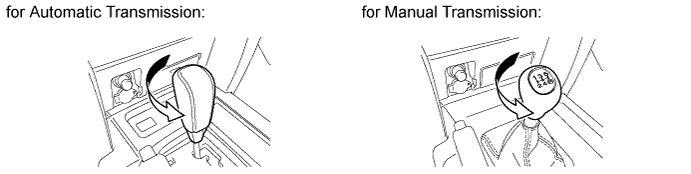
| 8. REMOVE SHIFT LEVER KNOB SUB-ASSEMBLY |
Twist the shift lever knob in the direction indicated by the arrow and remove it.
| 9. REMOVE LOWER CENTER INSTRUMENT CLUSTER FINISH PANEL SUB-ASSEMBLY |
Detach the 7 claws.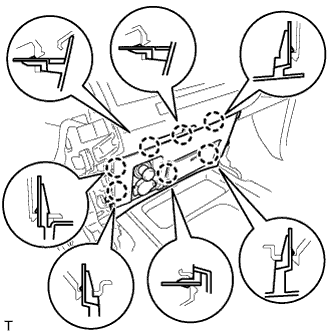
Disconnect the connectors and remove the panel.
| 10. REMOVE REAR UPPER CONSOLE PANEL SUB-ASSEMBLY |
Detach the 9 claws and remove the panel.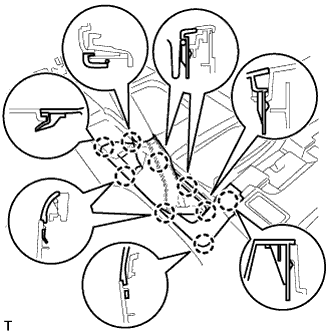
| 11. REMOVE CONSOLE CUP HOLDER BOX SUB-ASSEMBLY |
Detach the 4 claws and remove the box.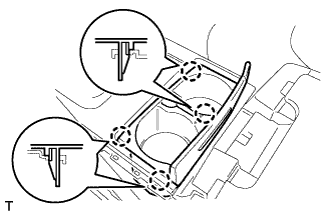
| 12. REMOVE UPPER CONSOLE PANEL SUB-ASSEMBLY |
Detach the 14 claws.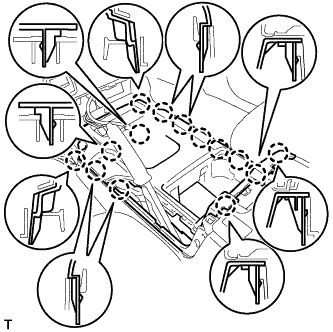
Disconnect the connectors and remove the console panel.
| 13. REMOVE NO. 1 COOLER COVER |
Detach the clamp on the lower part of the cooler cover, and then pull the cooler cover upward to remove it.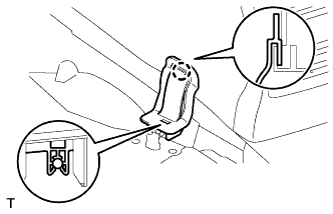
| 14. REMOVE REAR CONSOLE END PANEL SUB-ASSEMBLY |
Place protective tape as shown in the illustration.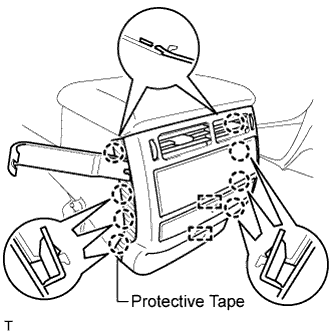
Using a moulding remover, detach the 8 claws.
Remove the end panel and disconnect the connectors and 2 clamps.
| 15. REMOVE COOLING BOX ASSEMBLY |
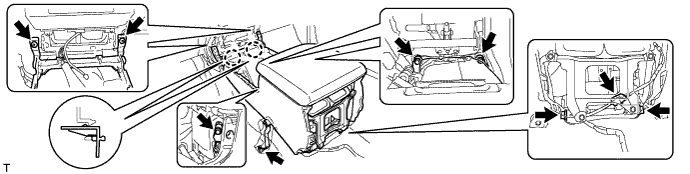
Remove the 4 bolts and 2 screws.
Remove the 2 bolts and disconnect the 2 cooler pipes.
Remove the 2 O-rings from the cooler pipes.
Disconnect the connector.
Detach the 2 claws and remove the cooling box.