Home › Drivetrain › A750F (AUTOMATIC TRANSMISSION / TRANSAXLE) › AUTOMATIC TRANSMISSION SYSTEM(for 1GR-FE) › 2015.08–2017.08
RM2660E _52 Drivetrain _052806 A750F AUTOMATIC TRANSMISSION / TRANSAXLE _0255290 AUTOMATIC TRANSMISSION SYSTEM(for 1GR-FE) J

A750F AUTOMATIC TRANSMISSION / TRANSAXLE  AUTOMATIC TRANSMISSION SYSTEM(for 1GR-FE)  Pattern Select Switch Power Mode Circuit  


DESCRIPTION

The ECM memory contains the programs for the normal and power shift patterns and lock-up pattern.

By following the programs corresponding to the signals from the PWR switch (integration control and panel assembly), the park/neutral position switch and other various sensors, the ECM switches the solenoid valves on and off, and controls the transmission gear change and the lock-up clutch operation.

WIRING DIAGRAM
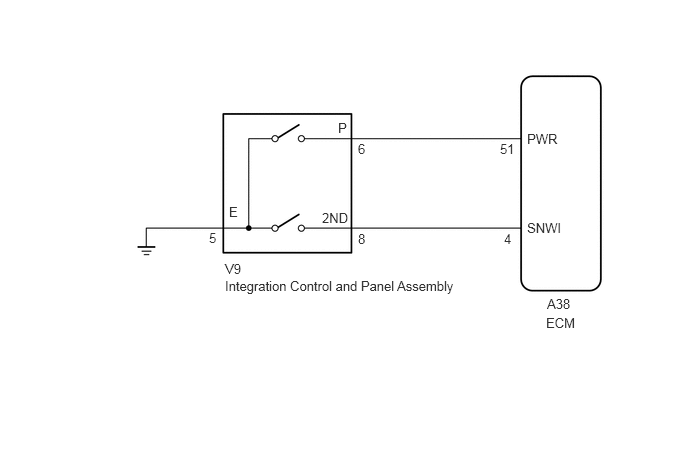
C344742E06
2.344,2.896 4.896,3.083 2.552,0.188 10 false Integration Control and Panel Assembly 2.344,2.719 2.635,2.917 0.292,0.198 10 false V9 3.729,1.469 3.927,1.667 0.198,0.198 10 false 6 3.521,1.25 3.719,1.448 0.198,0.198 10 false P 3.729,2.406 3.927,2.604 0.198,0.198 10 false 8 3.354,2.188 3.74,2.385 0.385,0.198 10 false 2ND 2.385,2.125 2.771,2.323 0.385,0.198 10 false E 2.177,2.396 2.375,2.594 0.198,0.198 10 false 5 5.49,1.365 6.26,1.563 0.771,0.198 10 false PWR 5.49,2.292 6.26,2.49 0.771,0.198 10 false SNWI 5.25,2.406 5.5,2.604 0.25,0.198 10 false 4 5.208,1.469 5.479,1.667 0.271,0.198 10 false 51 5.698,3.083 6.083,3.281 0.385,0.198 10 false A38 5.688,3.281 6.125,3.479 0.438,0.198 10 false ECM

CAUTION / NOTICE / HINT

When the PWR switch is pushed, switch contact is made and power mode is selected. To cancel power mode, push the PWR switch once again.

PROCEDURE
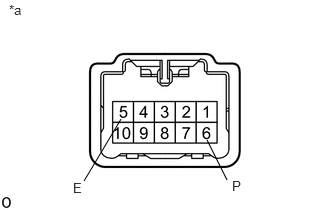
1.INSPECT PWR SWITCH (INTEGRATION CONTROL AND PANEL ASSEMBLY)
a.
C331266E24
2.365,1.875 2.156,1.458 false 0.875,1.885 1.26,1.24 false 2.417,1.854 2.604,2.052 0.188,0.198 10 false P 0.76,1.875 1.052,2.073 0.292,0.198 10 false E 0.094,0.021 0.385,0.219 0.292,0.198 10 false *a

Remove the integration control and panel assembly (See page Drivetrain>A750F (AUTOMATIC TRANSMISSION / TRANSAXLE)>COMBINATION SWITCH>REMOVAL).


b.

Measure the resistance according to the value(s) in the table below.

Standard Resistance:
Tester Connection Switch Condition Specified Condition
6 (P) - 5(E) PWR switch on Below 1 Ω
6 (P) - 5(E) PWR switch off 10 kΩ or higher


Text in Illustration
*a Component without harness connected
(Integration control and panel assembly)


OK

2.CHECK HARNESS AND CONNECTOR (INTEGRATION CONTROL AND PANEL ASSEMBLY - BODY GROUND)

NG

REPLACE INTEGRATION CONTROL AND PANEL ASSEMBLY

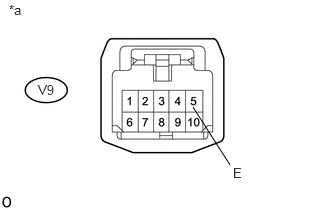
2.CHECK HARNESS AND CONNECTOR (INTEGRATION CONTROL AND PANEL ASSEMBLY - BODY GROUND)
a.
U165549E02
2.396,1.719 2.01,1.115 false 0.396,0.854 0.688,1.083 0.292,0.229 10 false V9 2.427,1.719 2.719,1.917 0.292,0.198 10 false E 0.094,0.021 0.385,0.219 0.292,0.198 10 false *a

Disconnect the integration control and panel assembly connector.


b.

Measure the resistance according to the value(s) in the table below.

Standard Resistance:
Tester Connection Condition Specified Condition
V9-5(E) - Body ground Always Below 1 Ω


Text in Illustration
*a Front view of wire harness connector
(to Integration Control and Panel Assembly)


OK

3.CHECK HARNESS AND CONNECTOR (INTEGRATION CONTROL AND PANEL ASSEMBLY - ECM)

NG

REPAIR OR REPLACE HARNESS OR CONNECTOR

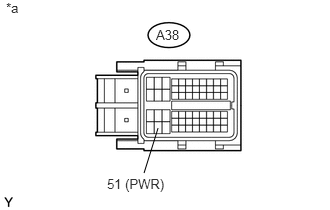
3.CHECK HARNESS AND CONNECTOR (INTEGRATION CONTROL AND PANEL ASSEMBLY - ECM)
U164936E03
1.5,1.802 1.646,1.333 false 0.063,0 0.375,0.198 0.313,0.198 10 false *a 1.625,0.281 2,0.51 0.375,0.229 10 false A38 1.115,1.833 1.792,2.031 0.677,0.198 10 false 51 (PWR)

a.

Disconnect the ECM connector.


b.

Measure the resistance according to the value(s) in the table below.

Standard Resistance:
Tester Connection Switch Condition Specified Condition
A38-51 (PWR) - Body ground PWR switch on Below 1 Ω
A38-51 (PWR) - Body ground PWR switch off 10 kΩ or higher


Text in Illustration
*a Front view of wire harness connector
(to ECM)


OK

NG

REPAIR OR REPLACE HARNESS OR CONNECTOR