Home › Audio / Visual / Telematics › AUDIO / VIDEO › AUDIO AND VISUAL SYSTEM(for Radio and Display Type) › 2015.08–2017.08
RM2660E _56 Audio / Visual / Telematics _052828 AUDIO / VIDEO _0255487 AUDIO AND VISUAL SYSTEM(for Radio and Display Type) J

AUDIO / VIDEO  AUDIO AND VISUAL SYSTEM(for Radio and Display Type)  AVC-LAN Circuit  


DESCRIPTION

Each audio system component connected to the AVC-LAN (communication bus) transfers switch signals using the audio visual communication local area network.

If a short to +B or short to ground occurs in the AVC-LAN, the audio system will not function normally because communication is not possible.

WIRING DIAGRAM
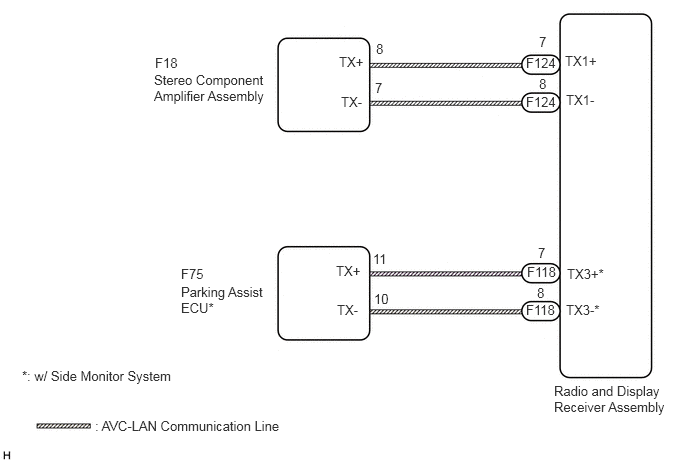
E335107E02
1.615,0.573 1.99,0.813 0.375,0.24 10 false F18 1.604,0.75 2.917,1.177 1.313,0.427 10 false Stereo Component Amplifier Assembly 3.531,0.563 3.833,0.771 0.302,0.208 10 false TX+ 3.552,0.979 3.854,1.188 0.302,0.208 10 false TX- 5.885,0.552 6.313,0.76 0.427,0.208 10 false TX1+ 5.896,0.958 6.354,1.167 0.458,0.208 10 false TX1- 3.5,2.74 3.802,2.948 0.302,0.208 10 false TX+ 3.51,3.146 3.813,3.354 0.302,0.208 10 false TX- 5.906,2.771 6.458,2.979 0.552,0.208 10 false TX3+* 5.896,3.146 6.448,3.354 0.552,0.208 10 false TX3-* 3.917,0.427 4.104,0.635 0.188,0.208 10 false 8 3.906,0.833 4.094,1.042 0.188,0.208 10 false 7 5.615,0.354 5.802,0.563 0.188,0.208 10 false 7 5.615,0.792 5.802,1 0.188,0.208 10 false 8 3.885,2.615 4.073,2.823 0.188,0.208 10 false 11 5.604,2.552 5.792,2.76 0.188,0.208 10 false 7 3.896,3.031 4.083,3.24 0.188,0.208 10 false 10 5.594,2.969 5.781,3.177 0.188,0.208 10 false 8 5.479,0.573 5.885,0.781 0.406,0.208 10 false F124 5.479,0.979 5.885,1.188 0.406,0.208 10 false F124 5.49,2.75 5.896,2.958 0.406,0.208 10 false F118 5.479,3.146 5.885,3.354 0.406,0.208 10 false F118 1.885,2.771 2.292,2.979 0.406,0.208 10 false F75 1.885,2.958 2.833,3.302 0.948,0.344 10 false Parking Assist ECU* 0.229,3.833 1.99,4.042 1.76,0.208 10 false *: w/ Side Monitor System 0.99,4.354 3.292,4.563 2.302,0.208 10 false : AVC-LAN Communication Line 5.771,3.99 7.083,4.406 1.313,0.417 10 false Radio and Display Receiver Assembly

CAUTION / NOTICE / HINT

HINT:
·

The radio and display receiver assembly is the master unit.

·

When replacing the radio and display receiver assembly, it is necessary to perform the vehicle contract setting for Connected Services (w/ Connected Services Function).


PROCEDURE

1.INSPECT RADIO AND DISPLAY RECEIVER ASSEMBLY
a.

Remove the radio and display receiver assembly (See page Audio / Visual / Telematics>AUDIO / VIDEO>RADIO RECEIVER (w/o Multi-display)>REMOVAL).
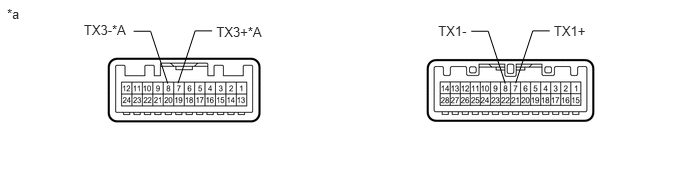
E335108E01
2.253,0.25 2.794,0.462 0.541,0.212 10 TX3+*A 1.854,0.866 2.032,0.321 2.032,0.321 2.209,0.321 false 1.747,0.87 1.568,0.325 1.568,0.325 1.391,0.325 false 5.37,0.866 5.549,0.321 5.549,0.321 5.726,0.321 false 5.263,0.87 5.085,0.325 5.085,0.325 4.908,0.325 false 0.873,0.229 1.393,0.441 0.520,0.212 10 TX3-*A 4.564,0.236 4.963,0.448 0.399,0.212 10 TX1- 5.769,0.243 6.168,0.455 0.399,0.212 10 TX1+ 0.073,0.066 0.412,0.277 0.339,0.212 10 *a

Text in Illustration
*A w/ Side Monitor System - -
*a Component without harness connected
(Radio and Display Receiver Assembly)
- -


b.

Measure the resistance according to the value(s) in the table below.

Standard Resistance:
Tester Connection Condition Specified Condition
7 (TX1+) - 8 (TX1-) Always 60 to 80 Ω
7 (TX3+) - 8 (TX3-)* Always 60 to 80 Ω


*: w/ Side Monitor System


OK

2.CHECK HARNESS AND CONNECTOR (AVC-LAN CIRCUIT)

NG

REPLACE RADIO AND DISPLAY RECEIVER ASSEMBLY

2.CHECK HARNESS AND CONNECTOR (AVC-LAN CIRCUIT)

*: w/ Side Monitor System


a.

Disconnect the F118 and F124 radio and display receiver assembly connectors.


b.

Disconnect the F18 stereo component amplifier assembly connector.


c.

Disconnect the F75 parking assist ECU connector*.


d.

Measure the resistance according to the value(s) in the table below.

Standard Resistance:
Tester Connection Condition Specified Condition
F118-7 (TX3+) - F75-11 (TX+)* Always Below 1 Ω
F118-8 (TX3-) - F75-10 (TX-)* Always Below 1 Ω
F124-7 (TX1+) - F18-8 (TX+) Always Below 1 Ω
F124-8 (TX1-) - F18-7 (TX-) Always Below 1 Ω
F118-7 (TX3+) - Body ground* Always 10 kΩ or higher
F118-8 (TX3-) - Body ground* Always 10 kΩ or higher
F124-7 (TX1+) - Body ground Always 10 kΩ or higher
F124-8 (TX1-) - Body ground Always 10 kΩ or higher


OK

3.INSPECT MALFUNCTIONING PARTS

NG

REPAIR OR REPLACE HARNESS OR CONNECTOR

3.INSPECT MALFUNCTIONING PARTS
a.

Disconnect and reconnect each slave unit one by one until the master unit returns to normal operation.

HINT:
·

Check all slave units.

·

When disconnecting a slave unit causes the master unit to return to normal operation, this indicates that the slave unit is malfunctioning. Replace the malfunctioning slave unit.


OK:

Master unit returns to normal operation.


OK

REPLACE MALFUNCTIONING PARTS

NG

REPLACE RADIO AND DISPLAY RECEIVER ASSEMBLY