AUDIO / VIDEO AUDIO AND VISUAL SYSTEM(for Radio and Display Type) Radio Broadcast cannot be Received or Poor Reception
WIRING DIAGRAM
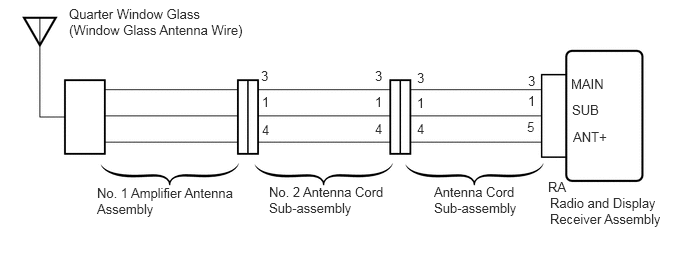
CAUTION / NOTICE / HINT
- HINT:
-
When replacing the radio and display receiver assembly, it is necessary to perform the vehicle contract setting for Connected Services (w/ Connected Services Function).
PROCEDURE
Check the radio automatic station search function by activating it.
- OK:
Automatic station search function stops on a station.
OK
(See pageGeneral>INTRODUCTION>HOW TO TROUBLESHOOT ECU CONTROLLED SYSTEMS>HOW TO PROCEED WITH TROUBLESHOOTING)
NG
Check if any optional components that may decrease reception capacity, such as sunshade film or a telephone antenna, are installed.
- OK:
Optional components are installed.
- NOTICE:
-
Do not remove optional components without permission of the customer.
OK
NG
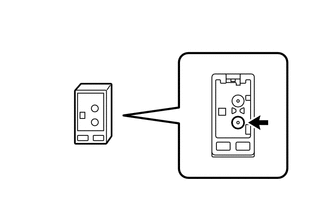
Remove the antenna connector from the radio and display receiver assembly.
Turn the engine switch on (ACC) with the radio and display receiver assembly connector connected.
Turn on the radio and turn into AM mode.
Place a screwdriver, thin wire or other metal object on the radio and display receiver assembly antenna jack and check that noise can be heard from the speakers.
- OK:
Noise occurs.
OK
NG
Inspect the quarter window glass (window glass antenna wire) (See page Audio / Visual / Telematics>AUDIO / VIDEO>WINDOW GLASS ANTENNA WIRE>REPAIR).
OK
NG
Disconnect the RA radio and display receiver assembly connector.
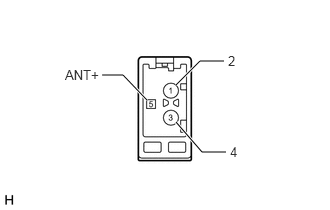
Measure the voltage according to the value(s) in the table below.
- Standard Voltage:
Tester Connection Switch Condition Specified Condition 5 (ANT+) - Body ground Engine switch on (ACC), radio switch on 11 to 14 V
OK
NG
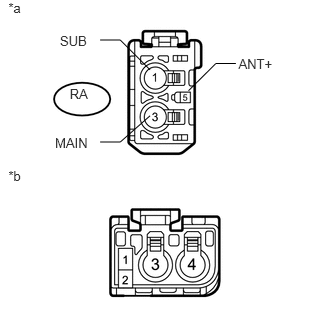
Disconnect the antenna connector from the radio and display receiver assembly.
Disconnect the antenna connector from the No. 2 antenna cord sub-assembly.
Measure the resistance according to the value(s) in the table below.
- Standard Resistance:
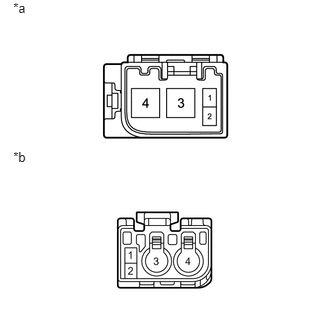
Tester Connection Condition Specified Condition RA-3 (MAIN) - 4 Always Below 1 Ω RA-1 (SUB) - 3 Always Below 1 Ω RA-5 (ANT+) - 2 Always Below 1 Ω RA-3 (MAIN) - Body ground Always 10 kΩ or higher RA-1 (SUB) - Body ground Always 10 kΩ or higher RA-5 (ANT+) - Body ground Always 10 kΩ or higher
| *a | Front view of wire harness connector
(to Radio and Display Receiver Assembly) |
| *b | Front view of wire harness connector
(to No. 2 Antenna Cord Sub-assembly) |
OK
NG
Disconnect the antenna connector from the antenna cord sub-assembly.
Disconnect the antenna connector from the No. 1 amplifier antenna assembly.
Measure the resistance according to the value(s) in the table below.
- Standard Resistance:
Tester Connection Condition Specified Condition 4 - 4 Always Below 1 Ω 3 - 3 Always Below 1 Ω 2 - 2 Always Below 1 Ω 4 - Body ground Always 10 kΩ or higher 3 - Body ground Always 10 kΩ or higher 2 - Body ground Always 10 kΩ or higher
| *a | Front view of wire harness connector
(to Antenna Cord Sub-assembly) |
| *b | Front view of wire harness connector
(to No. 1 Amplifier Antenna Assembly) |
OK
NG
Replace the No. 1 amplifier antenna assembly and check if radio broadcasts can be received normally (See page Audio / Visual / Telematics>AUDIO / VIDEO>AMPLIFIER ANTENNA>REMOVAL).
- OK:
Radio broadcasts can be received.
OK
NG