Home › Audio / Visual / Telematics › AUDIO / VIDEO › AUDIO AND VISUAL SYSTEM(for Radio and Display Type) › from 2015.08
RM2660E _56 Audio / Visual / Telematics _052828 AUDIO / VIDEO _0255487 AUDIO AND VISUAL SYSTEM(for Radio and Display Type) J

AUDIO / VIDEO  AUDIO AND VISUAL SYSTEM(for Radio and Display Type)  Microphone Circuit between Microphone and Radio Receiver  


DESCRIPTION

Using this circuit, the radio and display receiver assembly sends power to the telephone microphone assembly, and the telephone microphone assembly sends microphone signals to the radio and display receiver assembly.

WIRING DIAGRAM
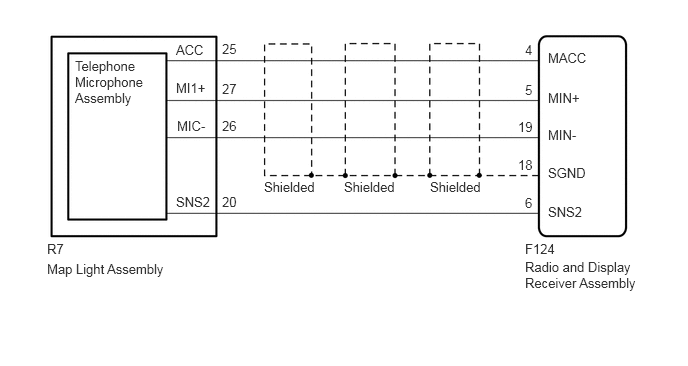
B360077E12
0.49,2.719 2.302,2.917 1.813,0.198 10 false Map Light Assembly 0.781,0.604 1.604,1.302 0.823,0.698 10 false Telephone Microphone Assembly 1.833,0.833 2.281,0.99 0.448,0.156 10 false MI1+ 1.844,1.229 2.26,1.385 0.417,0.156 10 false MIC- 1.833,0.438 2.188,0.604 0.354,0.167 10 false ACC 4.479,1.865 5.094,2.021 0.615,0.156 10 false Shielded 2.75,1.865 3.365,2.021 0.615,0.156 10 false Shielded 2.313,2.021 2.563,2.177 0.25,0.156 10 false 20 2.313,0.844 2.521,1 0.208,0.156 10 false 27 2.313,1.229 2.521,1.385 0.208,0.156 10 false 26 2.313,0.427 2.563,0.583 0.25,0.156 10 false 25 5.469,2.031 5.594,2.188 0.125,0.156 10 false 6 5.396,1.635 5.583,1.792 0.188,0.156 10 false 18 5.469,0.854 5.583,1.01 0.115,0.156 10 false 5 5.396,1.24 5.583,1.396 0.188,0.156 10 false 19 5.469,0.438 5.594,0.594 0.125,0.156 10 false 4 5.469,2.698 6.75,3.052 1.281,0.354 10 false Radio and Display Receiver Assembly 0.49,2.51 0.802,2.719 0.313,0.208 10 false R7 5.469,2.51 5.896,2.688 0.427,0.177 10 false F124 5.708,0.938 6.146,1.094 0.438,0.156 10 false MIN+ 5.708,1.323 6.146,1.479 0.438,0.156 10 false MIN- 5.708,1.719 6.198,1.875 0.49,0.156 10 false SGND 5.708,0.521 6.146,0.677 0.438,0.156 10 false MACC 1.833,2.021 2.229,2.177 0.396,0.156 10 false SNS2 5.708,2.125 6.146,2.281 0.438,0.156 10 false SNS2 3.583,1.865 4.198,2.021 0.615,0.156 10 false Shielded

PROCEDURE

1.CHECK HARNESS AND CONNECTOR (RADIO AND DISPLAY RECEIVER ASSEMBLY - MAP LIGHT ASSEMBLY)
a.

Disconnect the F124 radio and display receiver assembly connector.


b.

Disconnect the R7 map light assembly connector.


c.

Measure the resistance according to the value(s) in the table below.

Standard Resistance:
Tester Connection Condition Specified Condition
F124-4 (MACC) - R7-25 (ACC) Always Below 1 Ω
F124-5 (MIN+) - R7-27 (MI1+) Always Below 1 Ω
F124-19 (MIN-) - R7-26 (MIC-) Always Below 1 Ω
F124-6 (SNS2) - R7-20 (SNS2) Always Below 1 Ω
F124-4 (MACC) - Body ground Always 10 kΩ or higher
F124-5 (MIN+) - Body ground Always 10 kΩ or higher
F124-19 (MIN-) - Body ground Always 10 kΩ or higher
F124-18 (SGND) - Body ground Always 10 kΩ or higher
F124-6 (SNS2) - Body ground Always 10 kΩ or higher


OK

2.CHECK RADIO AND DISPLAY RECEIVER ASSEMBLY

NG

REPAIR OR REPLACE HARNESS OR CONNECTOR

2.CHECK RADIO AND DISPLAY RECEIVER ASSEMBLY
a.
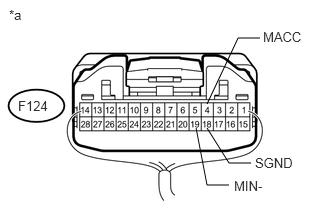
U166448E02
2.042,1.333 2.156,1.927 2.156,1.927 2.385,1.927 false 2.156,1.333 2.385,1.698 2.385,1.698 2.615,1.698 false 2.156,1.083 2.479,0.396 2.479,0.396 2.708,0.396 false 2.438,1.854 2.802,2.031 0.365,0.177 10 false MIN- 2.656,1.615 3.104,1.792 0.448,0.177 10 false SGND 2.74,0.302 3.188,0.479 0.448,0.177 10 false MACC 0.094,0.073 0.333,0.25 0.24,0.177 10 false *a 0.188,1.021 0.552,1.177 0.365,0.156 10 false F124

Remove the radio and display receiver assembly with its connectors still connected (See page Audio / Visual / Telematics>AUDIO / VIDEO>RADIO RECEIVER (w/o Multi-display)>REMOVAL).


b.

Measure the voltage according to the value(s) in the table below.

Standard Voltage:
Tester Connection Switch Condition Specified Condition
F124-4 (MACC) - Body ground Engine switch on (ACC) 4 to 6 V


c.

Measure the resistance according to the value(s) in the table below.

Standard Resistance:
Tester Connection Condition Specified Condition
F124-18 (SGND) - Body ground Always Below 1 Ω
F124-19 (MIN-) - Body ground Always Below 1 Ω


Text in Illustration
*a Component with harness connected
(Radio and Display Receiver Assembly)


OK

3.CHECK TELEPHONE MICROPHONE ASSEMBLY

NG

3.CHECK TELEPHONE MICROPHONE ASSEMBLY
a.

Replace the telephone microphone assembly with a known good one (See page Audio / Visual / Telematics>AUDIO / VIDEO>MICROPHONE AMPLIFIER>REMOVAL).


b.

Check that the malfunction disappears.

OK:

Malfunction disappears.


OK

END (TELEPHONE MICROPHONE ASSEMBLY IS DEFECTIVE)

NG