NAVIGATION / MULTI INFO DISPLAY NAVIGATION SYSTEM OPERATION CHECK
CHECK NAVIGATION SYSTEM NORMAL CONDITION
If the cause of a symptom is any of the following, the corresponding symptom is normal; it is not a malfunction.
| Symptom | Answer |
|---|---|
| A longer route than expected is chosen. | Depending on the road conditions, the multi-media module receiver assembly may determine that a longer route is quicker. |
| Even when distance priority is high, the shortest route is not shown. | Some routes may not be advised due to safety concerns. |
| When the vehicle is put into motion immediately after the engine starts, the navigation system deviates from the correct position. | If the vehicle starts before the navigation system activates, the system may not react. |
| When driving on certain types of roads, especially new roads, the vehicle position deviates from the correct position. | When the vehicle is driving on new roads not available on the SD card, the system attempts to match it to another nearby road, causing the position mark to deviate. |
| Expected arrival time is earlier than current time, or time different from expected arrival time is displayed. | If a destination is set to a point where a different time zone is used, the system displays an expected arrival time corresponding to the time zone of the destination. If a location on the sea is set as the destination, the system may display an expected arrival time corresponding to the time zone setting of the vehicle. Check which communication is not used for displaying traffic information. |
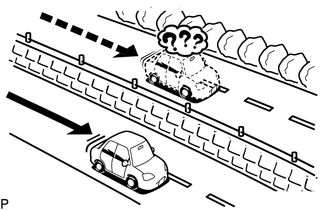
The following symptoms are not malfunctions, but are caused by errors inherent in the GPS, gyro sensor, speed sensor or multi-media module receiver assembly.
The current position mark may be displayed on a nearby parallel road.
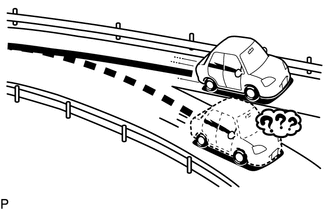
Immediately after a fork in the road, the current vehicle position mark may be displayed on the wrong road.
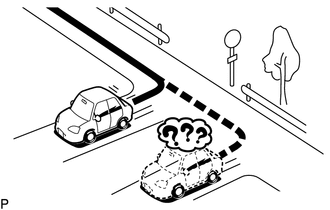
When the vehicle turns right or left at an intersection, the current vehicle position mark may be displayed on a nearby parallel road.
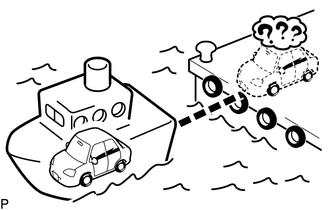
When the vehicle is carried, such as on a ferry, and the vehicle itself is not being driven, the current vehicle position mark may be displayed in the position where the vehicle was until a measurement can be performed by the GPS.
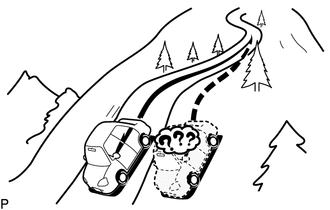
When the vehicle travels on a steep hill, the current vehicle position mark may deviate from the correct position.
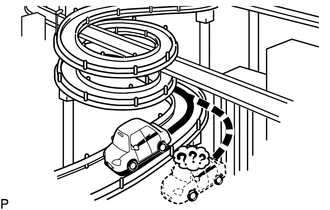
When the vehicle makes a continuous turn (e.g. 360, 720, 1080 degrees), the current vehicle position mark may deviate from the correct position.
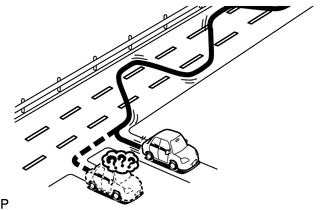
When the vehicle moves erratically, such as constant lane changes, the current vehicle position mark may deviate from the correct position.
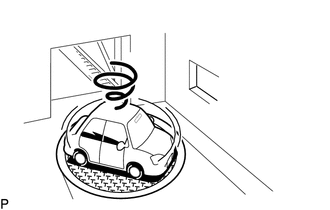
When the engine switch is turned on (ACC or ON) and the vehicle is turned on a turntable before parking, the current vehicle position mark may not indicate the correct direction. The same will occur when the vehicle comes out of the parking garage.
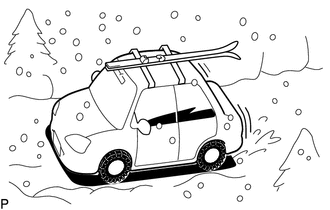
When the vehicle travels on a snowy road or a mountain path with tire chains installed or using a spare tire, the current vehicle position mark may deviate from the correct position.
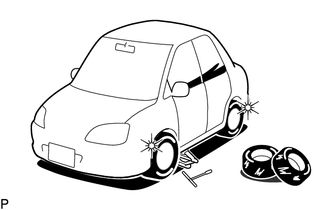
When the tires are changed, the current vehicle position mark may deviate from the correct position.
- HINT:
- ·
A change in tire diameter may cause a speed sensor error.
·Performing "tire change" in calibration mode will allow the system to correct the current vehicle position faster.
CHECK SD CARD
- HINT:
- ·
Check the SD card installed into the multi-media module receiver assembly.
·Illustrations may differ from the actual vehicle screen depending on the device settings and options. Therefore, some detailed areas may not be shown exactly the same as on the actual vehicle screen.
Enter diagnostic mode (See page Audio / Visual / Telematics>NAVIGATION / MULTI INFO DISPLAY>NAVIGATION SYSTEM>DTC CHECK / CLEAR).
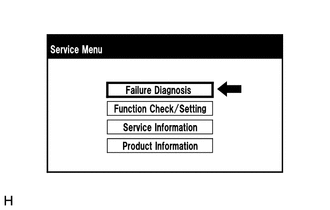
Select "Failure Diagnosis" from the "Service Menu" screen.
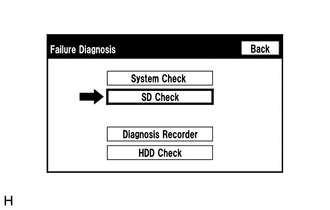
Select "SD Check" from the "Failure Diagnosis" screen.
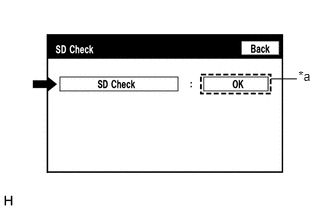
SD Check
Select "SD Check" to start the SD card check.
Check that the result is displayed when the SD check is completed.
| Display (Result) | Description |
|---|---|
| Checking | Check is in progress |
| OK | SD card is normal |
| NG | SD card is malfunctioning |
| *a | Result |
- HINT:
- ·
After selecting "SD Check", it may take a while until the result is displayed.
·If the cabin temperature is -20°C (-4°F) or lower, or 65°C (149°F) or higher, the SD card may not operate normally, and "NG" may be shown on the display. Make sure to perform the inspection with the cabin at an appropriate temperature.
·If "NG" is displayed even when the cabin temperature is appropriate, replace the SD card with a new one.
CHECK HARD DISK DRIVE (HDD) (w/ Sound Library Function)
- HINT:
- ·
Check the hard disk drive (HDD) built into the multi-media module receiver assembly.
·Illustrations may differ from the actual vehicle screen depending on the device settings and options. Therefore, some detailed areas may not be shown exactly the same as on the actual vehicle screen.
Enter diagnostic mode (See page Audio / Visual / Telematics>NAVIGATION / MULTI INFO DISPLAY>NAVIGATION SYSTEM>DTC CHECK / CLEAR).
Select "Failure Diagnosis" from the "Service Menu" screen.
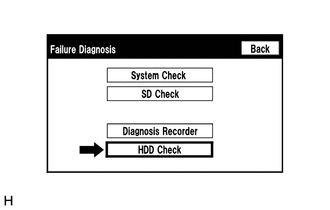
Select "HDD Check" from the "Failure Diagnosis" screen.
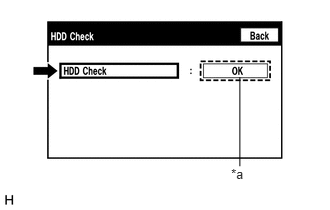
HDD Check
Select "HDD Check" to start the HDD check.
Check the result displayed when the HDD check is complete.
| Display (Result) | Description |
|---|---|
| Checking | Check is in progress |
| OK | Hard disk drive (HDD) is normal |
| NG | Hard disk drive (HDD) is malfunctioning |
| *a | Result |
- HINT:
- ·
After selecting "HDD Check", it may take a while until the result is displayed.
·If the cabin temperature is -20°C (-4°F) or lower, or 65°C (149°F) or higher, the HDD may not operate normally, and "NG" may be shown on the display. Make sure to perform the inspection with the cabin at an appropriate temperature.
·If "NG" is displayed even when the cabin temperature is appropriate, replace the HDD with a new one.
CHECK PANEL & STEERING SWITCH
- HINT:
- ·
The multi-media module receiver assembly panel switches and steering switches are checked in the following procedure.
·Illustrations may differ from the actual vehicle screen depending on the device settings and options. Therefore, some detailed areas may not be shown exactly the same as on the actual vehicle screen.
Enter diagnostic mode (See page Audio / Visual / Telematics>NAVIGATION / MULTI INFO DISPLAY>NAVIGATION SYSTEM>DTC CHECK / CLEAR).
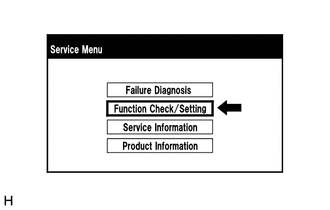
Select "Function Check/Setting" from the "Service Menu" screen.
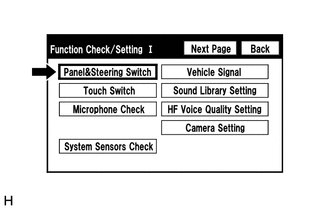
Select "Panel & Steering Switch" from the "Function Check/Setting I" screen.
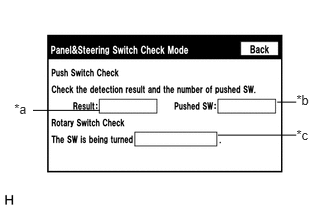
Panel & Steering Switch Check Mode
| Display | Content |
|---|---|
| *a: Switch condition | "Pushed" is displayed when any switch is pushed |
| *b: Number of switches pushed | ·
Number of switches pushed at once is displayed ·
If more than 3 switches are pushed at once, "More than 3" is displayed ·
If 4 or more switches are pushed at once, "More than 3" is displayed |
| *c: Rotary switch direction | Direction of rotary switch is displayed |
Operate each switch and check that the switch conditions are correctly displayed.
- NOTICE:
-
When the "SETUP" switch is pressed and held for 3 seconds or more, diagnosis mode will be canceled.
CHECK TOUCH SWITCH
- HINT:
- ·
The touch switches on the screen are checked in the following procedure.
·Illustrations may differ from the actual vehicle screen depending on the device settings and options. Therefore, some detailed areas may not be shown exactly the same as on the actual vehicle screen.
Enter diagnostic mode (See page Audio / Visual / Telematics>NAVIGATION / MULTI INFO DISPLAY>NAVIGATION SYSTEM>DTC CHECK / CLEAR).
Select "Function Check/Setting" from the "Service Menu" screen.
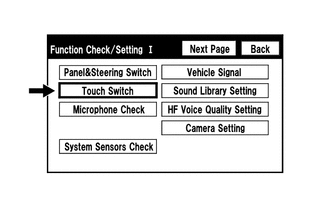
Select "Touch Switch" from the "Function Check/ Setting I" screen.
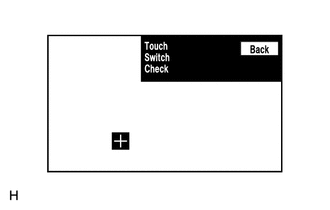
Touch Switch Check
Touch the display anywhere in the open area to perform the check when the "Touch Switch Check" screen is displayed.
- HINT:
- ·
A "+" mark is displayed where the display is touched.
·The "+" mark remains on the display even after the finger is removed.
CHECK MICROPHONE
- HINT:
- ·
The microphone and microphone input level are checked in the following procedure.
·Illustrations may differ from the actual vehicle screen depending on the device settings and options. Therefore, some detailed areas may not be shown exactly the same as on the actual vehicle screen.
Enter diagnostic mode (See page Audio / Visual / Telematics>NAVIGATION / MULTI INFO DISPLAY>NAVIGATION SYSTEM>DTC CHECK / CLEAR).
Select "Function Check/Setting" from the "Service Menu" screen.
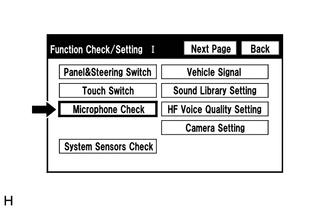
Select "Microphone Check" from the "Function Check/Setting I" screen.
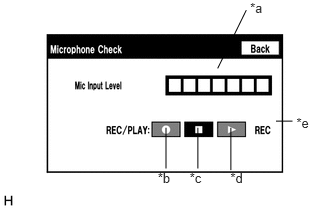
Microphone Check
| Display | Content |
|---|---|
| *a: Microphone input level meter | Monitors the microphone input level every 0.1 seconds and displays the results in 8 different levels. |
| *b: Recording switch | Starts recording. |
| *c: Stop switch | Stops recording and playing. |
| *d: Play switch | Plays the recorded voice. |
| *e: Recording indicator | Comes on while recording. |
When speaking into the microphone, check that the microphone input level meter changes according to the input level.
- HINT:
-
The microphone is active at all times when this screen is displayed.
Push the recording switch and perform voice recording.
- HINT:
- ·
Select the recording switch with the blower motor of the air conditioning system stopped. If an outlet of the air conditioning system is facing the microphone, noise may be recorded.
·While recording or playing, the switches other than the stop switch cannot be pushed.
·When no recording is present, the play switch cannot be pushed.
·Recording will stop after 5 seconds or when the stop switch is pushed.
Check that the recording indicator remains on while recording and that the recording can be played normally.
CHECK GPS & VEHICLE SENSORS
- HINT:
- ·
GPS information, vehicle signals and sensor signals are checked in the following procedure.
·Illustrations may differ from the actual vehicle screen depending on the device settings and options. Therefore, some detailed areas may not be shown exactly the same as on the actual vehicle screen.
Enter diagnostic mode (See page Audio / Visual / Telematics>NAVIGATION / MULTI INFO DISPLAY>NAVIGATION SYSTEM>DTC CHECK / CLEAR).
Select "Function Check/Setting" from the "Service Menu" screen.
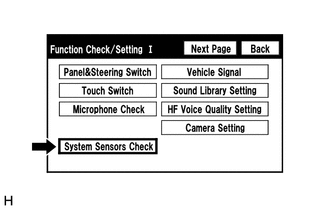
Select "System Sensor Check" from the "Function Check/Setting I" screen.
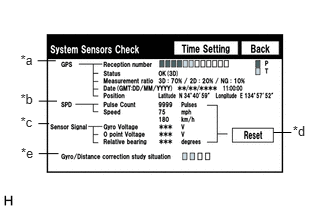
System Sensor Check
| Display | Content | ||
|---|---|---|---|
| Reception number | Displays reception condition of the satellites used to determine vehicle position | Blue: P (In use) | System is using GPS signal for location. |
| Yellow: T (Receiving) | System is tracking GPS signal for location. | ||
| No color: Not in use | System cannot receive GPS signal. (Searching for GPS signal) | ||
| Status | Displays reception status of the satellites used to determine vehicle position | OK (H3D) | High accuracy 3-dimensional location method is being used. |
| OK (H2D) | High accuracy 2-dimensional location method is being used. | ||
| OK (3D) | 3-dimensional location method is being used. | ||
| OK (2D) | 2-dimensional location method is being used. | ||
| NG | Location data cannot be used. | ||
| error | Reception error has occurred. | ||
| - | Any other state. | ||
| Measurement ratio | Displays the ratio of satellites performing measurements | 3D | The ratio of satellites performing 3D positioning, Hyper 3D positioning and Hyper 2D positioning is displayed. |
| 2D | The ratio of satellites performing 2D positioning is displayed. | ||
| NG | The ratio of satellites not performing measurement is displayed. | ||
| Date | Date/time information obtained from GPS signals is displayed in Greenwich Mean Time (GMT). | ||
| Position | Latitude and longitude information on current position is displayed. | ||
| Display | Content |
|---|---|
| Pulse count | Displays the accumulated number of input pulses beginning when this screen is displayed |
| Speed | Displays vehicle speed |
| Display | Content | Note |
|---|---|---|
| Gyro Voltage | Displays the output voltage of the gyro sensor | - |
| 0 point Voltage | Displays the zero-point voltage of the gyro sensor | - |
| Relative bearing | Displays the output angle of the gyro sensor | The amount of change in bearing angle (degrees) after the system sensor check screen is displayed (clockwise: "+", counterclockwise: "-"). |
| Display | Content |
|---|---|
| Reset | When this switch is pressed and held for 3 seconds or more, the values for display items of SPD signal and gyro sensor signal are reset and display "0". |
| Display | Content |
|---|---|
| Gyro/Distance correction study situation | Displays learning status of Gyro/Distance correction |
When the "System Sensors Check" screen is displayed, check all the sensor signals.
- HINT:
-
This screen is updated once per second.
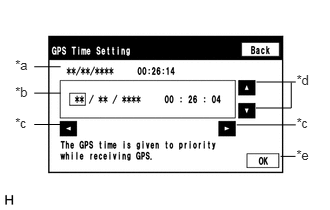
GPS Time Setting
| Display | Content |
|---|---|
| *a: Time display | Displays the date and time in the device. |
| *b: Time setting screen | Setting is possible only when GPS signals are not being received. |
| *c: Cursor movement switch | Moves the cursor on the date and time setting screen to the right and left. |
| *d: Adjustment switch | Adjusts values of items selected by the cursor. |
| *e: OK switch | Selecting this switch after setting the date and time updates the date and time in the device (only when GPS signals are not received). |
When GPS signals are not being received, the data and time in the device can be adjusted.
- HINT:
-
Time setting is possible only when GPS signals are not being received. When the navigation system is receiving GPS signals, priority is given to displaying the time and date received via GPS.
CHECK VEHICLE SIGNAL
- HINT:
- ·
Vehicle signals received by the multi-media module receiver assembly are checked in the following procedure.
·Illustrations may differ from the actual vehicle screen depending on the device settings and options. Therefore, some detailed areas may not be shown exactly the same as on the actual vehicle screen.
Enter diagnostic mode (See page Audio / Visual / Telematics>NAVIGATION / MULTI INFO DISPLAY>NAVIGATION SYSTEM>DTC CHECK / CLEAR).
Select "Function Check/Setting" from the "Service Menu" screen.
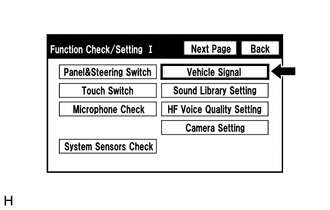
Select "Vehicle Signal" from the "Function Check/Setting I" screen.
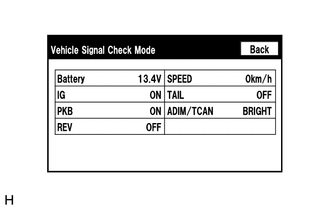
Vehicle Signal Check Mode
| Display | Content |
|---|---|
| Battery | Battery voltage is displayed. |
| IG | Engine switch ON/OFF state is displayed. |
| PKB | Parking brake ON/OFF state is displayed. |
| REV | Reverse signal ON/OFF state is displayed. |
| SPEED | Vehicle speed is displayed in km/h. |
| TAIL | Tail signal (Light control switch) ON/OFF state is displayed. |
| ADIM/TCAN | Brightness state DIM (with) / BRIGHT (without) is displayed. |
- HINT:
- ·
Only conditions having inputs are displayed.
·This screen displays vehicle signals input to the multi-media module receiver assembly.
·This screen is updated once per second.
When the "Vehicle Signal Check Mode" screen is displayed, check all the vehicle signal conditions.
CHECK SOUND LIBRARY SETTING (w/ Sound Library Function)
- HINT:
- ·
It is possible to check the sound library information and turn the sound library function on and off.
·Illustrations may differ from the actual vehicle screen depending on the device settings and options. Therefore, some detailed areas may not be shown exactly the same as on the actual vehicle screen.
Enter diagnostic mode (See page Audio / Visual / Telematics>NAVIGATION / MULTI INFO DISPLAY>NAVIGATION SYSTEM>DTC CHECK / CLEAR).
Select "Function Check/Setting" from the "Service Menu" screen.
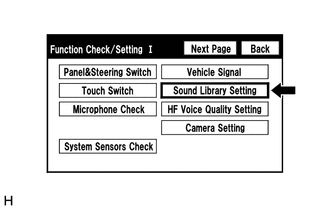
Select "Sound Library Setting" from the "Function Check/Setting I" screen.
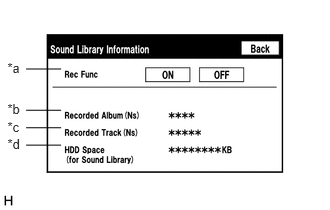
Sound Library Information
| Display | Content |
|---|---|
| *a: Recording function setting for HDD | Recording to HDD permitted (ON)/not permitted (OFF) |
| *b: Number of albums | Number of albums recorded on HDD |
| *c: Number of tracks | Number of tracks recorded on HDD |
| *d: Free space in HDD | Free space on HDD partition for sound library |
CHECK HANDS-FREE VOICE QUALITY AND VOLUME SETTING
- NOTICE:
- ·
Adjustment of the settings is required for each registered cellular phone.
·If no cellular phone has been registered, all switches cannot be selected.
- HINT:
- ·
The hands-free volume of a "Bluetooth" compatible phone can be adjusted using the following procedure.
·Illustrations may differ from the actual vehicle screen depending on the device settings and options. Therefore, some detailed areas may not be shown exactly the same as on the actual vehicle screen.
Enter diagnostic mode (See page Audio / Visual / Telematics>NAVIGATION / MULTI INFO DISPLAY>NAVIGATION SYSTEM>DTC CHECK / CLEAR).
Select "Function Check/Setting" from the "Service Menu" screen.
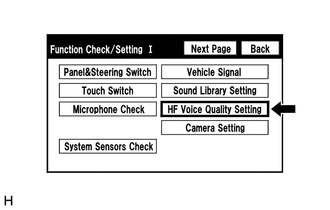
Select "HF Voice Quality Setting" from the "Function Check/Setting I" screen.
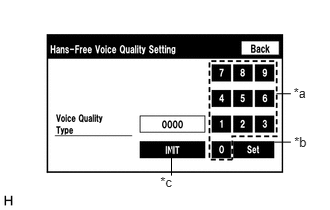
Hands-Free Voice Quality Setting (Voice Quality Type adjustment)
| *a | Numeric keypad |
| *b | Setting button |
| *c | Reset button |
If necessary, refer to the table below to adjust the voice quality type with the numeric keypad.
When adjusting the settings, use the number pad on the screen to input the voice quality type according to the table.
| Parameter | Target Phenomenon | Voice Quality Type | Positive Effect of Changing Voice Quality | Negative Effect of Changing Voice Quality |
|---|---|---|---|---|
| A
(Noise) |
The other party hears background noise when listening to your voice. | 1000 | The amount of background noise the other party hears when listening to your voice is reduced. | The volume of voice the other party hears when listening to your voice may temporarily drop. |
| B
(Noise) |
The other party hears a lot of background noise when listening to your voice. | 2000 | The amount of background noise the other party hears when listening to your voice is sharply reduced. | The volume of voice the other party hears when listening to your voice may temporarily drop. |
| C
(Echo) |
The other party hears weak echoes. | 0100 | The amount of echo is reduced (low level). | Sound quality of the other party deteriorates (low level). |
| D
(Echo) |
The other party hears strong echoes. | 0200 | The amount of echo is reduced (high level). | Sound quality of the other party deteriorates (high level). |
| Parameter | Target Phenomenon | Voice Quality Type | Positive Effect of Changing Voice Quality | Negative Effect of Changing Voice Quality |
|---|---|---|---|---|
| A+C | The other party hears background noise and weak echoes when listening to your voice. | 1100 | ·
The amount of background noise the other party hears when listening to your voice is reduced. ·
The amount of echo is reduced (low level). |
·
The volume of voice may drop temporarily. ·
Sound quality of the other party deteriorates (low level). |
| A+D | The other party hears background noise and strong echoes when listening to your voice. | 1200 | ·
The amount of background noise the other party hears when listening to your voice is reduced. ·
The amount of echo is reduced (high level). |
·
The volume of voice may drop temporarily. ·
Sound quality of the other party deteriorates (high level). |
| B+C | The other party hears a lot of background noise and weak echoes when listening to your voice. | 2100 | ·
The amount of background noise the other party hears when listening to your voice is sharply reduced. ·
The amount of echo is reduced (low level). |
·
The volume of voice may drop temporarily. ·
Sound quality of the other party deteriorates (low level). |
| B+D | The other party hears a lot of background noise and strong echoes when listening to your voice. | 2200 | ·
The amount of background noise the other party hears when listening to your voice is sharply reduced. ·
The amount of echo is reduced (high level). |
·
The volume of voice may drop temporarily. ·
Sound quality of the other party deteriorates (high level). |
- HINT:
- ·
The default value is "0000".
·Settings will be applied when the setting button is selected.
·If voice quality type values that are not in the table are input, the setting will not be applied and a positive effect may not be gained.
·If the quality of phone calls decreases due to the changed settings, return the settings to "0000" by pressing the "INIT" switch.
CLEAR PASSWORD OF EXPORT/IMPORT MEMORY POINT FUNCTION
- HINT:
- ·
This function allows the initialization of a password which was set on the multi-media module receiver assembly when exporting/importing memory points.
·Illustrations may differ from the actual vehicle screen depending on the device settings and options. Therefore, some detailed areas may not be shown exactly the same as on the actual vehicle screen.
Enter diagnostic mode (See page Audio / Visual / Telematics>NAVIGATION / MULTI INFO DISPLAY>NAVIGATION SYSTEM>DTC CHECK / CLEAR).
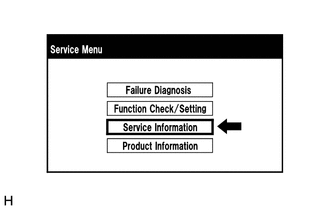
Select "Service Information" from the "Service Menu" screen.
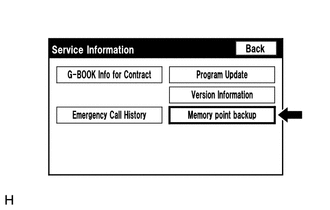
Select "Memory point backup" from the "Service Information" screen.
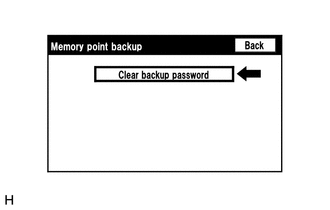
Clear backup password
- HINT:
-
Depending on the manufacturer, some component names and versions will be displayed differently.
Select "Clear backup password" from the "Memory point backup" screen.
CHECK SPEAKER
- HINT:
- ·
This function is used when checking the speaker wiring and whether the speakers are functioning properly.
·Illustrations may differ from the actual vehicle screen depending on the device settings and options. Therefore, some detailed areas may not be shown exactly the same as on the actual vehicle screen.
Turn audio mode on and play any audio source.
- HINT:
-
This audio source will be used for the speaker check.
Enter diagnostic mode (See page Audio / Visual / Telematics>NAVIGATION / MULTI INFO DISPLAY>NAVIGATION SYSTEM>DTC CHECK / CLEAR).
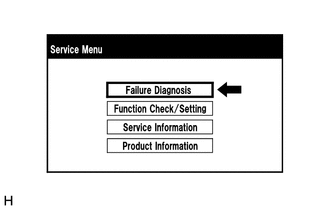
Select "Failure Diagnosis" from the "Service Menu" screen.
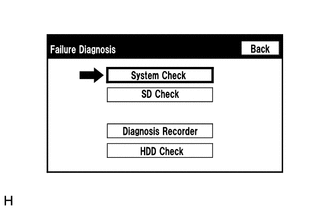
Select "System Check" from the "Failure Diagnosis" screen.
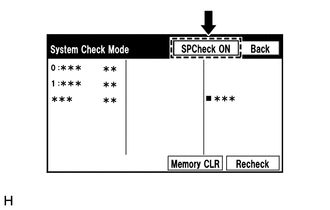
Select "SP Check ON" from the "System Check Mode" screen.
Check the speaker wiring and check that the speakers are functioning properly.
- HINT:
- ·
Check that each speaker outputs sound from the selected audio source properly.
·"SP Check OFF" is displayed during the speaker check.
·Sound can be heard from the speakers around the vehicle in order beginning from the speaker on the front passenger side.
·More than one speaker may sound simultaneously depending on the speaker wiring.
Sound stops when any of the following conditions are met.
The "SP Check OFF" switch is pressed.
The engine switch is turned off.
Diagnostic mode is turned off.
The screen is changed to another screen.
Audio mode is turned off.
CHECK SOFTWARE ERROR HISTORY
- HINT:
-
This function is used to check the cause when the multi-display assembly screen is blacked out.
Check software error history.
Connect the GTS to the DLC3.
Turn the engine switch on (IG).
Turn the GTS on.
Enter the following menus: Body Electrical / Navigation System / Utility / Software Error History.
When an item is stored for Software Error History, record it before repairing the multi-media module receiver assembly.
| Error Description | Trigger | Detail |
|---|---|---|
| Software Reset | Navi Microcomputer | Hexadecimal Number |
| Audio Microcomputer | ||
| CAN Microcomputer | ||
| No Video Signal | Front Monitor | |
| Rear Monitor | ||
| MOST Cold Restart | Always |
- HINT:
- ·
Software Error History can store up to 5 history data items. If a new software error occurs when 5 data items have already been stored, the oldest data is cleared and the new data is stored.
·If an error that is unsupported by the GTS occurs, a "-" is displayed for the display items.
Clear software error history.
When DTCs are cleared using any of the following operations, Software Error History will be cleared as well (See page Audio / Visual / Telematics>NAVIGATION / MULTI INFO DISPLAY>NAVIGATION SYSTEM>DTC CHECK / CLEAR).
Cleared using the GTS.
Cleared using the system check mode screen.
Cleared using the unit check mode screen.
CHECK OPTICAL DISC ERROR HISTORY
- HINT:
-
This function is used to check the cause when an optical disc error occurs.
Check optical disc error history.
Connect the GTS to the DLC3.
Turn the engine switch on (IG).
Turn the GTS on.
Enter the following menus: Body Electrical / Navigation System / Utility / Optical Disc Error History.
When an item is stored for Optical Disc Error History, record it before proceeding with troubleshooting.
| Display | Content |
|---|---|
| Error Type | Displays the type of error. |
| Device | Displays the malfunctioning device. |
| Date | Displays the date and time that the malfunction occurred. |
| Error Type | Detection Condition | Action |
|---|---|---|
| Read Error | When a disc read error occurs. | Proceed to next suspected area shown in Problem Symptoms Table (See page ( )) |
| Disc damaged/upside down/dirty | When it is determined that any of the following is the cause of the disc read error:
·
The disc cannot be read. ·
The disc cannot be read because of dirt or scratches. ·
The disc cannot be read because it is inserted upside down. |
|
| Cannot determine disc type | An unsuitable disc is inserted. | |
| DPS error | When an error occurs while decoding MP3/WMA/AAC files. | |
| Some files are corrupt | ·
When MP3/WMA/AAC files cannot be played back because they are unsupported. ·
Even though the file extensions are MP3, WMA or AAC files cannot be played back because the header information cannot be read. |
|
| Some files cannot be found | ·
When a disc without music data is played back. ·
When there are no playable MP3/WMA/AAC files. |
|
| Copy protection violation | When a file with copyright protection that cannot be played back is played back. |
| Device | Content |
|---|---|
| DVD-P | Multi-media module receiver assembly |
| CD-P | Not available |
| R-Seat DVD-P | Not available |
- HINT:
- ·
Optical Disc Error History can store up to 7 history data items. If a new optical disc error occurs when 7 data items have already been stored, the oldest data is cleared and the new data is stored.
·If an error that is unsupported by the GTS occurs, a "-" or blank is displayed for the display items.
Clear optical disc error history.
When DTCs are cleared using any of the following operations, Optical Disc Error History will be cleared as well (See page Audio / Visual / Telematics>NAVIGATION / MULTI INFO DISPLAY>NAVIGATION SYSTEM>DTC CHECK / CLEAR).
Cleared using the GTS.
Cleared using the system check mode screen.
Cleared using the unit check mode screen.
CHECK VIDEO DEVICE CONNECTION CHECK
- HINT:
- ·
This function is used to detect disconnection of the video devices.
·In order to inspect the RSE, a disc should be inserted into the multi-media module receiver assembly.
Check Video Device Connection Check.
Connect the GTS to the DLC3.
Turn the engine switch on (IG).
Turn the GTS on.
Enter the following menus: Body Electrical / Navigation System / Utility / Video Device Connection Check.
When an item is stored for Video Device Connection Check, record it before proceeding with troubleshooting.
- HINT:
- ·
DTCs are stored when errors are detected.
·Depending on the vehicle, some of the items are not displayed on the "Error Detected Image Line (Type)" screen.
| Error Detected Image Line (Type) | Areas to be Checked |
|---|---|
| H/U - > Separate Display (GVIF) | GVIF video signal between the multi-media module receiver assembly and multi-display assembly |
| H/U - > Full RSE (GVIF) | GVIF video signal between the multi-media module receiver assembly and multi-display controller sub-assembly |
| RSE - > Seat Back Display RH (GVIF) | GVIF video signal between the multi-display controller sub-assembly and television display assembly RH |
| RSE - > Seat Back Display LH (GVIF) | GVIF video signal between the multi-display controller sub-assembly and television display assembly LH |
| Rear Camera - > H/U (NTSC) | Not available |
| IPA/BGM/PVM ECU - > Separate Display (GVIF) | GVIF video signal between the parking assist ECU and multi-display assembly |
| IPA/BGM/PVM ECU - > H/U (NTSC) | Not available |
| IPA/BGM/PVM ECU - > H/U (GVIF) | Not available |
Clear video device connection check.
When DTCs are cleared using any of the following operations, Video Device Connection Check will be cleared as well (See page Audio / Visual / Telematics>NAVIGATION / MULTI INFO DISPLAY>NAVIGATION SYSTEM>DTC CHECK / CLEAR).
Cleared using the GTS.
Cleared using the system check mode screen.
Cleared using the unit check mode screen.
MAP INFORMATION
- HINT:
-
This function is used to check the map version of the navigation system.
Check map information.
Connect the GTS to the DLC3.
Turn the engine switch on (IG).
Turn the GTS on.
Enter the following menus: Body Electrical / Navigation System / Utility / Map Information.
CHECK "Wi-Fi" CONNECTION HISTORY (w/ "Wi-Fi" Function)
- HINT:
-
This function is used to check the connection history when the connection between the multi-media module receiver assembly and a "Wi-Fi" device is unstable.
Check "Wi-Fi" Connection History.
Connect the GTS to the DLC3.
Turn the engine switch on (IG).
Turn the GTS on.
Enter the following menus: Body Electrical / Navigation System / Utility / "Wi-Fi" Connection History.
When an item is stored for "Wi-Fi" Connection History, record it before proceeding with troubleshooting.
| Item | Content |
|---|---|
| Occurrence Date/Time | Year is displayed in 4 digits and month, date, hour, minute and second are displayed in 2 digits |
| Result | Connect/Disconnect Success |
| Timeout | |
| Communication Error | |
| Authentication Failure | |
| Disconnection Failure | |
| Other Failure | |
| Contents | No Error |
| AP Connection Error | |
| AP Connection Error (WPS) | |
| DHCP Connection Error | |
| DNS Connection Error | |
| HTTP Connection Error | |
| Other Error | |
| Destination MAC Address | Displayed in lower case hexadecimal format with "-" inserted every two characters. |
| Destination SSID Data is read as ASCII code | Data is read as ASCII code |
| WLAN Standard | 802.11 b |
| 802.11 g | |
| 802.11 n | |
| Undetectable | |
| Received Signal Strength | -127 dBm to +127 dBm |
| Data Rate | 1.0 Mbps |
| 2.0 Mbps | |
| 5.5 Mbps | |
| 6.0 Mbps | |
| 6.5 Mbps | |
| 9.0 Mbps | |
| 11.0 Mbps | |
| 12.0 Mbps | |
| 13.0 Mbps | |
| 18.0 Mbps | |
| 19.5 Mbps | |
| 24.0 Mbps | |
| 26.0 Mbps | |
| 36.0 Mbps | |
| 39.0 Mbps | |
| 48.0 Mbps | |
| 52.0 Mbps | |
| 54.0 Mbps | |
| 58.5 Mbps | |
| 65.0 Mbps | |
| Undetectable | |
| Packet Error Rate | Displayed in decimal format with "%" |
- HINT:
-
If there is nothing to display in the "Content" column, "-" or "No Information" is displayed.
Clear "Wi-Fi" connection history.
When DTCs are cleared using any of the following operations, "Wi-Fi" Connection History will be cleared as well (See page Audio / Visual / Telematics>NAVIGATION / MULTI INFO DISPLAY>NAVIGATION SYSTEM>DTC CHECK / CLEAR).
Cleared using the GTS.
Cleared using the system check mode screen.
Cleared using the unit check mode screen.
MAP DATA UPDATE ERROR CODE (w/ Sound Library Function)
When updating the map data, the following error codes will be output if the update does not complete successfully. Perform the inspection according to the "Action to be Taken" column of each error code.
| Error Code | Error Occurrence Condition | Cause of Error | Navigation System Status | Action to be Taken |
|---|---|---|---|---|
| from 01 to 2F: System malfunction | 01: Updating program (downloading) | ·
Data corrupted during download ·
Data cannot be read due to problem with USB device. |
Available | 1.
Using another USB device, obtain another update package and update the map data. 2.
If the same error code is output again, replace the SD card and update the map data. 3.
If the same error code is output again, replace the multi-media module receiver assembly. |
| from 30 to 4F: Program update error | ·
Temporary failure due to external factors such as vibration or excessive temperature ·
Hardware malfunction |
Available | 1.
Using another USB device, obtain another update package and update the map data. 2.
If the same error code is output again, replace the SD card and update the map data. 3.
If the same error code is output again, replace the multi-media module receiver assembly. |
|
| from 50 to FF: Internal error | Hardware failure | Available | 1.
Using another USB device, obtain another update package and update the map data. 2.
If the same error code is output again, replace the SD card and update the map data. 3.
If the same error code is output again, replace the multi-media module receiver assembly. |
|
| from 01 to 2F: System malfunction | 02: Updating program (installing) | ·
Temporary failure due to external factors such as vibration or excessive temperature ·
Hardware malfunction |
Available | 1.
Using another USB device, obtain another update package and update the map data. 2.
If the same error code is output again, replace the SD card and update the map data. 3.
If the same error code is output again, replace the multi-media module receiver assembly. |
| from 30 to 4F: Program update error | ·
Temporary failure due to external factors such as vibration or excessive temperature ·
Hardware malfunction |
Available | 1.
Using another USB device, obtain another update package and update the map data. 2.
If the same error code is output again, replace the SD card and update the map data. 3.
If the same error code is output again, replace the multi-media module receiver assembly. |
|
| from 50 to FF: Internal error | Hardware failure | Available | 1.
Using another USB device, obtain another update package and update the map data. 2.
If the same error code is output again, replace the SD card and update the map data. 3.
If the same error code is output again, replace the multi-media module receiver assembly. |
|
| from 01 to 2F: System malfunction | 03: Copying map data | ·
Temporary failure due to external factors such as vibration or excessive temperature ·
Hardware malfunction |
Available or cannot display map data | 1.
Using another USB device, obtain another update package and update the map data. 2.
If the same error code is output again, replace the SD card and update the map data. 3.
If the same error code is output again, replace the multi-media module receiver assembly. |
| from 30 to 4F: File cannot be read or written | ·
SD card is not inserted or connected properly ·
Temporary failure due to external factors such as vibration or excessive temperature ·
Hardware malfunction |
Available or cannot display map data | 1.
Using another USB device, obtain another update package and update the map data. 2.
Turn the engine switch off. 3.
Turn the engine switch on (ACC). 4.
Properly insert the SD card and update the map data. 5.
If the same error code is output again, replace the SD card and update the map data. 6.
If the same error code is output again, replace the multi-media module receiver assembly. |
|
| from 50 to 6F: Media update error | ·
Data corrupted during download ·
Data cannot be read due to problem with USB device. |
Available or cannot display map data | 1.
Using another USB device, obtain another update package and update the map data. 2.
If the same error code is output again, replace the SD card and update the map data. 3.
If the same error code is output again, replace the multi-media module receiver assembly. |
|
| from 70 to 8F: File operation error | ·
SD card is not inserted or connected properly ·
Temporary failure due to external factors such as vibration or excessive temperature ·
Hardware malfunction |
Available or cannot display map data | 1.
Using another USB device, obtain another update package and update the map data. 2.
Turn the engine switch off. 3.
Turn the engine switch on (ACC). 4.
Properly insert the SD card and update the map data. 5.
If the same error code is output again, replace the SD card and update the map data. 6.
If the same error code is output again, replace the multi-media module receiver assembly. |
|
| from 90 to FF: Internal error | Hardware failure | Available or cannot display map data | 1.
Using another USB device, obtain another update package and update the map data. 2.
If the same error code is output again, replace the SD card and update the map data. 3.
If the same error code is output again, replace the multi-media module receiver assembly. |
TOYOTA LINK RESET PROCEDURE (w/ Toyota Link Function)
Duplicate the problem symptom.
Check cellular phone compatibility.
Check if the cellular phone/vehicle is compatible (Refer to http://www.toyota.com.au/).
If the cellular phone is not compatible, recommend to the customer a compatible cellular phone.
Delete all paired devices from the cellular phone.
This procedure varies based on phone model.
Contact the service provider or cellular phone manufacturer if assistance is required.
Remove the Toyota Link app from the phone.
- NOTICE:
-
Only perform this step if the customer is present and approves.
The procedure varies based on phone model.
Contact the service provider or cellular phone manufacturer if assistance is required.
Reset the phone.
- NOTICE:
-
Only perform this step if the customer is present and approves.
Turn off the phone and remove the battery for 15 seconds. For instructions on how to reset cellular devices, refer to the appropriate manufacturer's website.
Reinstall the Toyota Link app on the phone (if removed).
This procedure varies based on phone model.
Contact the service provider or cellular phone manufacturer if assistance is required.
Delete all personal data from the multi-media module receiver assembly.
Delete all personal data from the multi-media module receiver assembly.
- NOTICE:
-
Only perform this step if the customer is present and approves.
- HINT:
-
Re-installation of applications must be completed before applications will appear on the multi-media module receiver assembly.
Disconnect the cable from the negative (-) battery terminal.
Record all radio station presets.
Disconnect the cable from the negative (-) battery terminal and leave it disconnected for 2 minutes.
Check if the problem symptom has been repaired.